HOME | DD
 rJoyceyy — dA STAMP TUTORIAL WITH .PSD
by-nc-sa
rJoyceyy — dA STAMP TUTORIAL WITH .PSD
by-nc-sa
Published: 2010-03-14 15:25:06 +0000 UTC; Views: 10158; Favourites: 176; Downloads: 244
Redirect to original
Description
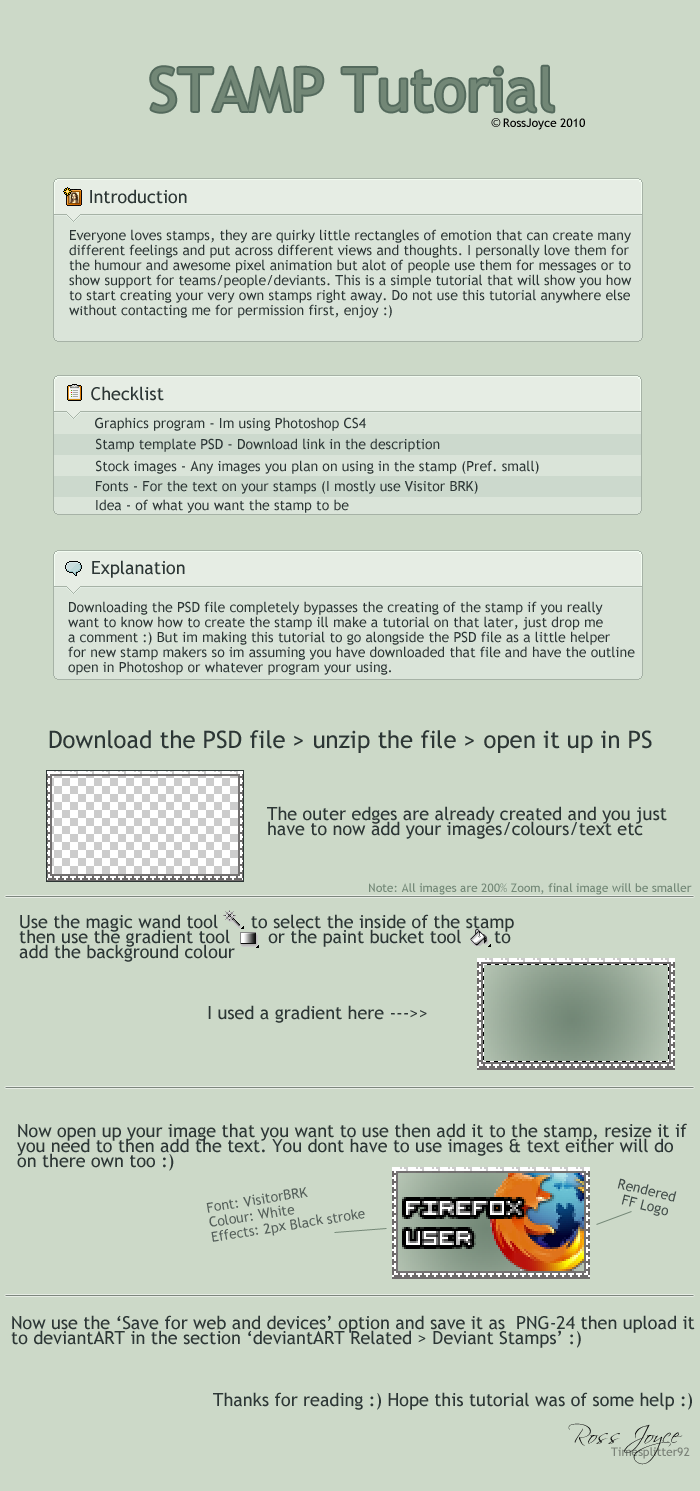
DOWNLOAD THE PSD HERE >>>Well here is my tutorial on making stamps, very simple as this is using a premade outer part haha
") If you really want to know how to make the outer part then note me or comment me and ill make a tutorial
If you really want to know how to make the outer part then note me or comment me and ill make a tutorial  (Smile)")
Basically in a quick format its:
-Download PSD
-Add colour/gradient
-Add picture and/or text
-Save
Hehe enjoy 
The background i used to the stamp is pretty basic, i will make a tutorial including how to do the scanlines and how to create the reflective effect soon.
_________________________________________
If you want the Visitor font then download it here - [link]
Related content


Comments: 40


i made this comment 3 years ago
👍: 0 ⏩: 0


may I used this stamp if you don't mind this would be my first time doing a stamp!
👍: 0 ⏩: 0


can someone send me a link or something to download PSD cuz my computers going screwy -.-
and can you make a stamp on paint?
👍: 0 ⏩: 0

How do you get the stamp to be animated? I mean, move or change pictures, etc?
👍: 0 ⏩: 0

*nods* Okey, I have been wanting to make my own stamp for some time now.

👍: 0 ⏩: 1
")


I made my firts stamp 'cause of this tut! [link]
👍: 0 ⏩: 0

Very nice tutorial! 

👍: 0 ⏩: 1

Nice stamp
👍: 0 ⏩: 1
Thank you
👍: 0 ⏩: 0

I have a question D:
how do you put in description a pic?
D:
👍: 0 ⏩: 0


I would like to ask your permission to translate this tutorial to Polish for the #GlobalTutorials group. Of course you will be credited.
👍: 0 ⏩: 1

Announced in dA Announcement Issue 004
Please take a look at this news article for other pieces of information, and also information on how to get featured in next week's issue.
Also, feel free to follow dAannouncements on Twitter! for quick up-to-date news and community projects.
Thank you, Sammie

👍: 0 ⏩: 0

thankyou its very helpful
👍: 0 ⏩: 2
Oops, it turns out thumb codes dont work in comments, that last example didnt work. My bad.
But basically when pasted it will show the stamp
👍: 0 ⏩: 1
Once you have created your stamp, upload the deviation to deviantART then on the deviation page you can copy the thumb code and then when pasted it will show up as a thumbnail of the stamp, this thumbnail displays at full size for a stamp though so people display them in there journals. One thing to note though is that to display stamps in your journal using thumb codes requires premium membership. However this doesnt stop you from making stamps and lettign others use them.
The thumbcode is found on the right hand side of the page, just scroll down a little.
thumbcode example: :*thumb101493706*: (without the *) this when pasted turns into :thumb101493706:
👍: 0 ⏩: 0

It would be good if people who need it actually read it

👍: 0 ⏩: 1
As long as it helps a couple of people it was worth making
👍: 0 ⏩: 0

Did you provide a mask over the whole thing so that the edges are transparent...? 
 (Wink)")
👍: 0 ⏩: 1
Very good point. Im not a photoshop wiz so im not sure about the mask you refer to but i should have mentioned that.
In the part 2 im making now ill add that to it, i usually just use the rectangular marquee tool then select the edges i need to erase so that the stamp edge is visible and the edges are transparent but id love to know how to use masking?
👍: 0 ⏩: 1
In that case, I shall tell you about maksing. It's great for moving bits in animating, because you don't need seperate versions of a layer!
A mask is a seperate layer that tacks onto a main layer in Photoshop, If you look at it in the layer view, it will be monochromatic. A mask will control what is visible and what isn't. WHITE will be 100% visible, BLACK will be 100% 'erased'. Grey midtones are semi-transparent.
Many artists will recommend using masks instead of the eraser tool (at least to start with) so if you chenge your mind later you can paint white on the mask and get the 'erased' parts back.
Now I'll get to how-to. Lemme just pull up my own template...
Okay. Now you can mask either layers or groups. For stamps, it's easer to group since you don't know how many layers they're adding. So just highlight everything and hit Ctrl+G to group it. (It'll automatically be called Group 1, just change its name to 'Stamp Base' or something.)
Now look at the bottom of the layer palette. You will see a line of small icons. That includes one like this: [o] ...grey with a white circle. That is the MASK tool. Select your group and click it.
VIOLA! A thumbnail has appeared! Paint black on that white thumbnail and the correalted space on the main group will disappear! (*ooer!*). Also, if you have a SELECTION active (eg with wand tool or marquee) then masking a layer will making the selection white/visible and the rest black/hidden.
You will also see between the group folder and the new thumb a small chain. If you move the group, the mask moves too, so the layer appears as if actually erased. BUT if you click that chain, it disappears. That means that the mask is now UNLINKED, and you can move just the mask (for making animated shine across text!) or just the layer (for moving something into the stamp without it showing outside edges).
Because masks are technically seperate layers (though they cannot be moved between one layer to another, they CAN be copied to another, and the original deleted) you can also use Filter effects like blurs etc. You can also right click on the mask and chose to 'disable' it. This will keep the mask, but temporarily remove its effects so you can see the layer as normal underneath.
Actually, here's a really useful tutorial on masks and some of the different things you can do with them: [link] ...I think it's the one I learned from actually.
👍: 0 ⏩: 1
Wow, thanks alot!
Looking through the tutorial it does seem like a handy method to be able to use.
Ill test it out on a stamp soonish then ad it to my .PSD, Thanks
Your help is much appreciated
👍: 0 ⏩: 1
