HOME | DD
 ScannerJOE — IRONMAN HELMET
by-nc-nd
ScannerJOE — IRONMAN HELMET
by-nc-nd

Published: 2010-05-23 08:03:46 +0000 UTC; Views: 57413; Favourites: 112; Downloads: 6179
Redirect to original
Description
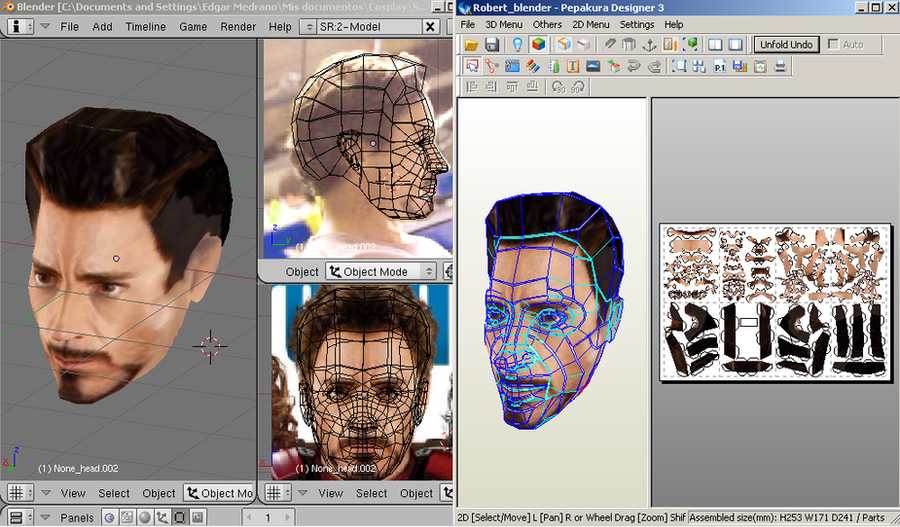
Now an unlocked version of the IRONMAN HELMET is included in a zip with other parts of the suit at [link] you can see what's in the zip hereThe helmet is fully functional, it is a high detailed papercraft based on a laser scanned model found at [link] . It's part of my MARK III and MARK IV Cosplay suit.
Here are a few tips to build it right:
1. You can use a different material for the eyes, I have used the bottom of a disposable plate.
2. There are two little cones where you might install two 3volt high intensity leds, and place two AA batteries between the eyebrows.
3. Leave some gaps between the eyes and above of them so you can see through them, it's not much but you can see through "scanning". And be sure there is no light reflected from the leds back to your eyes or you wouldn't see anything at all.
4. Use galvanized wire to build the sliders and screw them to the face using flat head screws, nuts and washers.
5. Install a magnetic lock behind the mouth for instant lock when the face fall in place.
6. Join all the (helmet's) nape parts using two paralell ribbons
To wear it slide the (helmet's) nape parts up, insert your head slowly watching your ears, once inside slide the (helmet's) nape parts down.
To open the face, lift and slide back.
Related content


Comments: 81

this looks amazing... is there any chance that you have a pdf version of this? im using a mac and very sadly cannot view/print it...
👍: 0 ⏩: 1

I don't like/recommend PDF for complex models like this one but i know this is your only option so here's the pdf version and also a numbered version (without texture). Use the numbered version as a guide.
👍: 0 ⏩: 1
yeah it really is unfortunate, thank you very much though
 (Smile)")
👍: 0 ⏩: 0

Really awesome Papercraft! The whole building was a satisfying pleasure
[link] This is my one but it still needs painting and LEDs
👍: 0 ⏩: 1
Thanks for the picture, it shows how it look like using the texture included in the PDO.
Nice work!
👍: 0 ⏩: 1
yeah works very well, but your finished one is a whole other league
")
👍: 0 ⏩: 0

This is far too awesome. Far far far too awesome. Amazing.
👍: 0 ⏩: 0

I'm making this helmet right now and I think it's bigger then it must be. I'm from belarus and I want to know what paper format should be used to make it? I used A4.
👍: 0 ⏩: 2
The published version is in Letter size, pepakura should warn you about scaling
👍: 0 ⏩: 0
I must add A4 is the unique paper format in my country
👍: 0 ⏩: 0

I am currently building this right now and it is looking awesome. I was curious as to what you would think of the idea of using clear Plasti-dip spray to coat this? Would this give it some good strength...I'm currently using 110lb card stock and it seems fairly strong but id like stronger
👍: 0 ⏩: 1
I don't think even 110lb cardstock (alone) can resist direct paint, please tell me if you already did this before.
I know it's a lot of work, but you can try the special mix that i used for the suit, as i refer here (look for my 3rd comment). You can see the result in the chest, lower arms, lower legs and shoes.
👍: 0 ⏩: 1
well what I did was i put it all together and I am painting it as I go. I thought after i get it all done i put a few layers of Plasti-dip clear spray on top of the paint but Im not sure if that idea would work
👍: 0 ⏩: 1
The only advice i can give you is: try it first on cardstock alone first (not in the helmet) to see the reaction.
I had really bad days while i was painting my first suit (the MARK III back in 2008) while i was trying to cover the red paint with lacque, it took the red paint off and it formed bubbles.
---
Tony Stark: "Tell you what. Throw a little hot-rod red in there."
👍: 0 ⏩: 0

This is some fantastic work and i'd love to make print it out and make it but I dont have a clue what parts to glue to what parts!
is there a guide to show me?
again brilliant work!
👍: 0 ⏩: 1
Well right now there's no full documentation, i'm working on it with your comments in this forum. But i'll tell you one thing, Pepakura software is very intuitive, if you download the viewer it can tell you which pieces to join.
If this is your first papercraft i suggest you to start with the last two pages.
👍: 0 ⏩: 0

First Tips from Joe and Me:
Make your own tabs where are none or they are too small, you can use duct tape for this or own paper tabs, score them in the middle for the shape, also you may put some white glue outside in the joins.
Build it on really thick paper, i use 200g paper, and it works very well.
About the building Joe can say he build the jaw and rear part separatedly, that's handy to locate the mobile parts.
Alright thats all i can say this far, hope your are all enjoying the building of this as much as i
👍: 0 ⏩: 1
That's right. And If you want it to be really strong you can paste the printed pattern to a slim (3mm) corrugated fiberboard, but if you do, you'll have to (almost) ignore all of the tabs and use it only as a reference to paste your own paper tabs inside.
👍: 0 ⏩: 0

Dear Joe. Awesome helm. I built the one that dungbeetle designed. I would love to try to build yours however the link/file you have posted is corrupted I think. I tried downloading it several times and each time the pep viewer kept flashing on and off with no image showing. If you could re submit the files to another link or if possible send to my email I would appreciate it. Very cool build. Looking forward to trying it. Once again great job.
brothergrimm668
👍: 0 ⏩: 1
I'm testing it right now, downloading it from mediafire and it is working. I'm using Pepakura viewer 3.0.4. It was created using Pepakura Designer 3.0.7. I'll try to send it to you later anyway.
👍: 0 ⏩: 0
Wow. Thats an awesome papercraft.
Definitely the best Papercraft Helmet i have seen.
Big Congrats to the whole build.
I would like to rebuild it, if done a lot of papercrafts so far, but it would be great
if you could make a more pics of the helmet, specially the batterie/led, magnetic lock, wire and screw placement, and a few shots from all sides/ inside...
Every picture you could make would make the build a lot easier
So far i thank you alot for this great Papercraft, Replica,Duplicate,Helmet....
Ed
 (Wink)")
👍: 0 ⏩: 1
Well i have to write a complete instructions document, but yeah, maybe i should start by taking a set of pictures.
👍: 0 ⏩: 1
Complete instructions are really practical, but i can imagine the hard work behind it, so i just ask for a couple pictures because i know time is rare
👍: 0 ⏩: 1
Here you go, enjoy! [link]
👍: 0 ⏩: 0
A few more tips to make it durable:
1. Print it without texture and paste it to cardboard
2. Paint the exterior with water diluted white glue at least 3 times (for a shine effect) then paint with spray paint, first silver and then red and gold.
3. Apply silicon inside with a spatule to protect agains sweat.
👍: 0 ⏩: 0

Would love to see how it looks like when you have the nape parts up.
👍: 0 ⏩: 1
Well that's cool too, but the coolest part is when the face is up and with a simple movement of your head it closes. People just can't believe it.
👍: 0 ⏩: 1
I can imagen! I would love to see that too.
Maybe if you got a video clip or an animated gif?
Once again totaly awesome!!!
By the way how was IronMan 2? Good as the first one, same or even better?
👍: 0 ⏩: 1
Well it won't be hard to put the video in you tube, don't know maybe later.
About IM2, all i can say is "well it's a 2nd part!", it's not better, but certainly it's not bad. I really expected a lot more of War Machine.
👍: 0 ⏩: 0