HOME | DD
 Serio555 — Basic CG Part 2
Published: 2005-05-20 22:14:14 +0000 UTC; Views: 9938; Favourites: 231; Downloads: 4518
Redirect to original
Description
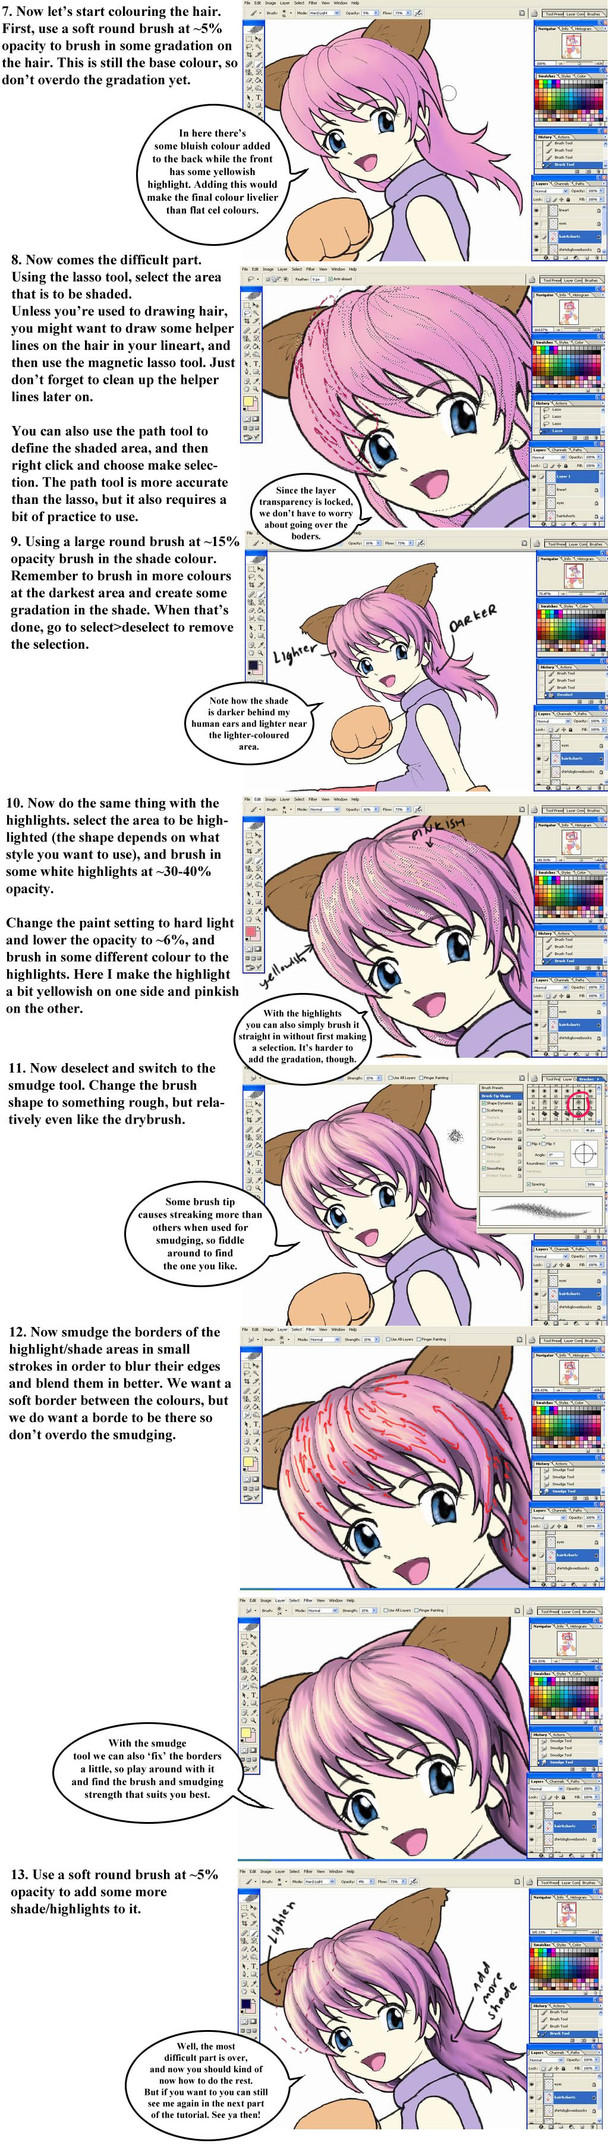
Part 2 of my basic CGing tutorial. Of course, this is the method I use, so others would have different methods which people might find easier. I tried making this as simple as possible, so if people can't understand what I'm talking about... well, there's nothing more I can do.On the last one people pointed out to me that I had "lock opacity" instead of "lock transparency". I'm sure people know that the two mean the same thing (opacity=how not transparent something is)
 (Smile)")
Part 2 of 4
Software: Photoshop CS
My advice on learning photoshop: there's no better teacher than trial and error. If you see a button, push it.
 (Wink)")
Related content


Comments: 41

Thanks to this very USEFUL tutorial! I managed to make my first photoshop work ^^
[link]
thanks and keep it up!!!
👍: 0 ⏩: 0

Wah~ That's amazing. I just did my very first colouring job today on Macromedia Fireworks, and needless to say, it wasn't fun. I should get a tablet...might be a tiny bit easier then.
Anyways, that's amazing, and really, really helpful, so thanks for posting it!! ^^
👍: 0 ⏩: 0

i love the tutorial really well done...but is it necessary to select the areas u shade and highlight? like wat does doing that do like would it work the same just colouring it using different sized brushes? cos i dnt hav a tablet n i wouldnt b able to use lasso like dat lol
👍: 0 ⏩: 1

The selection tool effectively creates the working area, and I use it mainly to accentuate and get a crisp edge.
There is no real need to select the areas to shade and highlight as you can achieve the same effect with just a hard brush, however my method for cel-shading used in this tutorial is based basically on airbrushing, and as such by selecting the areas I effectively create a 'mask' upon wich I can make gradients and shades/highlights wthout worrying about the other areas. It's just easier this way for me when it comes to cel-shading, as I can tweak the area shapes before I actually colour and get that nice, defined border or gradation. But these days most of my drawings are brushed and not cel-shaded, but I still use selection tools for a lot of things as it gives a nice, defined edge, and the colour will only apply to the selected areas so I can use things like the gradation tool or pattern stamp using the same basic principle.
As for accurate selection of shade/highlight areas you can use the path tool and then make selection from the paths if you don't have a tablet.
👍: 0 ⏩: 1
Kool thanx for explaining it to me, and thanx for the tip ")
👍: 0 ⏩: 0

I absolutely love this tutorial! 
👍: 0 ⏩: 0

Ack! This is so helpfull! I love your tutuorials, so to the point and clear. LOVE IT!
👍: 0 ⏩: 0


thank u for creating these tutorials
much help >.<
👍: 0 ⏩: 0


Love the tutorial! It's really helpful for doing values in a Photoshop image. Thanks for the help!
👍: 0 ⏩: 0

a hair tutorial!!XD yays!! i love fiddling with hair stuffs! thankies for the awesome and understandable tutorial!
👍: 0 ⏩: 0

wh00T finaly get to see the next part! yay! ^_^ ..this is perfect..!
👍: 0 ⏩: 0

incredible!!!!!!!!!!!!! great tutorial! I need this.
👍: 0 ⏩: 0


It should. I did all my linearts on paper and scan it into the computer at 150-300 dpi.
👍: 0 ⏩: 1

So I've been cg the hair all wrong *___*. Thank you so much for being so specific.
👍: 0 ⏩: 1
Well, there's no right or wrong in colouring. this is simply my method ^^
👍: 0 ⏩: 0

*faints* 

👍: 0 ⏩: 1


wow i do like banners and layouts and stuff in photoshop.....i think im gonna have to try to do this thx for the tut very good job
👍: 0 ⏩: 0

Oh yay more tutorials! I am defernitly coming to you if I ever have trouble
👍: 0 ⏩: 2
XD oh but I don't know about that...hmm I'll try to lose them if I can
👍: 0 ⏩: 0
as long as the said trouble doesn't involve the cops

👍: 0 ⏩: 0

Yes!! The second part is finished!
Hm...if I see a button, I should push it, huh? XDDD Good advice...XD Unless, of course...it has something to do with the panic button in a car. 

👍: 0 ⏩: 1
And remember to avoid the big red button with "SELF-DESTRUCT" written on it.
👍: 0 ⏩: 1
Haha...oh, yes...I've forgotten about that button...*has a sudden urge to push it*
👍: 0 ⏩: 1
*gulp* If anyone needs me I'll be in the bomb shelter.
👍: 0 ⏩: 1


👍: 0 ⏩: 0


Thank you for making this..I believe it will help me a good deal.
👍: 0 ⏩: 0

oooooooooo......well when I actually get done with your 1 st tut
then I can do the second and finallly the third one
can't wait!
👍: 0 ⏩: 0

I want to know how do some decent skin shading. so I guess I'll just have to wait for the next tutorial! btw, your pic looks really good so far.^^
👍: 0 ⏩: 1
Well, skin shading is just painting... so it's more colour choice rather than actual technique. But for a smooth gradation I simply work with very low opacity (5-7%)
👍: 0 ⏩: 0

Thank you for the second!! 
👍: 0 ⏩: 0


-sigh-
I wish I had photoshop u____u
Lovely tutorial, I'll have to keep checking bakc for more, eh?
👍: 0 ⏩: 0