HOME | DD
 SilverSummerSong — Tutorial::Hair Tutorial V.2

#equine #hair #painting #photomanipulation #tutorial #tutorialphotoshop
Published: 2015-07-24 22:03:06 +0000 UTC; Views: 15727; Favourites: 158; Downloads: 45
Redirect to original
Description
IntroductionHello everyone!
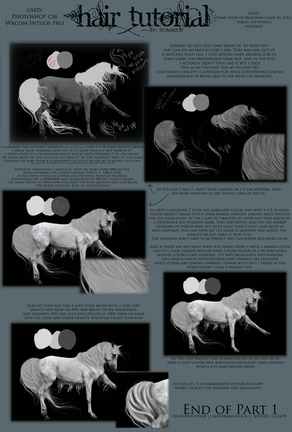
I finally found the time to make this for you guys! As you know, things have been hectic lately for me, but I am happy to say it has calmed down dramatically, so I made the time to make a hair tutorial as a thank you for all you guys have ever done for me when it comes to supportive comments, helpful critiques, and overall just being wonderful people. I hope to have a horse prep tutorial on its way. I decided to use a horse that will be making an appearance in my current manip that's in progress, so you guys get a little sneak peak; though most of you probably have seen her if you have popped onto any of my JMs in the last month or so. Also, I'M SORRY THAT IT'S SO LONG; I JUST CAN'T SHUT MYSELF UP (which is why I wrote the steps in the description; I could never fit all I want to say on a reasonable sized document).
To start off, a few disclaimers. This is NOT the only way to do hair, and there are many many many many more hair tutorials out there for your viewing pleasure, and I will link a few at the bottom of this if you'd like to check them out. Also, I'd like to say, my hair style has changed so much over the years, and the process has evolved, and is still evolving today. I also would like to mention that my hair style, as well as quite a few other artists, is a very stylized version of hair. It is long, flowy, and like nothing one would ever see on a horse in the real world. If you prefer a realistic style (nothing wrong with that!) this tutorial will most likely not be for you, but I hope that if you do find the time to read through it all, you take away some pointers or helpful information! I have linked one realistic hair painting tutorial at the end though for anyone who is interested. Also want to say that nothing about this is particularly original, and it pretty much just reiterates what other artists have been making tutorials on for years, but I thought I'd put it in my own words and hopefully someone finds it helpful! So without further ado, let us begin!
Tools
I use photoshop cs6 and an intuos pro 5 medium tablet, but any program and tablet that supports pen pressure will do fine. On the image, I have shown the two brushes I use. The second brush can be found in this Brush Set I chose to make all the brush names in bold caps so you can just skim the tutorial for which brush I use for each step. It's also probably best to have a basic understanding of your program (photoshop in this case) in order to follow this tutorial. I have only ever used photoshop, but I am happy to try and help translate these steps to a different program. If you have any questions, just comment below, and I will answer as soon as I can or at least try and point you in the right direction in order to find your answer!
Step One:: Observation
I think the biggest thing that sets a good artist from a great artist is their ability to observe the smallest details and take into consideration every factor possible. So before you pick up your pen and tablet, take a look at your image. Personally, I do my background first in manips because the background is the foundation of a manipulation. It determines light sources, ambiance, color schemes, etc. After that, I usually cut out a horse and prep it. This includes lighting to a certain extent because I like to color pick from the horse's coat when I do hair. Also, if the horse has accessories, I will at least sketch those out, so I have an idea where everything falls. For example, in this piece, the mare will actually have a feather headdress on her head, so you'll notice that on the top I stopped detailing because something will be hiding that spot anyway. While it pertains less to this piece since the area is so small, you should keep these things in mind because if something is hiding the hair, you do not want to spend hours painting it just for it to become lost behind a wing or other object. If it's a commission always remember that time is money, so don't waste your time on something that won't even be seen.
Now that you have your horse all ready and prepped, look at the image. Take a second to try and envision how you want the hair to flow, and consider the implications of your hair shape. For example, if you choose to have the hair flowing wildly in the wind, it'll give the piece a sense of motion and even a bit of chaos while if you have the hair gently perched and delicately looped, it will have a much calmer appearance. If the piece is relatively lacking in concept, you can easily make up for it in your attention to detail. Look at where you have the horse placed to determine creative placements for things like the hair. Also, if it's a character, make sure and take the time to read the little blurb about the personality or ask the RPer about the character's habits. If the horse is a wild child, it wouldn't make sense to draw a tidy and straight hairstyle UNLESS you wanted to portray their calmer side and show a moment in time when they are going against their normal personality. What I am trying to say is, take a moment to formulate a loose concept that you can always fall back on to ask yourself if your actions are solidifying the message you are trying to get across. Remember that art is a way to tell a story with lines, color, and movement.
While this may sound a snitch complicated, lots of people do this step without even thinking about it. I just thought I'd mention it, so maybe if you don't, you can try to become more conscientious about your artistic choices. This step only needs to take a few seconds to a minute or two, and there's nothing wrong with skipping this step completely and just diving in to start sketching something that looks good.
Step Two::Sketching (I'm sorry I didn't document this step in the gif D: )
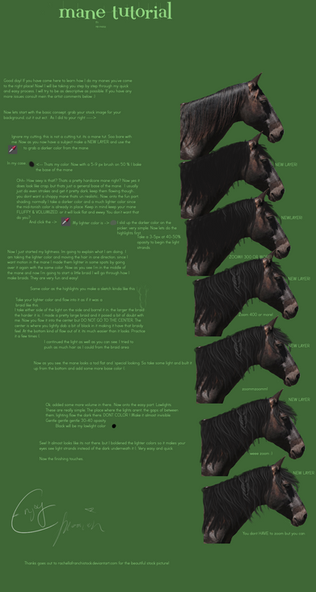
This step is pretty self-explanatory. Pick up your tablet pen and start sketching some hair. You can either do this in the base color or in some bright color so you can see it, and then lock the layer and change it to the base color when you're done. I use the HARD MECHANICAL brush that is a default brush of photoshop. I personally do not change any of the settings, I just use the programmed default settings. Size wise, it depends on the size of the image, but I'd suggest anywhere between 9-13 pixels. You don't want the brush too small or too large but somewhere in the middle. You just want to be able to get some basic shape. On the other hand, the sketch is VERY important because by the end of this step you should be at least 85% happy with the overall look because the last thing you want to do is fill in your sketch and shade it and then realize you hate it, and you have to start over.
DON'T BE AFRAID TO DO SEVERAL SKETCHES. On the other hand, do not waste your time to make several sketches just to realize they all are relatively the same. If you are going to do multiple sketches, make sure each is unique. No use in painting the same thing 50 times. I find this to be hard sometimes though because my hand likes to make similar lines. To avoid this, do not be afraid to flip your image by going Image>Image Rotation>Flip Canvas Horizontal. I have found that sometimes flipping the canvas makes this step quite a bit easier. You can also tilt your canvas by using the Rotate View Tool.
Step Three::Fill it Up
Once you have a sketch, choose a base color (mine is the color furthest on the left in my color palette box oval) and begin to paint a solid flat base shape of your hair. Follow the general flow of your sketch. Change up your brush sizes, but keep your opacity and flow at 100%. I still am using the HARD MECHANICAL brush for this step. Use a big brush for filling in the center of the hair where it doesn't split, use a medium sized brush for the parts of the hair that begin to separate into strands, and then use a small brush for the ends of the hair. You can even take a small brush (3-5 px) to draw some flyaways.
Step Four::Shadows
Now comes the fun part as you start to add dimension to your hair, but this can also be the most frustrating because it tends to set the whole tone for how the hair drawing will go. Make a new layer that will be above your base layer. For this step I start with using the HAIR BRUSH from the set I linked above. You want the brush to be medium sized, and if I had to guess, I'd suggest 15-20px. Now, the most crucial aspect of my hair drawing technique is I build up my color slowly by changing my opacity and flow instead of using lots of colors. So, I color pick a dark shadow color from my horse, but then I change my opacity to around 10-15% and my flow to 20-30% and begin to paint some basic shadows. You want to follow the general flow of the hair, but it doesn't have to be perfectly straight. You can make some curves. In this particular piece, I kept my strands pretty uniform and straight because I want a groomed, neat look at the end to portray Angel's tidiness. As a character, she has OCD, and she likes everything spick and span (this goes back to step one about considering the implications of your hair shape). After I get a basic sense of the direction of my strands of hair, I change to my HARD MECHANICAL brush to begin to define some the strands. You do not want to go over the same strands you just painted, but you want to paint new strands that overlap with the old which will begin to build up color where they intersect because your opacity is less than 100%. For the definition of shadows, I use a brush size of anywhere from 5px-12px, and I slowly increase the opacity and flow, but as I increase those two things, I define fewer and fewer areas. By the end of this step, there should be some depth to the hair. You'll also notice that I detailed the mane more than the tail because the main focus of the piece is near the head and neck.
Step Five::Highlights
Now it's time for the highlights. I chose a lighter color than the base and then started painting the strands with the HARD MECHANICAL brush at anywhere from 5-9px (note that I use smaller brush sizes for my highlights). Generally, I paint my highlights in between the strands of my shadows. It's important to note your light source for this step, but it's not completely necessary because you can always go and darken or lighten areas in the end, as you will see in later steps. Like the shadows, I start with low opacity and flow, and slowly begin to increase it as I define certain areas. Also remember that even if hair is in the shadows, there still should be some highlights.
Step Six:: Defining
Looking back at the overall image at the last step, many may have called it done. You have your base, your shadows, and your highlights, but this is when the separation from good to great comes in. This is the defining stage, where you darken any shadows that may have been lost in your highlighting stage (but don't overdo it!) and you bring forward a few highlights if appropriate with your light source while also adding flyaways. I generally use a small HARD MECHANICAL for this stage, but I may use the HAIR BRUSH also because I do like the texture of it. In general, I have always thought that I want my shadows to be large strands of color while the highlights are where you define the individual strands, and thus, I use larger brushes for my shadows than my highlights. When I was just starting out, I used similar brush sizes for both steps, and what I found is that the hair becomes too detailed. Sometimes less is more. Have you ever looked at a piece that had too much going on that your eye didn't know where to look? Well a similar dilemma can arise in hair. It is better to suggest certain shadows and highlights by keeping it minimal but powerful. You want every strand to count rather than let them get lost in the crowd.
Step Seven::Refining
At this point the hair is basically done, but I do fiddle and try a few extra things. I will duplicate my hair layers and merge them and then duplicate the merged version, so I have two layers of the merged version. I will sometimes mess with my Filter Gallery, and if I do settle for a filter, I usually use Dry Brush or Paint Daubs. I will also sometimes Filter>Sharpen>Smart Sharpen and fiddle with those settings, but this isn't always necessary. I then lower the opacity of the layer so it's a combination of the original version of hair that I painted and the edited version. I don't know many who use the filter gallery, but I sometimes use it to clean up some of my lines while also simplifying some of my strands which all goes back to less is more. I don't always do this, but I have found I like the effect most of the time, but do keep in mind I work on large canvases of 5000px+, so on a smaller canvas, the filters may do wonky things. I may also mess with curves, levels, color balance, etc.
Step Eight::Lighting
So as I mentioned before, I don't worry too much about matching my painting to my lighting because I can always mess with it at the end which is what I did here. I just took a SOFT MECHANICALbrush (which is the same as the hard mechanical brush I was using earlier just with the hardness set at 0%) and clipped the layer to the merged hair layers and brushed over where the shadows are and set the layer to 'Multiply'. I then took the bright blue to paint the highlights where my light source is strongest and set it to 'Color Dodge' (though I have also used overlay or softlight before!). And that's it! Your horse has now become Rapunzel with flowing locks of beautiful and luscious hair!
Extra Tips and Information
Multi-Colored Hair
I personally paint the hair all one color and then merge the layers and color change the parts that need to be a different color. You can also just paint the sections different colors from the start; it doesn't matter. Although for ombre hair, I find it much easier to paint it all one color and then color change by selecting the area you want to be a different color and filling it with the new color you want that section of hair and playing with layer blending modes. The best I have found is combining the usage of 'Color', 'Soft light', and 'Overlay'. You may need to then color pick and redefine a few strands afterwards, but that shouldn't be too hard or time consuming!
Braids
Use refs! In general, I am terrible at braids (as exemplified above), but if you're ever unsure, just google 'Braids' and there's plenty of pictures for you to study!
Overall
I cannot emphasize enough the importance of building up your color slowly by keeping your opacity and flow low with this technique. If you start with high opacity from the start, you will not get an adequate amount of depth needed since you are only using 3-4 main colors(excluding lighting) instead of 6-8. Also, don't be discouraged if the hair doesn't come out perfectly in the beginning. Hair takes a lot of practice and a lot of patience. Also, remember to read this tutorial and try to follow it, but then go out and tweak it to create your own style. Mesh it with someone else's technique if it suits you!!! Just practice practice practice and experiment to your hearts content!
Parting Words
Thank you so much for taking the time to view and read this, and if you've gotten this far, I applaud you. I know it's long, but I hope it was worth your while. I'd love to see what you guys have made if you use this tutorial, and I'd love if you shared this with friends if you found it helpful. If you have any questions feel free to note me or comment below! Also, I'm going to link to some more hair tutorials you can check out if this one just didn't tickle your fancy.
With much love,
Summer


Other Hair Tutorials to Check Out!
Ribbon Style Hair Painting by mockingale
Equine Hair Tutorial by mockingale
Tail Tutorial for GIMP and/or Mouse Users by Twistyh-stock
Hair Tutorial by Esveeka
Soft Hair Tutorial by saftkeks13
Mane and Tail Tutorial by Cantatus-Promise
Unicorn/Lion Tail Tutorial by Cantatus-Promise
Mane Tutorial by BlueHorseStudios
Realistic Hair Tutorial by aliyaahgrl
Also need to thank BlueBird-Stock for providing my horse model for this tutorial. The original stock can be found here
Related content
Comments: 9

omg thank this is so helpful! (also I agree with Phan, I need a braid tut)
👍: 0 ⏩: 1

lol braids and I are on a rocky ground, but I shall work on getting a short extension to this tutorial dedicated to braids up soon!
👍: 0 ⏩: 0

do a tut specifically on braids pls and thank
lol but seriously this is super cool
👍: 0 ⏩: 1

But but braids are so hardddddd and I suck at them.
Thank you 
👍: 0 ⏩: 1

Pffft braids are the bane of my existence the way I
used to think wings were. (wings so mainstream now that it's
almost expected to see oc's with them like????) Now everyone
is starting to want braids and I NEED TO BE ABLE TO DO THEM
WELL AHHH.
👍: 0 ⏩: 1

Wings are still the bane of my existence...well wing stock searching. I swear I always end up finding the weirdest angles for my horse stock and then I realize I need to add wings. It's a real struggle. Maybe I'll make a short braid extension to add to this sooooon. 
👍: 0 ⏩: 1

I learned to warp the perspective of wings and that makes them
a lot easier to fool with when you need them to bend in odd ways to
fit a pose.
👍: 0 ⏩: 1

Me and the warp tool have a love, hate relationship. And if it's not the position of the wings it's the detailing or color changing. Something always decides to be difficult for me.
👍: 0 ⏩: 1

I know what you mean. It takes forever and a day to
finally get comfortable with wings. sooooo glad I eventually
got there. x'D
👍: 0 ⏩: 0
