HOME | DD
 Snigom — Basic Pencil Shading

Published: 2006-10-31 16:20:34 +0000 UTC; Views: 336936; Favourites: 5558; Downloads: 16684
Redirect to original
Description
Some people have asked me how I go about detailed pencil shading. Sadly there is at least a decade of knowledge that I posses that would take weeks to unfold into a tutorial. So I made a quick basic pencil shading reference for those who want to begin tightening up their skills. To some this might be too basic, but bear with me. (Smile)")
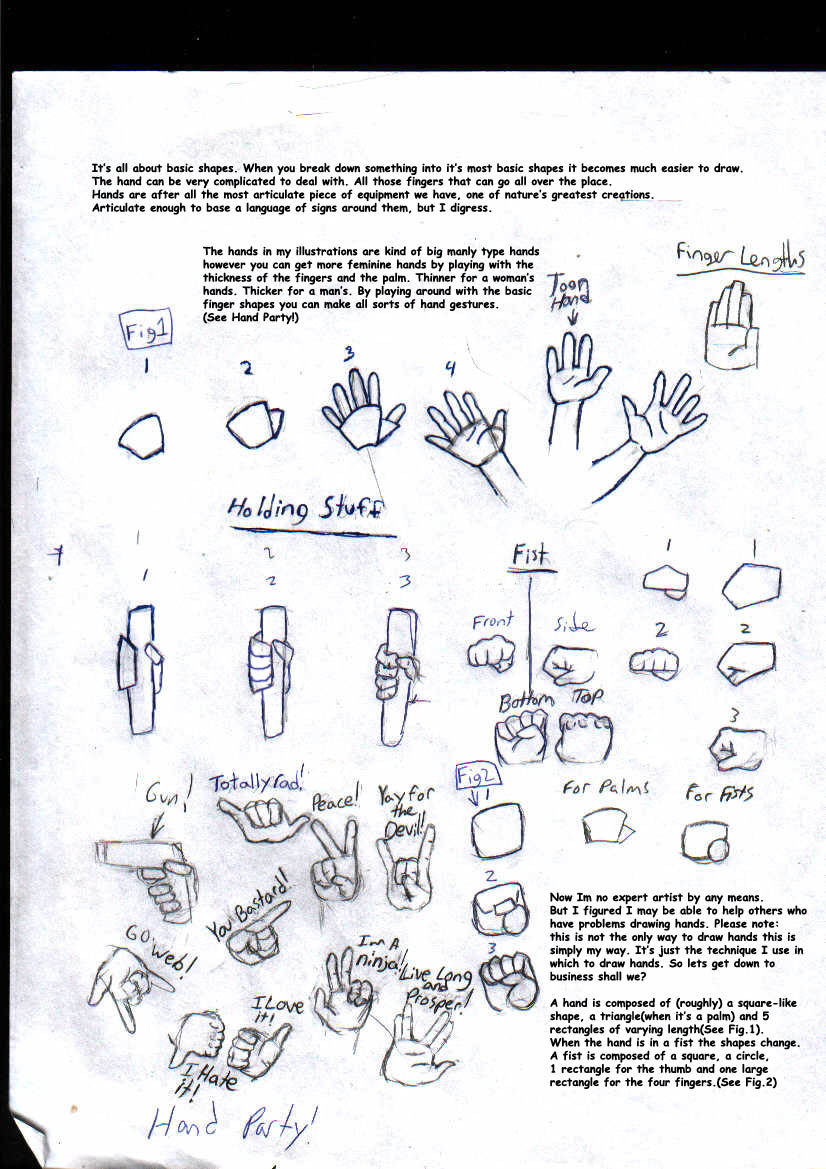
1. Item one in this tutorial covers the 2 basic methods of drawing.
#1 is the standard way to hold a pencil. It is basically whatever method you use to write. You want to use this method for detail work. You can use it to draw layouts, but it forces your brain to think of things in a rational, technical manner.
#2 is the loose or free-hand method of drawing. It isn't very comfortable to do as your mind might feel lost at first on how to draw. However, that confusion is to your best interest as you will not be hindered by logic. Instead you will be free and more creative than normal. Practice with this method until you develop a sense of control. I recommend doing all your layouts in this method and then using option #1 for tight details.
Additionally I recommend using HB pencils for layouts. Then get a mechanical pencil (with 2B lead) for details. HB is relatively easy to erase. Remember not to press down too hard!!! Don't leave grooves in the paper if you can help it! Not only will this allow you to erase lines if you need to but will also give you more stamina to draw longer. If you tighten your grip and press down too hard your hand will tire quickly and your art will suffer.
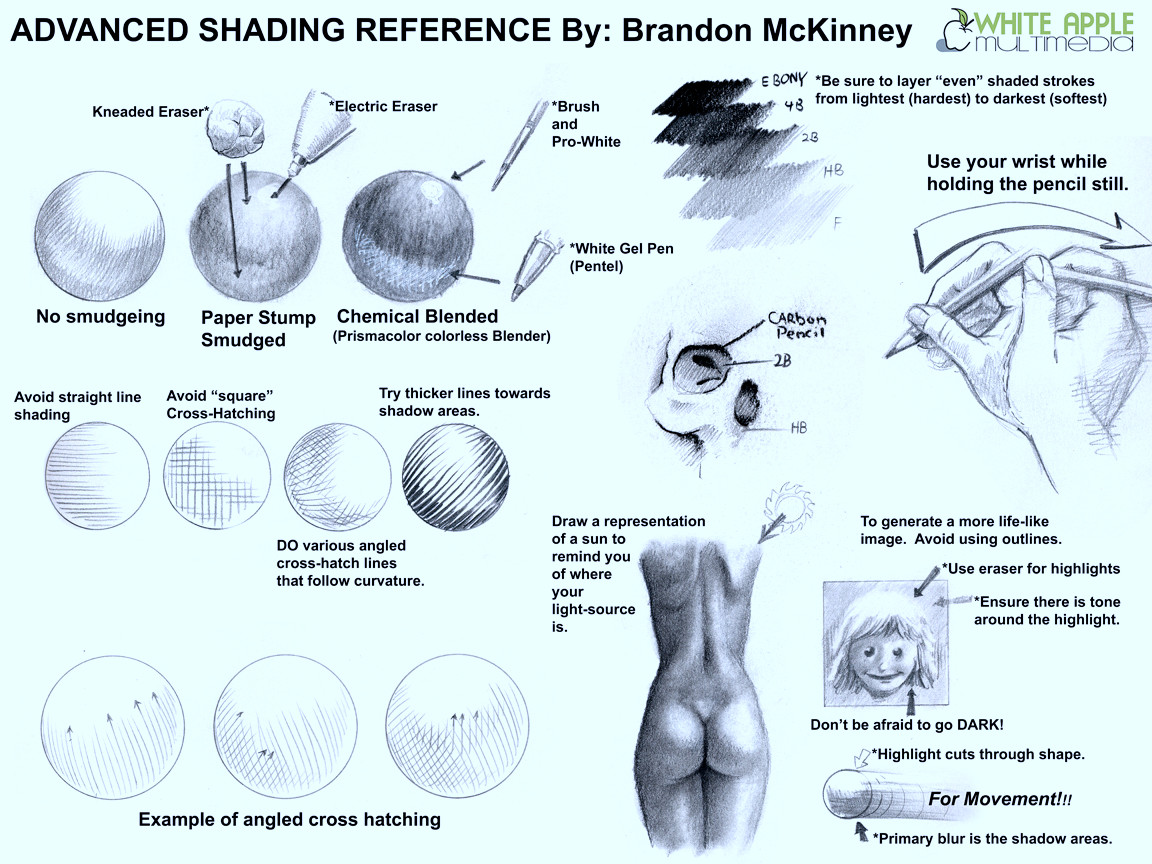
2. Item two concerns shading types.
Underneath the hands you'll see a gradation of diagonal lines. I did this by combining layers of softly drawn lines and hard drawn lines. You can also control shading by spacing out your lines as it gets "Lighter' remember, what you're really doing is controlling WHITE-SPACE. White Space is the "white" part of the paper. In fact, while you are drawing, use peripheral vision to look at the entire drawing and try to see the highlights. Then shade around those imaginary highlight borders.
For those who accidentally smudge a lot when drawing, use a sheet of paper under your hand. This doesn't protect 100% but it's much better than flesh as there are no oils to pick up the graphite and smear them.
There are many ways to smudge graphite. I like to smudge against the direction of the lines, but you don't have to hold yourself to that rule. In fact, many times you will likely have to break that rule. How you smudge will be up to your personal touch or style. Sometimes I use my finger and other times I use a Paper stump. The Stump provides more control than the finger.
At the far right you'll see a very basic pencil lead scale from dark/soft to hard/light. I did this to take the confusion out of what lead type does what. H stands for hard. This means less graphite actually gets on the paper. B stands for soft and means that more graphite gets on the paper. You'll find that the harder the lead, the thinner the lead and the softer the lead the bigger. At the end of the scale, EB is for an Ebony pencil. I will admit that every manufacturer has a different mixture for their leads and thus changes how each will look on paper. For example a Sanford HB is lighter than Faber-Castle HB or General Pencil Co HB even though they are marked the same. It'll be up to you to find out which you prefer.
3 Item 3 covers shading techniques and tips.
* the 3 squares that you see are a 3 step process of full pencil shading art.
1) The first step is to draw what you like. Then shade the entire picture in ONE shade of a medium tone.
2) The second step is to use an eraser to erase out your highlights. In this step I used a Kneaded Eraser. Its that weird grey eraser that looks like plastic explosive
 (Wink)") .
.3) Finally you add all your shadows and dark areas. Usually you'll have to go back and re-define your highlights or maybe add new ones.
Do not forget that light reflects off objects!!! So when shading an object, remember that light can hit a wall or another large object elsewhere and cast a slight highlight behind a shadow. I show you a small example how light hits a cylinder and light reflects off the floor and back up underneath the cylinder. This can add more 3 dimensional weight to your drawing and make it seem more alive.
4. This covers applied techniques.
Shadows tend to have a direction. I urge you to go find a photograph and see if you can see the direction of the shadows. They do not always follow the direction of light. For example the subject ot the left has a light-source coming from the left shooting diagonally downward. The shadows follow the general direction of the curve of the body part (or area.)
Remember that its not a bad thing to mix line shading with smudge shading. This adds a sense of texture to your work. IN the item to the right shows some shading done with lines and others were done with smudge or solid pencil. Don't be afraid to mix. In fact, remember that there really isn't a right or wrong answer to art, no matter what anyone says; including me!
Finally, remember that lines that are against the light source should be thin. Lines that are in the shadow should be darker and thicker. This will add weight to your drawing even if you don't shade it.
Lastly...practice, practice, and practice some more! Draw EVERYDAY, no matter what it is and no matter if its good or not! Your development is solely dependant on your desire to continue. you WILL get better over time. Listen, some people are born with an inherent ability and understand of drawing and others have to work hard to achieve the same level of skill. That's fine! Do not be discouraged if you weren't born a prodigy. If you have a desire to draw, then do not stop. Always continue to draw!
Now...also keep in mind that some people will get jealous and will happily throw negative criticism your way. DO not allow yourself to get frustrated. Just keep doing it in spite of their foolishness!
That concludes this tutorial for now. DRAW ON!
Related content


Comments: 297

Wow, this is SO helpful!! Your explaination is really clear and easy to understand, and the drawings are awesome
...Although, I just realised that I appear to hold my pencil wrong. 
Anyways, thanks for the great tutorial

👍: 0 ⏩: 0

I think you covered well, Everything someone needs to develop their own style of shading ^^
👍: 0 ⏩: 1

Thank you! I try to teach foundations that someone can build on. I have never seen the benefit of teaching someone to draw just like someone else
")
👍: 0 ⏩: 1


you=shading god
thank you so much for making this ")
👍: 0 ⏩: 1
Oh I don't know about that. I'm pretty good...but this guy...IS the shading GOD: [link]
👍: 0 ⏩: 1
WOW! O.O you were right, ok I will rename your title,
you=basic shading god
other guy= shading god
(if your confused on the whole god thing, so am I. ^_^
👍: 0 ⏩: 1

👍: 0 ⏩: 1

this makes me wonder where the hell i put all my art pencils from school. *sighs* U kno most of ur tutorials make me want to draw. or at least try drawing again =d lolz. thanks for tis tutorial
👍: 0 ⏩: 1
LOL! You can get a cheap pack of pencils at your local hobby store.
👍: 0 ⏩: 0

Wow. Now I know how to shade my drawings much better than was my original method. KUDOS.
👍: 0 ⏩: 1
Thank you! Just trying to share the wealth, so-to-speak
👍: 0 ⏩: 0

Thank you for submitting this tut; i've always had a problem with shading, and this tut is simple and easy to understand, but very informative.
👍: 0 ⏩: 1
You're welcome! I am glad its understandable. I knew there was alot of 'explanation' I felt was needed and that people might be confused having to read through the description along with the image.
👍: 0 ⏩: 1
Elaboration is definitely needed in these sorts of things, I guess. At any rate, I wasn't confused. It was explained very well.
👍: 0 ⏩: 1
Excellent! Well, if you're lookin' for more I have another shading tut as well as some anatomy tuts
👍: 0 ⏩: 1
Really? I may just have to check them out.
👍: 0 ⏩: 0

this is sure going to help me 
👍: 0 ⏩: 1
you're welcome, I hope it does!
👍: 0 ⏩: 1

This helps alot! And it's sooo easy to understand! Thnx ^^
👍: 0 ⏩: 1


thanks very much for this, it helped (especially the darknes of different pencils on the side)
but i have 1 quesion ^^' Where you have the ball and the light refelects onto the underside of the ball, would it also refelct back from the ball, so the shadow of the ball on the table would have a light patch aswell?
sorry if that sounded confusing D: anyway thanks again ^^
👍: 0 ⏩: 1
You're welcome.
yes, you are correct. In many cases the reflected light will cast back into the shadow. However, it won't be very bright. I tried to keep things as simple as I could for this tutorial. It can get very advanced very fast

👍: 0 ⏩: 0

Good tutorial, though I might want to add I never recommend using the finger to smudge graphite. Our hands have oils and that oil gets transfered onto the surface of the paper. How many times have people seen their fingerprints on their work when they went over a section of paper they were touching? I know I did when I didn't know any better.
👍: 0 ⏩: 1
I agree, but sometimes there are those without paper stubs
👍: 0 ⏩: 0

You've got an amazing set of tutorials--thank you for taking the time to post them!!
👍: 0 ⏩: 1
Thank you! I apprecify that!
I am glad they helped out

👍: 0 ⏩: 1
^_^ Yay for being a spiffy person that way!!
👍: 0 ⏩: 1
You're welcome. I like being spiffy
👍: 0 ⏩: 1

Very good! I'm not new to drawing, and I found this very helpful! It inspires me to actually post stuff on DevinantArt. -set off to get scanner fixed-
👍: 0 ⏩: 1
Wow, thanks
👍: 0 ⏩: 0

I love blending stumps! Those things are godsends!
👍: 0 ⏩: 1
Yes indeedy! I couldn't find my socks without them

👍: 0 ⏩: 0

being a fresh member of deviantart, and a newbie of drawing at that
👍: 0 ⏩: 1
Hey thanks I appreciate that alot
👍: 0 ⏩: 0

Excellent! You are very welcome
👍: 0 ⏩: 0

ooh! ive been practicing shading like this lately, so this helps alot
👍: 0 ⏩: 1

omg use a piece of paper to prevent smudging !!
*bonks self in head like in da V8 commercials* thanks for that so very much ><
👍: 0 ⏩: 1
LOL
👍: 0 ⏩: 0
<= Prev | | Next =>