HOME | DD
 Spiritofdarkness — Modelling Tutorial p1
Published: 2006-03-22 18:58:01 +0000 UTC; Views: 3006; Favourites: 21; Downloads: 1044
Redirect to original
Description
Hithis is my first tutorial
 (Smile)") hope you like it
hope you like it I had to split it because the file was somehow to big for uploading
check out the second part here: [link]

Related content


Comments: 39

how am i supposed to see the actual tutorial ? I only see a photo of a modeled object....
👍: 0 ⏩: 0

Dont want to be the stupid one here, but where is the tut? sorry, thanks
👍: 0 ⏩: 1

check out the Download Image botton
 (Wink)")
👍: 0 ⏩: 0

nice techniques... but I'm using Maya 7.0 so I don't understand everything about the menus but the basics are the same
👍: 0 ⏩: 2
o .. oops, sorry, you said Maya . . . recognized to late
👍: 0 ⏩: 0
thanks ")
👍: 0 ⏩: 0

LOL. My eyes cross just looking at it. I think I need to take a real class or something...
👍: 0 ⏩: 1

Ugh, I hate sounding like the n00b at 3ds Max that I am, but I'm following the steps for the second part involving snapping the cylinder...and my cylinder just will not snap. what am i doing wrong?
👍: 0 ⏩: 1
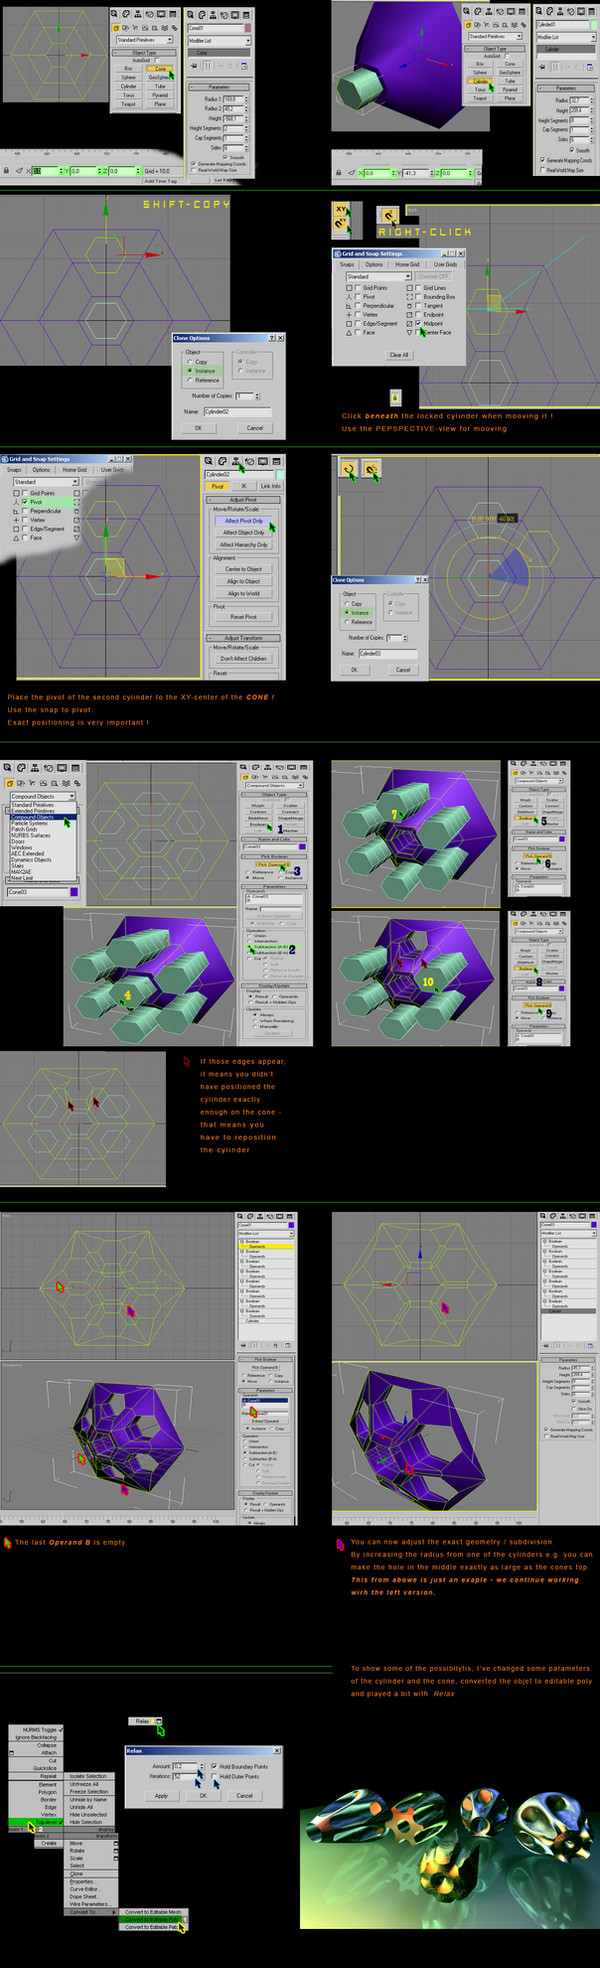
you have to make shure you have chosen the right snapping-method (there is 2D, 2.5D, and 3D) - I always work with 3D, like in this exaple. If you have chosen 3D-snap you have to work in a perspectiv- or camera-viewport. After selcting the right method, you have to right-click on the snap-button to have access to the snap-settings (in this example it was "midpoint").
Now lock the object you want to place (space-bar) and click somewhere near this object (otherwise the selected object will snap to the position where you have selected it) and move it to the place you want to place it (make shure you move on the right axis, therefor use "snaps use axis constraint toggle" and restrict moovement once to xy- and once z- plane)
👍: 0 ⏩: 1
I'm following your instructions but it will not snap. Snapping objects is new to me, so I must be doing something wrong. I don't understand what exactly to do after I set the snaps to midpoint and pivot. Is it supposed to automatically connect to the midpoints? Do i drag them to their position? I've quite a bit of time trying to get this because it is very important and I think I have much to learn from your tutorial, but I can't even get past the 2nd step. oh, and I don't know where the button with the magnet and 'XY' is.
👍: 0 ⏩: 1
ah, o.k. I guess I got it:
we want to snap the cylinders (pivot) to the midpoint (of the edge) of the cone - but it doesent snap automaticly, you have to move the cylinder towards the cone.
Therefor select first the cone, hit the space-bar (that locks your selection so you can't select anything else), click somewhere near the cylinder and drag it towards the edge-midpoint, a blue-snap-helper-line should appear during you moving it.
Now it's importnent that all works in the right direction, so if you don't have the 'xy'- button, there is also another way: while you have your "moving"-tool selected cilck on the dirction-arrow of the selected object (the cylinder in this case) (z for example) or that little rectangle between the arrwos (xy for example) and you will notice that arrow will remain highlited, which means you'll moove your object only in this direction. if that arrwows are to small you can make them bigger/smaller with the +/- keys. So select object, hit space bar, make sure you have mooving-tool, click on that xy-arrow of the object to restrict movement only in that direction (just make sure that arrows are highlited), click somewhere near the cylinder (mouse snaps automaticly to its pivot) and drag it towards the edge (the blue helper line will appear and when it snapped you will see a small blue square, which shows the midpoint it will snap to - than release the mouse). The xyMagnet (Snaps Use Axis Constraint Toggle) can also be activated with Alt+D, Alt+F3.
depending on what UI you are yousing it might be you don't have this buttons, but you can find all you need under
customise -> customize user interface -> toolbars -> "group" Main UI - "category" snaps - axis constraints
hope that helps (and doesn't confuse
👍: 0 ⏩: 0

Nice tutorial!
Good stuff man

👍: 0 ⏩: 1
hehe
yea, therefor I've made this one, because I've really liked this way and it provides so much possibilitys
👍: 0 ⏩: 0


👍: 0 ⏩: 1

dude, i been looking for something like this for awhile. all i can say is thnx and will send you link to how i used your tut..
👍: 0 ⏩: 1
👍: 0 ⏩: 1
cool, ima abstract it, but i will remember to link and credit you.
it may be a week though.
👍: 0 ⏩: 1
if you're having some questions you know where to find me
👍: 0 ⏩: 1
i would bug you with so many questions, lol.. but second part is hard for me todo..
maybe would be cool to talk to you on msn.. if so let me know..
👍: 0 ⏩: 1
hm, I'm not using msn, I'm more the mirC user; however, I'll send you a note, where you can find me
👍: 0 ⏩: 0

This is just what i need - clear and well presented - ive been thinking of doing something like this. Cheers - sam
👍: 0 ⏩: 1
👍: 0 ⏩: 0

Hmm, good tut, though its very big on screen, it could fit all in one, and your approach is a bit difficult
Now it sounds like im just criticizing ")
Im not a fan of boolean, but this certainly does the job

👍: 0 ⏩: 1
I'm also not a big fan of boolean, but I've somehow rediscovered it, just wanted to show how to use it as base for editable-poly
it's nice to hear it's easy to read
but what is difficult 
👍: 0 ⏩: 1
its a dodgy approach alltogether, i would do it differently
though, this is the easiest way to explain probably
i would go into poly mode, use cut for one of the cylinder parts, delete the rest of the surrounding surface, extude, bevel at 0 extusion and -## (so there would be a cap over the extrustion that is smaller than the initial extrusion, to create the tube look) then extrude that cap to the inside to make a deep tube look, smooth group the lot , copy it around at last, weld it together and subdivide the whole thing.. if i dont make sense. i'll make a tut about it
👍: 0 ⏩: 1
👍: 0 ⏩: 1
the radius of the holes can be done with vertex, and if you instanced the rest, itll edit too
👍: 0 ⏩: 1
I must admit I'm a bit confused, how should it work with vertex-instances in a welded object (maybe with symetry) ?
and it edidts differently, if I change the radius of one cylinder, it interacts with the cone (it cuts properly), with your method there is much more work
I've just updated it, maybe it makes it a bit clearer what I mean
👍: 0 ⏩: 2
mmh i dont know.. it can edit separately in poly sub anyway.. or not.. confused now too, i would know how to get it done though
👍: 0 ⏩: 1
try this, it's pure fun you'll see
👍: 0 ⏩: 0
👍: 0 ⏩: 0


