HOME | DD
 tanya1 — .: Polymer Clay Rose Tutorial :.

Published: 2012-09-28 03:43:14 +0000 UTC; Views: 28243; Favourites: 723; Downloads: 230
Redirect to original
Description
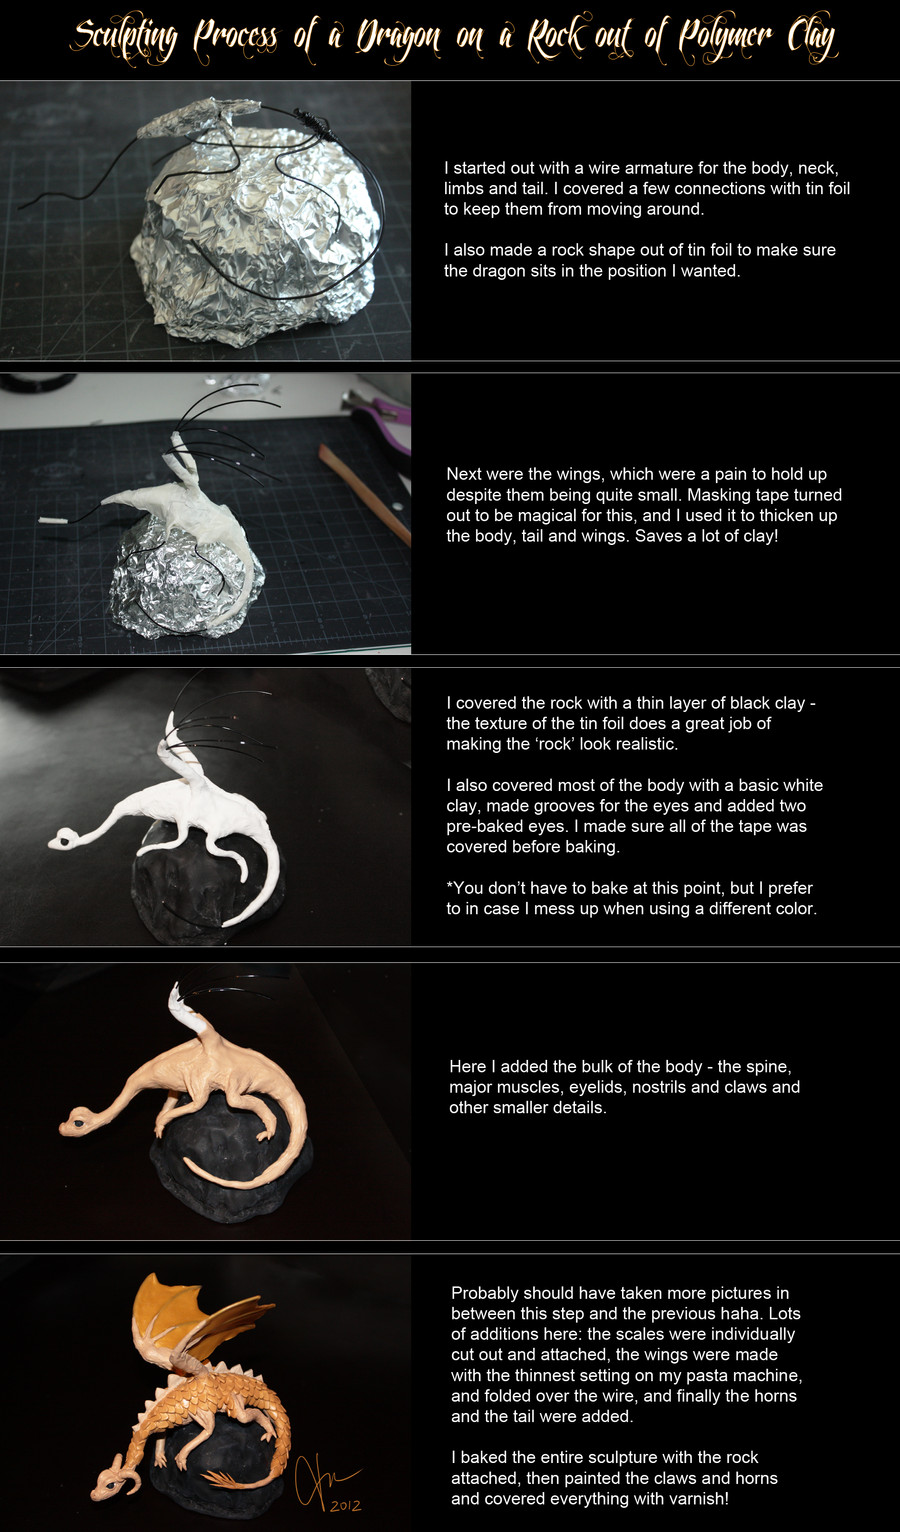
So I know it's pretty weird to have a drawn tutorial of an artisan craft. And I did spend a ridiiiiculous amount of time on it haha.Out of the 15 pieces I need for my art portfolio, there are four requirements, one of which is a "sequence of events" such as tying a shoelace. I tried to think of something more original, so here's what I got!
This is actually how I make my roses, and I hope you find it useful! Please feel free to ask me any questions.
Edit: Since I did not add all this info on the tutorial, I'll add it here. I use Premo! Sculpey for almost all of my work, and the paintbrush at the end is for the glaze or varnish to strengthen the clay and make it shine! I also usually cut a little off the end before I bake so it stands straight, then cut off the rest after I bake so it doesn't mess up the shape of the rose.
Facebook: www.facebook.com/Takanik
Etsy: www.etsy.com/shop/takanik
My Society6 Store: society6.com/takanik
Related content


Comments: 49
KonekoShimizu [2013-10-30 08:57:31 +0000 UTC]
I love this DIY ♥ !!! Very Helpful♥
but, I have one question please~
can we use normal clay for this ? because I'm planning to design this on some wood for a school project you see . A .
👍: 0 ⏩: 1

Thanks!
And not sure about the cooking part, but you can use this technique with a variety of materials. I've done it with cake fondant too
👍: 0 ⏩: 0

I never thought a non-photography craft tutorial could explain everything well enough but you showed me different: you did such a great job!!
Being really clumsy with polymer clay I might try something easier first and practice a bit before using this tutorial

👍: 0 ⏩: 0

OMG THIS WAS SO FREAKING HELPFUL THANK YOU SO MUCH!
👍: 0 ⏩: 0

That's exactly how I do it, right down to the number of petals
👍: 0 ⏩: 0


Do we suppose
That our noses knows
Is that a rose is a rose
Was a clay, now is a rose.~
👍: 0 ⏩: 0


Great stuff! Really easy to understand too. I'll try it myself one day.
👍: 0 ⏩: 1

OMG i can see fingerprints!!!
wow, this tutorial itself is an art.
👍: 0 ⏩: 1

You make it look so easy. I tried this back in January and my roses came out so difformed!! Lovely tutorial though..
=missimoinsane ~missimoinsane-crafts
👍: 0 ⏩: 1
Practice and more practice! I find roses 100x harder when the clay is too warm and sticky too!
👍: 0 ⏩: 1
Maybe that's my problem!! (warm and sticky) Thank you! I've also taken to wearing latex gloves in a size too small so that my finger prints don't end up embedded in the petals!! lol...
👍: 0 ⏩: 1
I've gotten around to liking fingerprints on flowers simply because it looks like petal veins, but they're such a bother on anything bigger! I should try out the latex gloves too haha
👍: 0 ⏩: 1
My hands are like a medium size hands (compared to male hands which are usually XL lol) I got a box of 200 latex gloved in small which are a tiny bit tight but work wonders as there's no loose latex, hands and nails are protected from polymer colouring and saves finger prints. You can get them on Ebay at a reasonable price or for a little bit more you can get latex free rubber gloves (if latex is a problem for you) - also make sure to get powderless ones or you end up with white powder on your clay (not attractive) but yeh. I'm in the UK and notice your in Canada? Hope it helps (just thoughts).
Also I bought a toaster oven today ")
~missimoinsane-crafts
👍: 0 ⏩: 1
Ah Ebay. If only I could grab a box from my anatomy lab haha, they have dozens.
I have never owned or even used a toaster oven haha. I actually love how much I can fit into my regular one though - although I have bought vases which turned out to big to fit in, which is unfortunate :/
👍: 0 ⏩: 1
Or a sneaky boxfrom the anatomy lab would suffice
Shame about the vases. I'm mostly concerned about the gas used when cooking so electric toaster over - lets give it a whirl. Plus I can keep it in my craft room which saves lil-o-disabled me from too much faffing and having to get the boyfriend to bed down to the oven for me lol..
")
👍: 0 ⏩: 1
Oh I didn't know toaster ovens were so mobile? That sounds really handy haha
👍: 0 ⏩: 1
Yeh they can go anywhere. So craftroom table it totally fine!! Handy dandy!
👍: 0 ⏩: 0

Neat. Thanks for the tutorial! I'll have to try this sometime.
👍: 0 ⏩: 1
Thanks! You definitely should, it gets addicting
 (Wink)")
👍: 0 ⏩: 0


awesome !!!! where can i find some polymer clay :Þ?
👍: 0 ⏩: 1

Your local craft store should have it, like Michaels, Joanns, or Hobby Lobby. They even have some in walmart in the craft isle, it should say "SCULPY" on the back, its just a sample pack though.
👍: 0 ⏩: 1
hehe alrighty thank u very much (:!!!!
👍: 0 ⏩: 1


Simple, pretty easy to follow; I also like the illustrative style. My only concern is that the baking instructions appear to come before you cut the rose, which is confusing. Perhaps if it were to come after the cut in your layout, it would clear the confusion? I 
👍: 0 ⏩: 1
Thanks!
Ah but I actually cut after I bake the rose a lot of the time - or at least cut off a little to make it stand up, and then make it even after I bake. I've messed up the shape of way too many roses cutting it first haha
👍: 0 ⏩: 1
You're welcome!
My bad, I made an assumption heh… 
👍: 0 ⏩: 0

very nice C: one question: do you bake it before you cut the rose, or after?
cool idea about drawing it XD
👍: 0 ⏩: 1

bake the rose after it's cut
baking it will cause the clay to harden so it'd be very difficult to cut after xD
👍: 0 ⏩: 1
I don't find it hard to cut right after it's taken out of the oven - it hardens a lot after about five minutes, but I find it ideal before then. That way the shape of the rose is less likely to mess up!
👍: 0 ⏩: 1

yeah.. that is pretty weird that you drew this tutorial XD lol. but good on you! I'm going to show my mom this, she really likes polymer clay! thank you!
👍: 0 ⏩: 0

Never made anything out of clay before, but I'm gonna try it out for the first time using your tutorial.
Amazing work by the way, love the detail and style of it
👍: 0 ⏩: 0

I love how you did this!
At first I didn't understand the lay out with the separate columns and arrows. But then it clicked. I love the lay out, unique and creative. Well done!
👍: 0 ⏩: 1

This is the most visually beautiful tutorial I've ever seen  (Smile)")
on a polymer clay note, the only question I have is: what do you use the paintbrush for at the end?
👍: 0 ⏩: 1
Ah, forgot to add the text for that! It's glaze, or varnish to make the clay shine
👍: 0 ⏩: 1
That's what I thought it probably was, but I just wanted to clarify
👍: 0 ⏩: 0