HOME | DD
 thrwm — Daz Tutorial - Use G8.1 Mouth and Teeth maps on G8

#3d #daz3d #dazstudio #mouth #teeth #tutorial #daz3dstudio
Published: 2023-01-21 04:40:10 +0000 UTC; Views: 2096; Favourites: 5; Downloads: 9
Redirect to original
Description
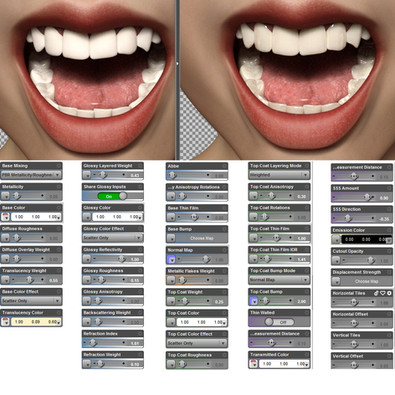
Daz Tutorial - How to use Genesis 8.1 Mouth and Teeth image maps on Genesis 8 charactersDo you have a Genesis 8.1 character, for example Victoria 8.1, whose mouth and/or teeth image maps you particularly like and would like to use on a Genesis 8 character? If so, follow along...
Genesis 8.1 and Genesis 8 have exactly the same mesh and are fully compatible, however the surface groups do differ slightly. The UV layout for Genesis 8.1 Mouth and Teeth surfaces differs from Genesis 8. Therefore we will have to load the G8.1 UV set onto our G8 character to be able to use the G8.1 image maps. First we will open up a G8.1 and prep her (or him), and export her as an OBJ mesh. Then we will load the UVs from that mesh onto our G8 character and select those UVs for the Mouth/Teeth surfaces, then swap out the maps for the G8.1 maps.
Stage 1 - prepping G8.1, exporting G8.1 as an OBJ
This stage is best done in an empty new scene, otherwise there could be unwanted side effects - WARNING! If your existing scene has Genesis 8.1 characters in it, their surfaces will become corrupted by Daz's under-the-hood mechanisms.
1) Open Daz with an empty new scene
2) Load a vanilla Genesis 8.1 [My DAZ 3D Library > People > Genesis 8 Female > Geneis 8.1 Basic Female]
3) In the Scene tab, select her and delete her Eyelashes and Tears nodes
4) In the Parameters tab, set Mesh Resolution to Base (very important!)
5) Open the Geometry Editor [Tools menu > Geometry Editor]
6) In the Tool Settings tab (if you don't have this tab already you can find it under Window menu > Panes (Tabs) > Tool Settings), under Surfaces, rename the surface "Body" to "Torso" (double-click on the "Body" name and type in "Torso", press Enter)
7) In the Tool Settings tab, under Surfaces, select the "Head" surface (click on the + symbol). Then in the Viewport, right-click to get the context pop-up and assign the Head surface to the newly renamed Torso surface (Geometry Assignment > Assign To Surface > Torso)
8) In the Tool Settings tab, under Surfaces, delete the Head surface which now has a poly count of 0 (right-click on Head > Remove Selected Group(s))
9) We have now finished prepping G8.1. So now export the prepped G8.1 as an OBJ mesh (File menu > Export... > chose a folder location and filename (eg. "Genesis8.1forMouthTeeth") > chose "DAZ Studio (1 unit = 1cm)" as the export preset under the To: dropdown list > Accept)
[Note: I tried exporting vanilla Genesis 8.1 without doing the above surface renaming/reassigning steps and it results in failure when trying to load the UVs... so they are essential preparation steps]
Stage 2 - loading G8.1 UVs and updating the maps
Close Daz without saving anything and open it again. Open the scene which has your Genesis 8 character
10) In the Scene tab select your G8 character
11) In the Surfaces tab click on the stack-of-pancakes icon in the upper right corner > Edit > Load UV Set... Navigate to the folder with the exported G8.1 OBJ and select it.
12) A small popup "Load UV Set ?" will ask you to enter a name for the new UV Set (I named mine "G8.1forMouthTeeth")
13) In the Surfaces tab, expand Surfaces and navigate to Teeth. Scroll down the list of sliders to "UV Set", open this dropdown and select the new UVs. Do the same for the Mouth surface if you want that also.
14) Your G8 character is now using the G8.1 UV layout for Teeth and Mouth - so her existing image maps will not match up. So now go through the Teeth and Mouth sliders and replace all the image maps with the G8.1 maps of your choice (Diffuse, Bump and/or Normal etc). Make sure you don't leave any G8 maps because these no longer match the new UVs.
Happy rendering!,
Thrwm


