HOME | DD
 TrapperMitch — Four Sword commission WIP

Published: 2008-09-05 04:57:43 +0000 UTC; Views: 9137; Favourites: 132; Downloads: 49
Redirect to original
Description
Guess who got a commission to build the Legend of Zelda: Four Swords Adventure Sword(s)...")
Very exciting! and and their mates are the benefactors for this project, Thanks for the chance gals.
More to come.
_____________________________________
Now some of you may be asking "How did you do it?" or "Can you Post a tutorial" or some such question. Here's my plucky reply: I sure could! But the thing about it is, what ever I put here, Your sucess depends completly on your skill and available tools. Now If your handy in the woodshop you'll know there's a way around everything powertool that can be done by hand but its just more labor intensive.
TOOLS ~ I put this together using:
Skil Saw
Router with various roundover bits and Slot cutting bit
Rasp
1/2" chissel and/or Dremel tool with carving bit
Sandpaper
Paintrushs
Wood burning iron (essentially a soldering iron with screwdriver tip)
Clamps
Yee Olde Wood glue
2 nails (for keeping the Pommel Sphere in place)
Minwax- English Chestnut wood stain and semi-gloss finish
Ace Brite Gold and Chrome Silver wood stain
Various enamel paints (Testors).
THE STEPS!
1 - LOOK at what you want to build. Develop a plan, consider EVERYTHING! How will it look, What are the thicknesses, dimentions, size realitive to you, layers-how it will go together, potential weak points, parts that may need painting before assembly, Materials you'll need, etc and so forth. (True of ANY build and how I developed this list. Also, No I will not give you my templates, this is deviantART...be artsy and derive your own interpretation)
2 - Layout the part on your board
3 - Cut out the sword blank and hilt halves
4 - Cut out the Sheath halves
Sheath Assembly
5 - Route Sheath slot on both halves of the sheath to a depth equal to Half of the sword blank thickness + a suitable tolerance (I gave it about 1/16" )
6 - Pre assemble sheath halves and test fit with sword blank.
7 - Glue Sheath halves together and Clamp till glue dries
8 - Rasp/file edges flush from one half to the other
9 - (optional) Go over the edges with a R 1/2" roundover except the top opening, use R 1/4" there
10 - Rasp/file the sheath edges into a quarter-oval shape
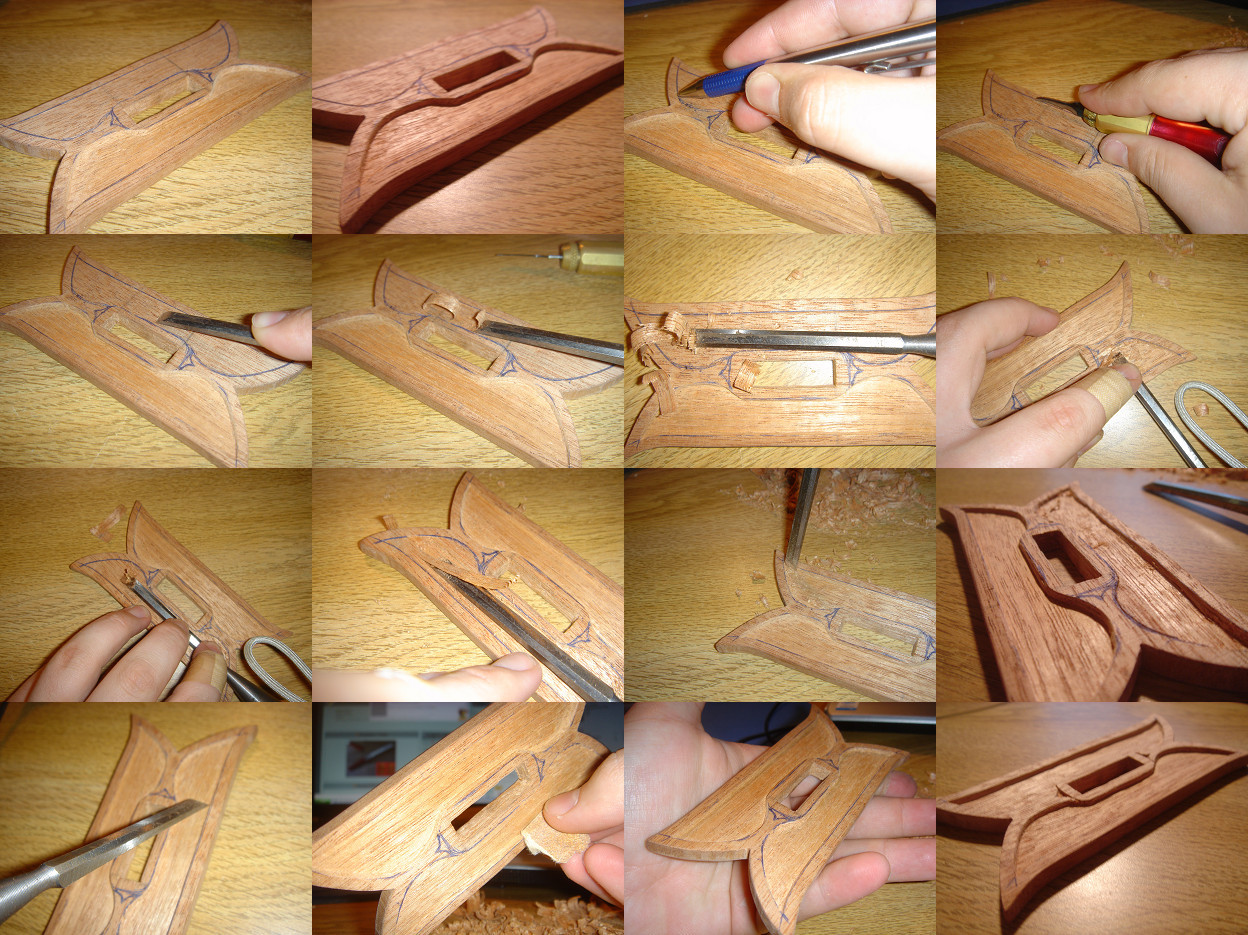
11 - Scribe and Chissel/dremel the "end cap" grooves into sheath (spiral bit at the base, straight band at the top)
12 - Give it a sanding (100,220,400 grits till nice an satiny smooth)
Sword Shave
13 - Route the Handle and Pommel of the sword blank R 1/4" roundover
14 - Route the Handle Only and (optional) Blade R 3/8" Roundover
15 - Rasp/File Blade into a chamfered slope with slight rounded edges (I dont recomend going for a "Sharp" edge less you're really good and dont mind chips comming off when someone playfully clashes with your sword, or the tip contacts the ground. Be mindfully a sharp edge means a sharp POINT as well, which = Pointed stick = Much more dangerous)
16 - (Optional) Chissel the handles taper into the Pommel (This is a really nice touch but the strength at that point will be considerably weakend)
17 - Cut/drill Hole for the Colored Sphere into the Pommel
18 - Give it a Sanding (in all area but the Hilt section)
Hilt Shave
19 - Route the edges of the Hilt halves on one side only to R 1/2" roundover (I did this now instead of at step 22 because once the the hilt and sword blank are joined the round over bit is not going to be able to get everywhere on account of the sword blanks handle and blade)
20 - Rasp/File the "V" part in the center of the hilt to a chamferd-down edge more-or-less flush with the Blade part it will contact (Sorry this bits tricky to explain with out a picture)
Sword Assembly
21 - Match up and Glue Hilt Parts to Sword Blank and clamp till dry
22 - Rasp/File Hilt and corresponding sword blank part till all three are flush with each other (There's prolly a better way to do this bit but I dont know it)
23 - Rasp/File hilt section to narrow the combined width of the three pieces to about the width two or what you like at the tip of the "wings"
24 - Re-Rout the hilt roundover where ever needed
25 - scribe then Chissel/dremmel/stamp/burn Hilt inlay and handle wrap (I burned this in to great effect)
Leather work
26 - (I made this bit with a leftover bolt of upholstry leather a friend donated. I Cut the belt strip in double, glued the rough sides together, and cut out a square pattern on the outer face for appearances. Fold, glue, rivet where necessary to get the buckle on, and punch coresponding holes on the opposite end. Also make holes for a couple of screws to attach it to the sheath) make your shoulder rig/Baldrick or you could buy one and mod it
Painting/Staining
26 - Stain Sheath (Stain choice is up to you and depends entirely on what wood you used to construct it with)
27 - Paint the Sheath "Endcaps" a Metalic silver (Scout around for arts and crafts metalic paints for wood, they work like stain but are metalic colors. I found mine at ACE Hardware.
*Should not I initially used Spray paint. This reacted badly to the finish, so I had to remove it, finish and then paint over the finish with Testors enamel. And THEN I found the metalic wood stain...all to late.)
28 - Apply a protective Finish to the Sheath (this is a tricky part so be careful not to let anything run*, and remember you can always apply multipul thin layers. I did two)
29 - Tape off the hilt of the sword to protect it from paint while painting the blade
30 - Paint the blade a Metalic Chrome (I've noticed that if you do not use a primer this can result in a "Damascus steel" look which I think is awesome)....allow to dry
31 - Remove tape and this time tape off the blade to protect it while painting the hilt. also tape off any inlay work you might like to keep its natural color
32 - Paint the hilt a Bright Gold
33 - Paint the Pommel Sphere a color of choice (LoZ:FSA color scheme is Green, Red, Blue, and Purple)
Final assembly
34 - Screw the Baldrick to the back of the sheath
35 - Insert Pommel Sphere and imobilize it with two nails at right angles driven through the pommel wall(Predrilling is recomended)
36 - insert sword into sheath
37 - Put on your finely crafted short sword and draw it in triumph.
**If at this point you realize you cant draw it from it's sheath while wearing it...you didn't consider Everything.
_____________________________________
The following is my production log for this project. Done in my bits of free time durring college mind you.
8-26-08
Project is proposed, Planning begins
10-14-08
Prototype sword cut and assembled
10-28-08
Mass part blanks cut-outs complete
1-1-09
Sheath building complete. Baldrick production started
1-12-09
Sheaths stained and painted. sword blank issues head tramua. Hanging parts from rafters is not always a good idea.
1-14-09
Paint reacts to finish badly..as in it ran, paint removed, Finish applied.
"Edges" formed, one hilt cracked falling off bench
1-30-09
Sheath paint reapplied over finish, Baldric attached, Sheaths complete.
2-17-09
All swords fully assembled.
2-28-09
Shaping complete, Pommel Ready for setting
3-15-09
Gaurd details burned to hilts
3-15-09
Paint Applied to sword blade
4-11-09
Paint Applied to sword Hilt
Pommel sphere Set
5-2-09
Handle Wrap applied and completed project delivered
Should note: silver paint may need touch up from time to time as a clear protective finish over it could not be achieved w/o compromizing the silver and metallic aspects.
A Link to the cosplay groups picture will hopefully be available some time in the future.
Related content


Comments: 18

")

awww...I wish I had the money to pay someone to make those for me...or the skills to do it myself... -.-
👍: 0 ⏩: 0


Oh god, that is amazing.
I am honestly speechless.
Good job~
")

👍: 0 ⏩: 0

Hey... here's a question... What happened to the shields? Lol I was just looking at the picture and started wondering...
👍: 0 ⏩: 1

Ah, so you did catch on to the fact those exist. They're awaiting wall mounting hardware...or a handle? I'll be sending them with the belt buckles.
👍: 0 ⏩: 1
yes... lol I dunno who wants what. I think a handle would be cool cause then you could still put it on the wall, but it would also be functional!
Erm... otherwise, huzzah! Question: Do the shields cost extra?
👍: 0 ⏩: 1
Alrighty, I'll figure a way to work both in. Should note, it's only about buckler sized (less than 12"x12").
And yes, they're already covered. They were included with the bill.

👍: 0 ⏩: 1
Oh... lol... You are AMAZING! XD <3 Gah! Have to do this cosplay so well now! *scampers off to work on things*
👍: 0 ⏩: 0
Holy crap Mitch... that... that is AMAZING! XD I knew asking you was the right thing to do! XD
👍: 0 ⏩: 0


Yeah , i think is awesome too , can you put a tutorial
 (Smile)")
👍: 0 ⏩: 1
Updated. Hows that work for ya?
👍: 0 ⏩: 1
