HOME | DD
 WebsterWorks — Making of Spirit
Published: 2017-01-27 05:08:21 +0000 UTC; Views: 417; Favourites: 7; Downloads: 0
Redirect to original
Description
I can’t believe I didn’t start taking in-progress pictures until the making of Spirit. They are really fun to look back on, even though they’re not the greatest quality photographs… when I am on a roll I can't bring myself to stop right in the middle and set up good lights and get the real camera so every now and then I would just snap a few with my phone. Despite that I hope they can give you glimpse into how I make each sculpture! Finished Spirit can be found here !
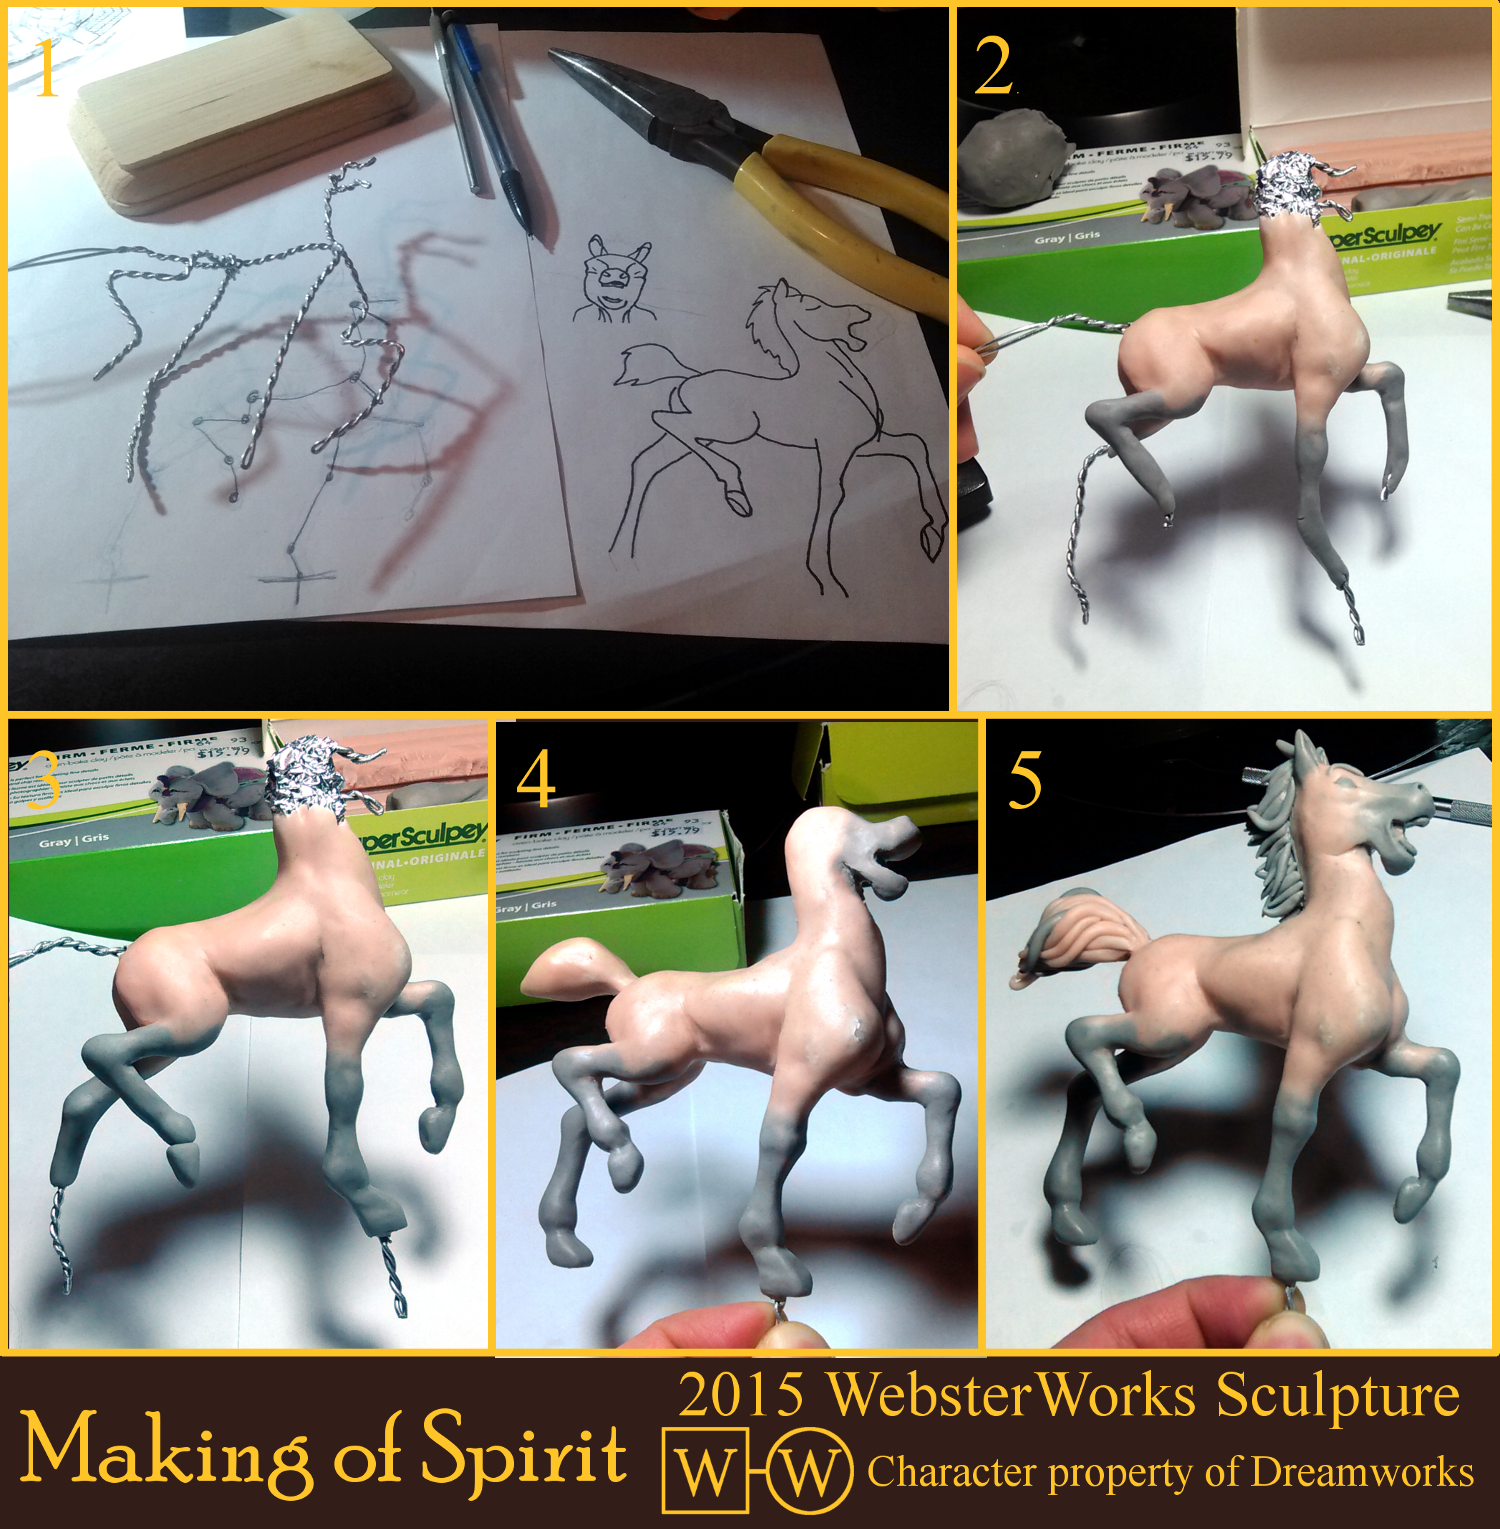
1) The more work I do at the beginning the easier everything is later! I always plan it out on paper because it is much easier to change the 2D drawing right away and get it how I like instead of trying to change the 3D sculpture halfway through, which can be a rather destructive process. In this case I used the screencap from the movie… mostly because it affords maximum accuracy, but also because it sure is easier! I also drew what it should look like from other angles using as many references as I could, from real horses to stills and art form the movie. Real horses show the underlying anatomy while the movie reflects the artist’s style. They began by studying real horses too! When trying to mold it from clay, it helps seeing it from many different angles. Inside the traced outline I drew the armature ‘skeleton’ and marked out all the joints. Then, when twisting the armature wire together, I matched it up with the drawing to ensure everything is the correct length and proportion. For the feet touching the ground I kept the wire longer to anchor it into holes I will drill in the wooden base.
2) After adding the aluminum foil to bulk it out, I blocked out the clay for the body. I try to keep the thickness of the clay from about 2 to 10 millimeters. This keeps the weight of the sculpture down and ensures that it bakes evenly. I roughly started defining the chest and the joints, all while trying to ignore that his face looks like a duck! But for characters with an open mouth, I found it is much easier if both the upper and lower jaws are supported with wire. I can’t stress the importance of references! Even though I am making a cartoon character, it was really useful to look at pictures and videos of real horses to see how they are put together.
3) Here I finished the front legs and I am beginning to block out his hind legs. I started building the hooves with simple shapes and then blended the joints together, adding details as I went along. Once again references of real hooves from all different angles helped immensely! I should mention here that the different colors are from the different types of clay used. You can see the boxes in the background – they’re not staged! I took the pictures as I was making it and the boxes were just on the table. The beige body is made from Super Sculpey Original, which is much softer and easier to handle, but does not hold as many details – it just smushes instead. His legs are made from a mixture of Super Sculpey Firm and Original. It is stronger (but more brittle) and can hold very crisp details, but pure Super Sculpey Firm lives up to its name and is very hard to work with. So I mix it with the much softer Original to make it workable. I’ve heard you can use a pasta machine to make this easier but since I don't have one I just mix it with my hands until it is a uniform color throughout. It takes a while but works just as well.
4) In this step I finished the hooves, trimmed and roughed in the tail, and started blocking out the head. I finished the details to the body and refined the shapes, getting everything but the head close to finished. I always do the head and face last because it is naturally a focal point of the sculpture and usually demands the most details. It is easier to visualize the head properly when the rest of the body is done. You can also see that I didn’t make the back hoof’s wire long enough. I was planning on having wire stick out there too so I can insert it into a hole I drill in the base, which gives it extra stability. Fortunately the pose is rather balanced and not too extreme, so one hoof was fine.
5) Here I added the ears, eyes, nose, and teeth, and finished detailing the head and refining the mouth. I also embedded wire mesh into the back of his neck to anchor the mane and added hair strands on top. They were made from simple rolled-out clay ‘snakes’ that any kindergartener could make. The tricky part is layering them to look as though they are naturally flowing in the wind. I also smoothed everything out by dipping my fingertips in 70% isopropyl alcohol and lightly rubbing it over the surface. It erases the fingerprints very nicely but can also streak or bead up the clay if used excessively. After giving it a final check, Spirit is ready to bake but the work is far from done! After this there is sanding, priming, and painting, but it’s always nice to be finished with the biggest step of the process!