HOME | DD
 WebsterWorks — Making of Spyro Crystal Dragon
Published: 2017-06-16 15:24:52 +0000 UTC; Views: 1058; Favourites: 14; Downloads: 0
Redirect to original
Description
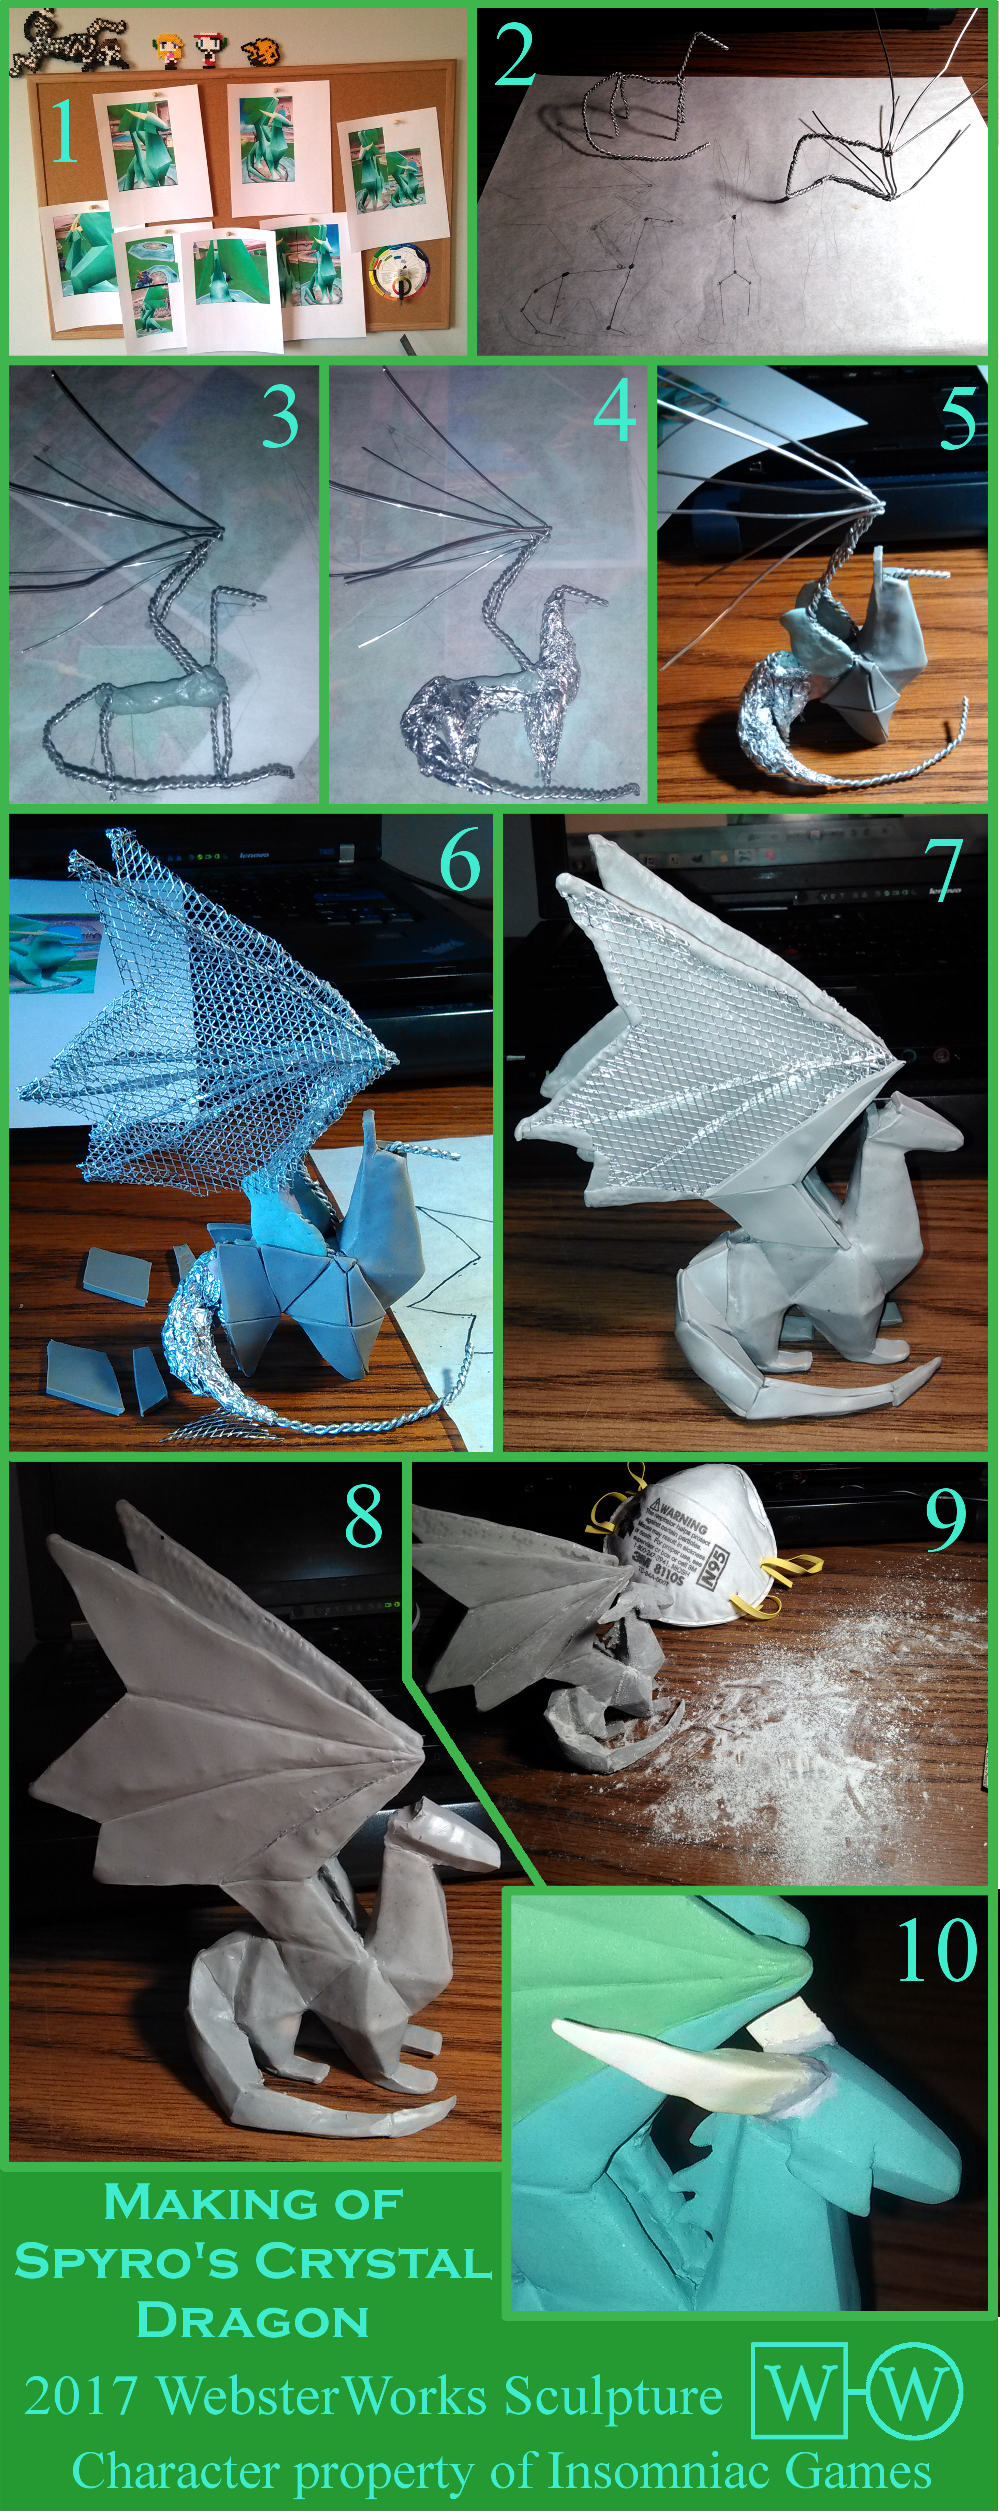
Here are the steps I took to make the crystal dragon statues that appear in the original Spyro game, Spyro the Dragon. For the ‘low poly’ style I highly recommend a pasta roller!
1. There is no such thing as too many references! Especially when you are trying to recreate a recognizable character. I wanted to be as close I could get, so I tracked down as many pictures and angles that I could. Bonus color wheel and perler beads characters on my bulletin board!
2. Here is the beginning of the wire skeleton. To begin, I planned it out on paper first and traced the side and front view at the size I wanted it to be (I am rubbish at drawing). I then built the body by bending a long length of 18 gauge aluminum wire in half and twisting it together, then separating the two strands for the front and back legs. The wings are an entirely separate piece of wire and were made with three strands twisted together, separating for the ‘fingers.’
3. Here I attached the wings and reinforced the spine with epoxy putty. I put the wings on in the correct place, holding it up to my traced skeleton (you can barely see it in the image) and smushed the mixed epoxy all around the joints as best as I could. You can find it in the hardware store in a little tube or stick. Just put on some gloves, cut off the amount you need, and mix them together until it is a uniform color. It gets really sticky and while I don’t think it’s toxic it can be irritating, and it’s best to limit your exposure to chemicals anyways. Also once it dries it is very hard to get off. This stuff is pretty inexpensive and durable (it’s made to fix chips in pipes after all, and you can even get industrial-grade stuff with steel in it), especially compared to epoxy dedicated for sculpting, BUT it will harden within 5 minutes. You will barely have enough to shape it, much less sculpt with it, so I can only recommend it on places that don’t have to look pretty!
4. Here I simply bulked out the thicker parts with aluminum foil. Usually I can crimp it enough so it will stay on its own, but sometimes I use hot glue to ensure they stayed in place. I am trying to get the clay about the same thickness. That doesn’t work everywhere, but it can be useful around the body. I have found that oftentimes I make the foil too thick and end up having to remove some. While not impossible, it is a bit of a pain so try not to do that! While that wasn’t the case here, it was rather close!
5. Here I began attaching the clay. I used Sculpey Original (the tan stuff) for the inside – you can barely see it under the wing near the back leg. It is very pliable but does not hold a fine details well. If you try to ‘sharpen’ it, it will just mush and deform and not get a clean edge. So I blended Sculpey Original and Sculpey Firm in about a 1:2 ratio to make the grey outside. These were created by cutting the pieces out of a sheet of clay with an exacto knife. I finally got a clay/pasta machine (just a hand crank that squishes the clay between two steel rollers) and it works so well! It would have been much more difficult to get a consistent width rolling the clay out by hand.
6. Here I smoothed the first pieces added and began moving backwards. You can see a few of the next pieces as well. I also added more epoxy putty to the wings, because I realized that there would be too much left unsupported without something more rigid there. The wing membranes were added with something called Wireform, which I got at a craft store. It is very bendable aluminum mesh that I just held up to my template and drew around the wings with a permanent marker, leaving about a quarter inch on all sides to fold over.
7. Started applying clay to the wings and tail, moving backwards as I go. It was easier to smooth the edges together with a sharp metal tool. I use old dentist’s tools and a pack I bought online a while ago that are supposed to be for working with wax.
8. Clay is all in place! I had to cheat a little on the wings and score the dividing lines because in the game model they were truly 2D and I didn’t have enough space to attach them at an angle to one another. I also attached the spines along the dragon's
face and the back of his neck. The spines have a core of Wireform covered in a thin layer of clay. I left a bit of exposed wire mesh sticking out so I could press it into the existing clay. I made the horns separately because they are so close to the wings it is be much easier to sand and paint if they weren’t in the way. Sorry this isn’t pictured, but I made the horns with two separate pieces of 18 gauge wire wrapped with thinner 24 gauge to help the clay stick. I poked a hole in the clay where they were going to be inserted, made sure they lined up, and baked them unattached along with the sculpture.
9. After baking in the oven it is ready to sand! I went crazy with sanding this time because I wanted each plane to be very smooth. I started with 200 grit (coarse) to smooth out the really bumpy parts, then on to 400 (medium). That still left some noticeable scratch marks, so I finished with 800 grit (fine). Just for fun, about halfway through I decided to not clean off my work surface, and this is how much ‘clay snow’ I got. It’s quite a pile! And always remember safety first! All that dust you create when sanding is very fine and can irritate your lungs. I wear a dust mask throughout the entire sanding process.
10. A bit of a jump here but the figure has been painted and I am ready to attach the horns! I lined them up and put a tiny dab of super glue in the socket, then slid the exposed wire of horn in place and there it stays! Except, I’m not so good yet that I was able to make the pieces fit seamlessly… So here’s where more epoxy comes in! I used Apoxie Sculpt but I have heard Magic Sculpt works well too. The main difference between these and the Epoxy putty I used in step 3 is that after mixing, the epoxy meant for sculpting will stay pliable for about two and a half to three hours, which allows plenty of time to get the clay where you want it and shape and smooth it into place. I applied it to the base of the horns so there was no gap between the head and where I attached the pieces. Then allow it to dry, sand the seams, and a quick touch-up with paint and it’s ready to be sealed!
As always this got a bit long but I hope somebody finds it useful! Thanks for reading!
Related content


Comments: 9

hey I am currently making a dragon sculpture myself. But it will take some more work before it's finished
👍: 0 ⏩: 1

Awesome! Dragons are always the most work because of the wings, especially if they are really big. But I bet it will be awesome! I can't wait to see!
👍: 0 ⏩: 1
hihihi, I am really eager to show it you, but I have to wait, because I absolutely want to upload the finished work. Maybe a few more days. Tomorrow I have time to work a bit longer on it. We will see ")
👍: 0 ⏩: 1
Awesome! I am looking forward to it!
👍: 0 ⏩: 0
aah these memories...the first time I played this game was in 1998 when I was 10 years old. And since that day I love dragons!
👍: 0 ⏩: 1
Yeah, what a classic game! I guess I never thought about it that way but I bet it introduced a lot of kids to dragons by being relatively cute and rated "E for everyone!" It was certainly the first time I was really exposed to dragons too, and all the variety they can have.
👍: 0 ⏩: 0

Ooh nice, thanks for sharing! Its a random detail but i really like that little color circle thing there, i should print that out.
👍: 0 ⏩: 1
I am sure you can find some online, but it is really useful! There are two parts to it and you can spin it around and it will show you what happens when you mix the selected color with red, yellow, blue, white, and black. Especially for someone still learning about color theory and painting and such, it helps a lot with mixing!
👍: 0 ⏩: 1

👍: 0 ⏩: 0