HOME | DD
 WebsterWorks — Alpha Toothless
Published: 2017-03-02 04:07:25 +0000 UTC; Views: 2974; Favourites: 60; Downloads: 0
Redirect to original
Description
See how I made it here!
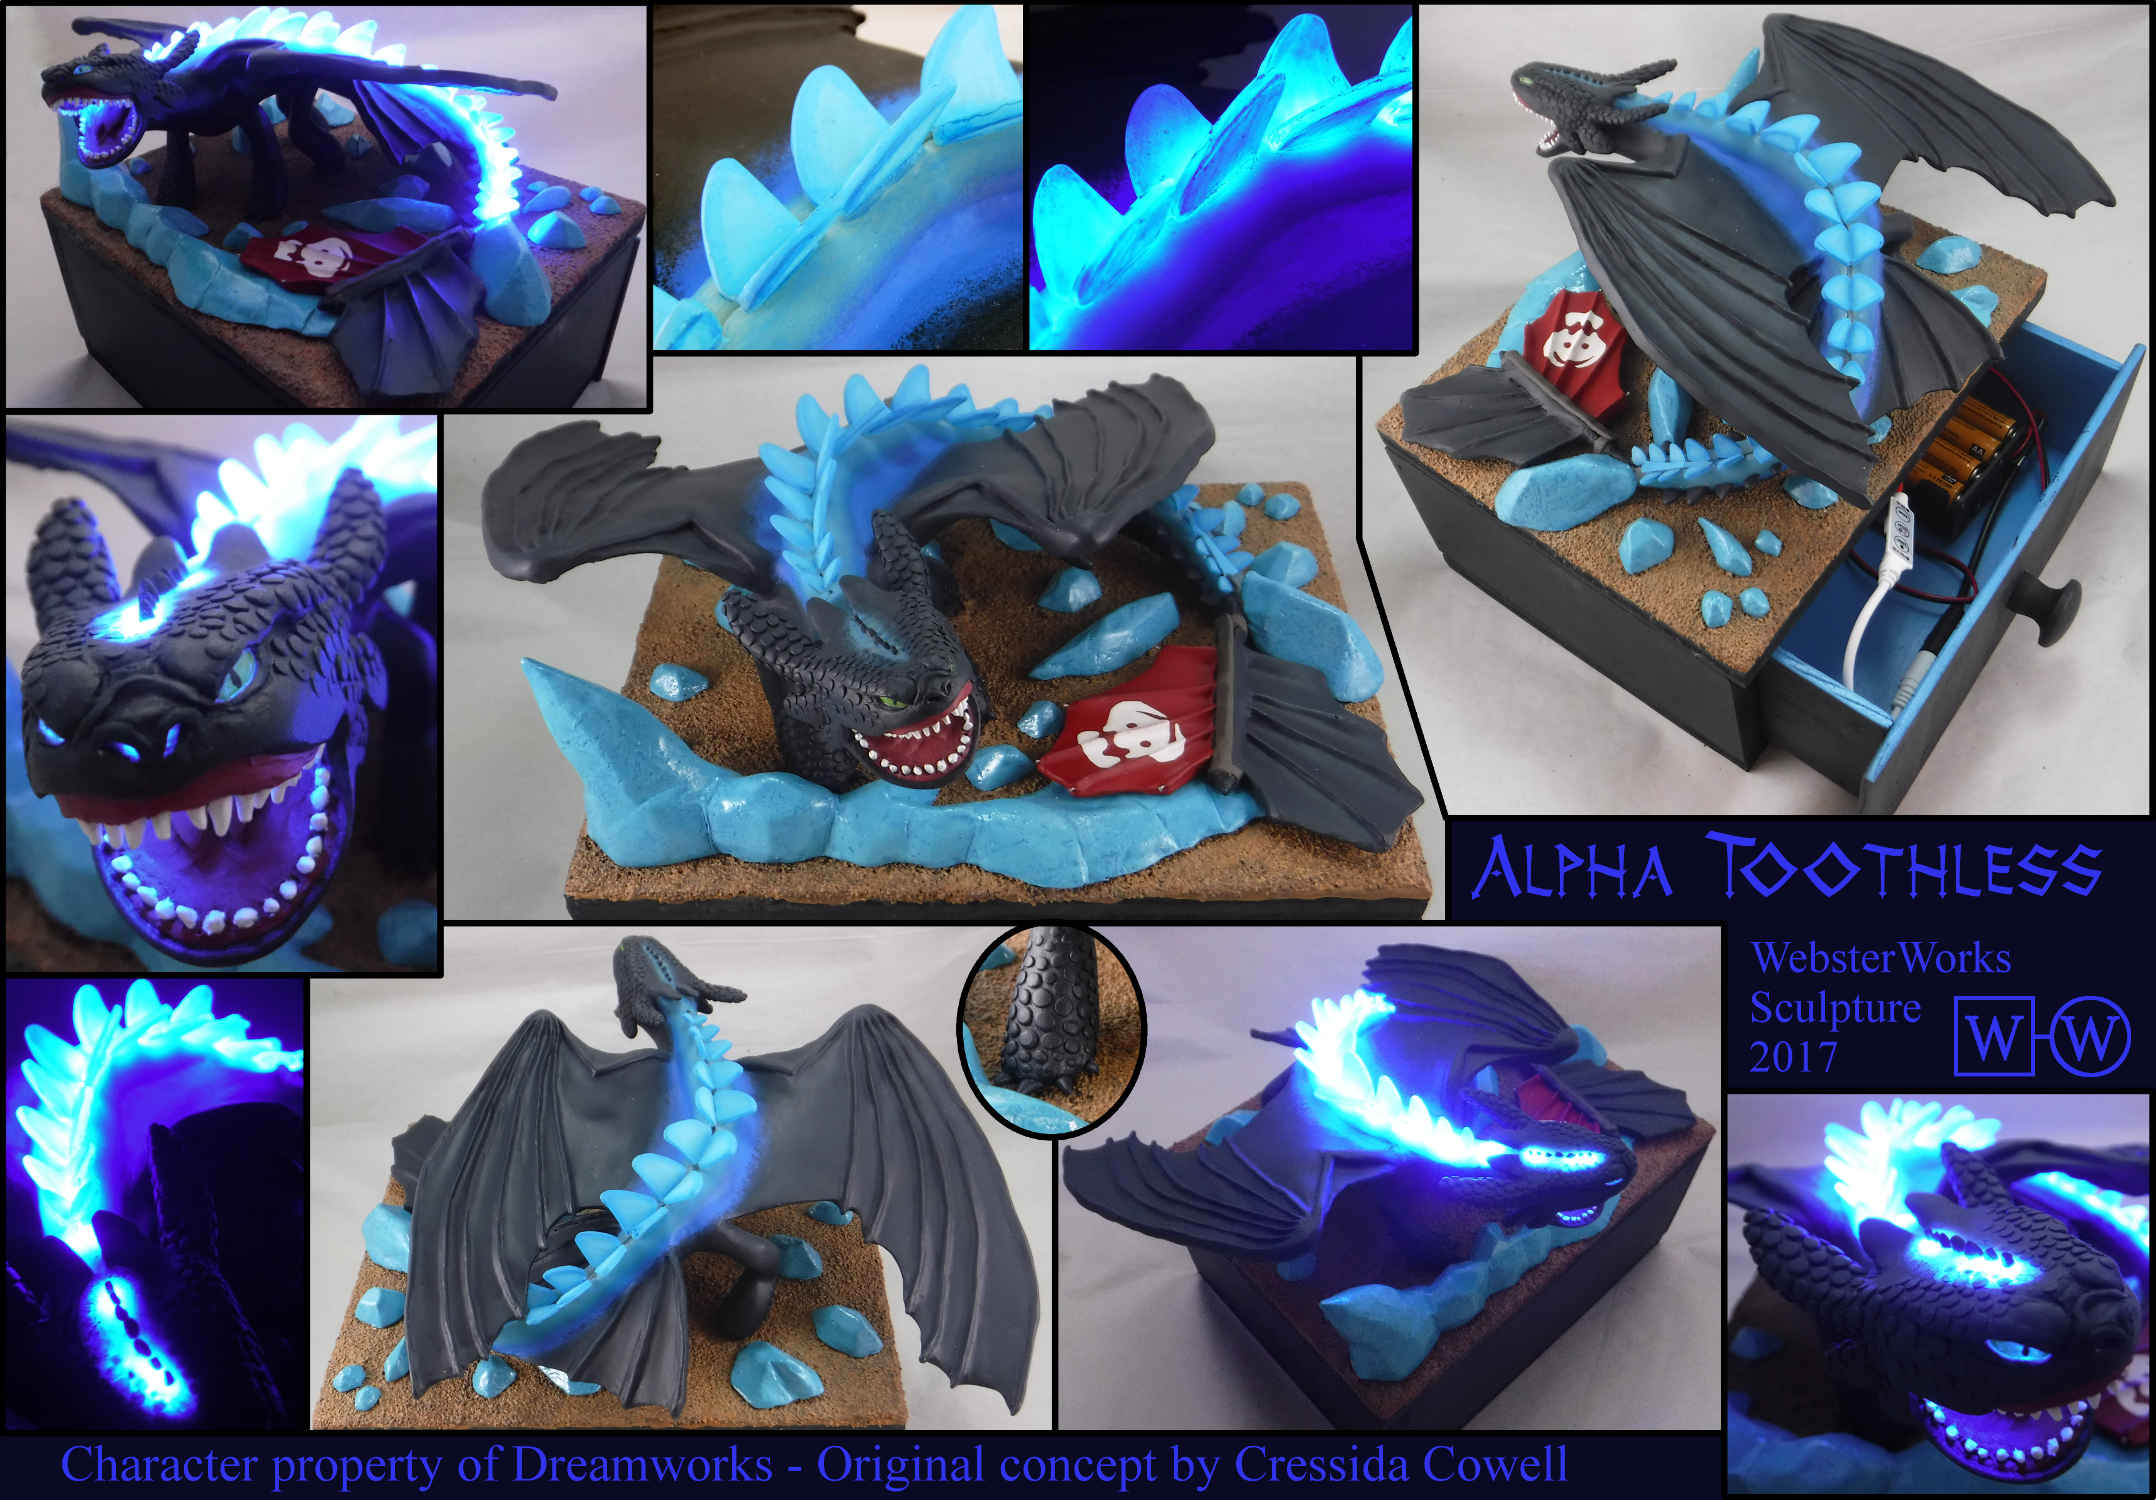
Here it is, my magnum opus. Fourteen months of work over hundreds of hours - I wish I would have counted. What an adventure it has been! As soon as I saw How to Train Your Dragon 2, I knew I had to make something that does justice to the final scene. I hope that I succeeded. I debated on whether or not to light up for a long while. I am very glad that I did, even though I’m sure that made it twice as hard and take four times as long. If you’ve seen the movie, you’ll know why I didn’t have much choice!
There were so many new things I had to work with to accomplish this sculpture. Wings, lights, transparent clay, molding, casting, resin, dirt texture… at one point very near the end of the sculpting process (after I had baked it) I wasn’t happy with a part of his tail so I cut it off and built a new one. That was terrifying, but it did turn out much better and in the end I am glad I did. Although if I did it again there are a few things I would do differently, I am extremely pleased with the final result. I don’t think I will ever do something this cool ever again in my life. Time to take a break and make something simple for a while!
Materials: 18-gauge aluminium wire wrapped with aluminum foil, epoxy putty, LED strip and battery pack, Super Sculpey Original, Super Sculpey Firm, handmade box (plywood, spray paint, decorative sand, acrylic paint), Rust-Oleum grey primer, acrylic paint, Krylon Matte finish, and Gede crystal resin for the spikes.
Dimensions: 10 inch wingspan, 7.5 inches from head to fin, and 4 inches tall (excluding the box).
Technical details to follow, if you are interested in that sort of thing.
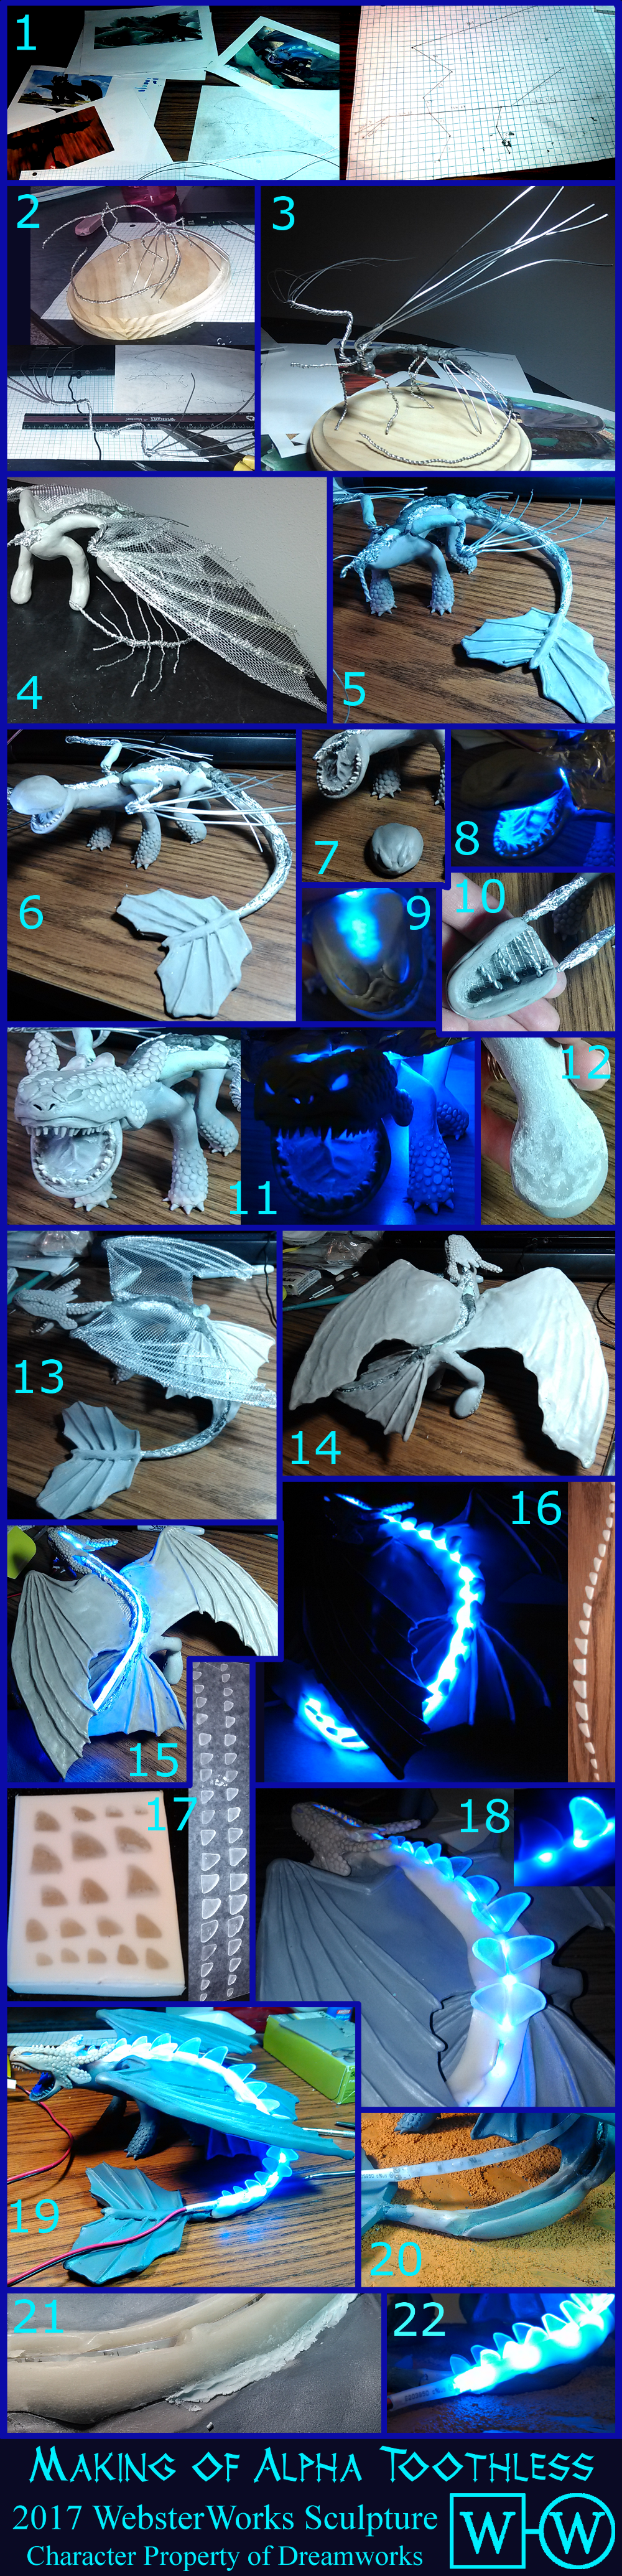
The LED strip was purchased from Super Bright LEDs, but everything else in this sculpture is handmade. The LED kit was purchased here (in blue). However, when curved around the tail the lights were oriented incorrectly – they were pointing to the side and not up toward the spikes. So I ordered this side-emitting LED , which worked great and plugged right into the battery and switch kit that I ordered before.
My wordworking experience is pretty much nil, so my dad helped me make the box to house the batteries and on/off switch. It isn’t anything fancy, just some sanded pine boards (and unfinished drawer knob) from the hardware store that we cut, glued, and nail gunned together. It was spray painted. After I finished the sculpture and determined where everything would go, I drilled a hole in the top to stick the wire through.
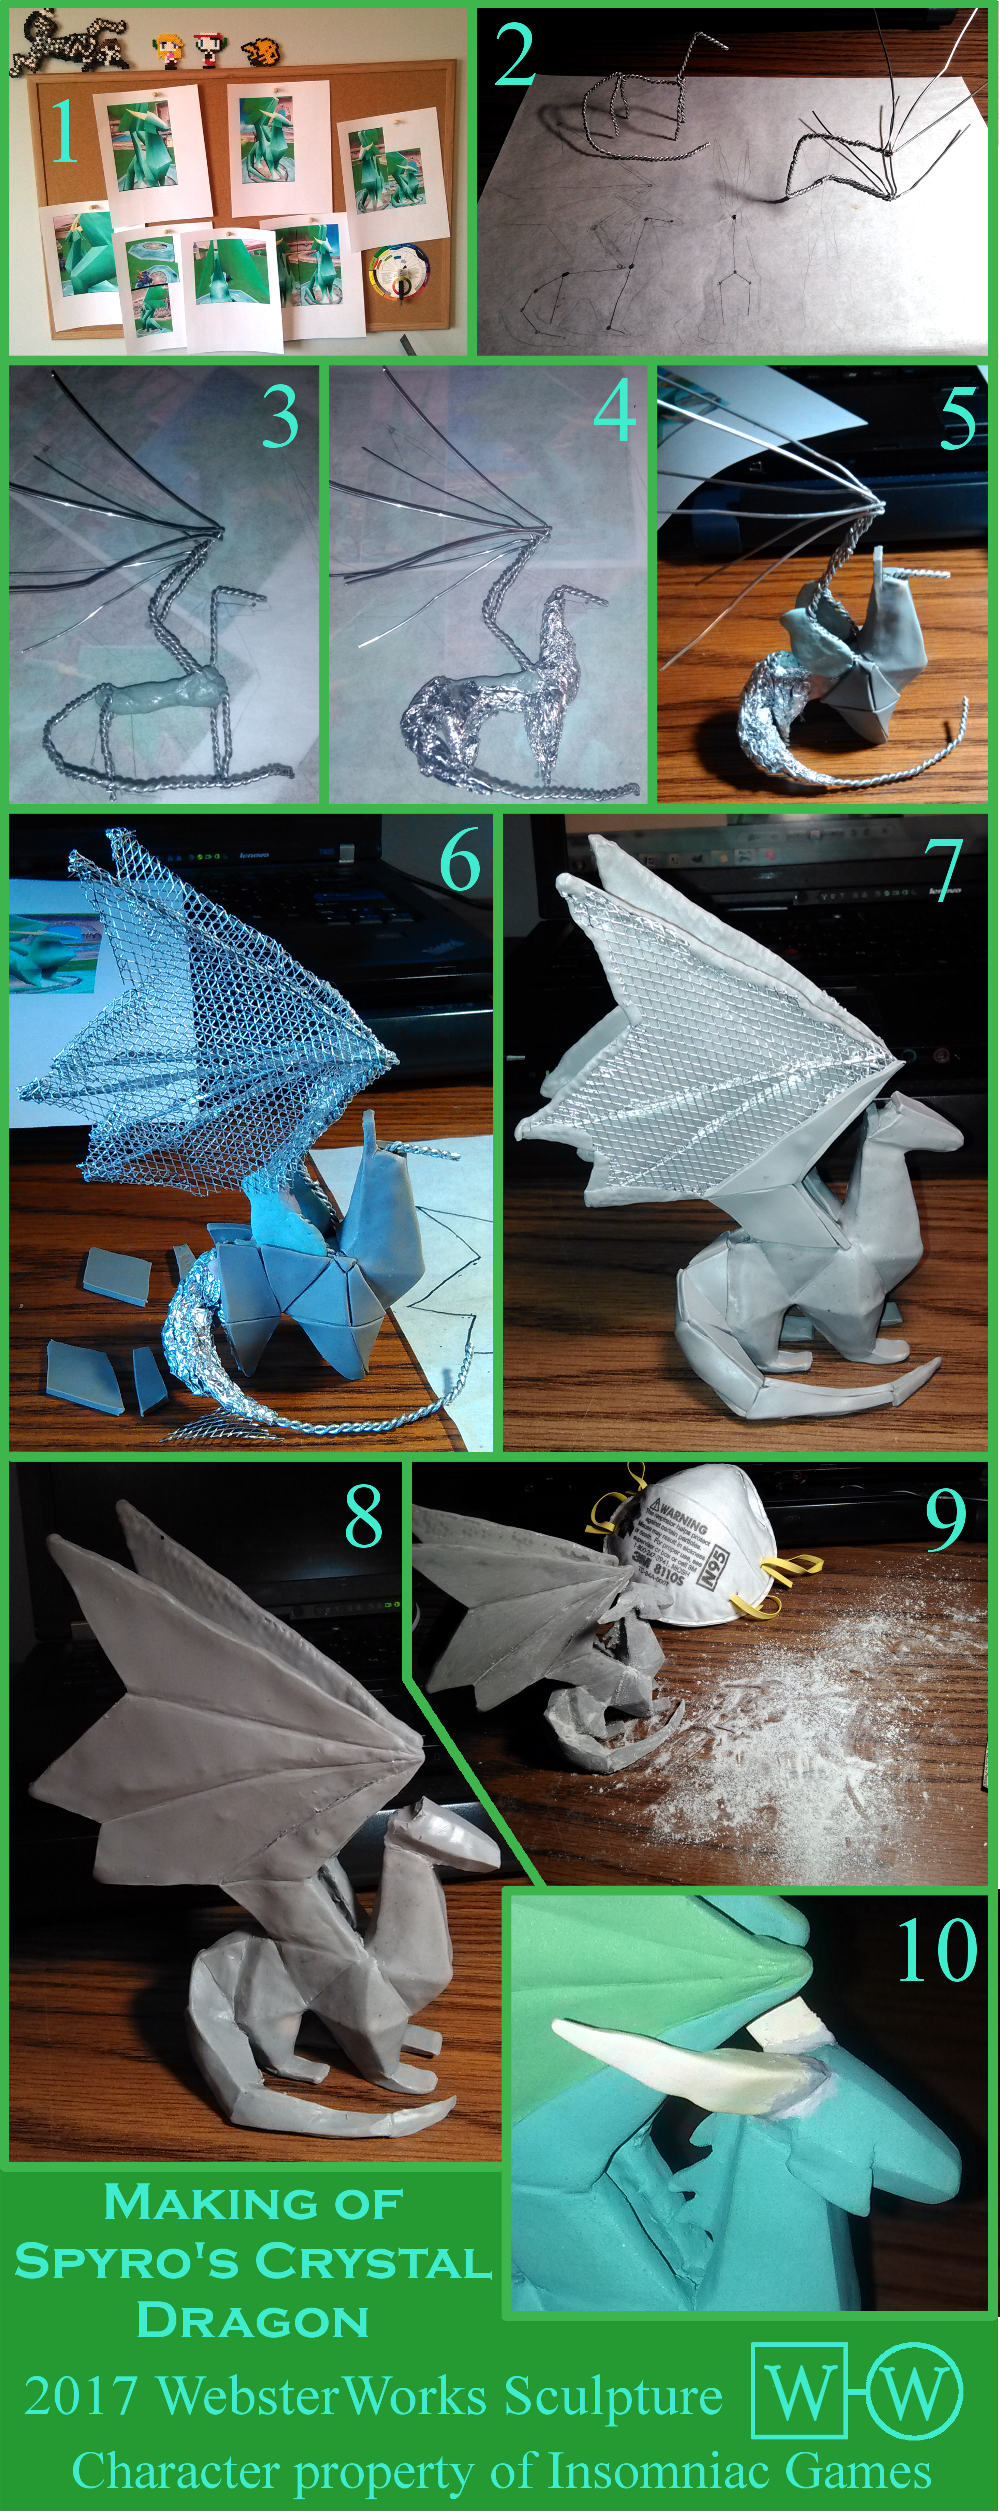
Toothless was built with a wire armature strengthened with plumber’s putty and bulked out with aluminum foil. I made everything I could with a mixture of Super Sculpey Firm and Super Sculpey Original. However, once I inserted the lights I could not bake it again because it would fry the electronics, so I built as much as I could with the oven-bake slay, leaving a hole for the lights. Afterwards I finished everything else with Apoxie Sculpt, which does not need to be baked but hardens on its own in 3 hours. His wings were draped with WireForm, which is very flexible aluminum mesh, and covered in Sculpey.
This was the first sculpture that I baked in stages, which I highly recommend. It eliminates messing up something I’ve already completed when working on a new area of the sculpture. It does take a little more work to blend the seams together, but I find it to be much easier when dealing with large sculptures. I finished and detailed his legs and neck, then baked it. Then I made his lower jaw (bake), tail fin, (bake), wings (bake), then head (bake).
His head was absolutely the hardest part of the sculpt. It had to be hollow to let the light through, but also have an internal structure for support and as an attachment point to affix it to the wire skeleton. The teeth were pre-baked and inserted into his jaw. After baking I removed the teeth, put super glue in the socket, and reattached them. The top of his head was made with a gradient of transparent clay mixed with regular sculpey. His eyes are purely transparent sculpey. I supported it with more WireForm inside, and used aluminum wire to span the top of his jaw. Eventually I used that to tie the top of his head to the wire skeleton. The back of his head was left open to eventually slide the LED strip in, sort of like a spinal cord.
His back spikes were made with clear epoxy resin. They really do look like glass (before I painted them). I made the first set of spikes out of transparent clay, but even though the light did shine through, it dissipated quickly and didn’t light the whole thing. Even the most transparent clay isn’t entirely see-through. So I used those as the original and poured a silicone rubber mold around them. Then I poured the epoxy into the mold twice for the final spikes. They came out perfectly clear, with the added benefit that each spike would be identical to its neighbor because they were cast from the same mold. This video was extremely helpful in showing me how to mold and cast.
The clay around the LED is made with transparent Sculpey so it would glow when the light is turned on. That was tricky because it needs to be oven baked, but also installed after the light. So I made a snake out of aluminum foil to approximate the shape of the LED strip. Then I rolled out the transparent clay as best as I could and placed it where it was going to go. I used the cast spikes to make an indent in the clay and baked it. It adhered itself a little to the already-baked clay, so to get the aluminum foil out and put the light in I had to separate it a little with an exacto knife. That was a bit nerve-wracking, but eventually I got it out and the light in! After the light install I used super glue to attach the spikes.
Then finally the paint! I used acrylic. Toothless isn’t black but actually a very dark blue. I mixed in some of the color I used on his spikes to tie it together. The blue on his spikes and around the glowy bits are extremely watered down and only have one coat so they would remain see through when the light was turned on.
For the ground, I made the texture by actually gluing down some sand I bought at the craft store. I baked the sand first to eliminate any moisture, then glued it on teh top of the box and sealed it with a mixture of Elmer’s Glue-All and water. To color it, I used one base color and made a lighter and darker version of it. First I coated it with the base color. For the dark shades, I watered it down and dabbed it all over the sand, and quickly soaked it up with a paper towel. The dark color then stayed in the nooks and crannies of the texture and was removed from the top. For the light color I did not water the paint down at all and instead brushed it against a paper towel first until most of the paint was gone. I then lightly brushed it all over, painting only the raised areas.
For the ice chunks, I used more Sculpy firm in the mix so it would hold a more hard edge. I created the texture with crumpled aluminum foil, and used the same technique to paint them as I did the ground, with a base coat followed by a dark wash and a light dry brush. I also added more light to the sides that would be illuminated when Toothless was glowing. Lastly, I finished them with floor varnish so they would be shiny.
Lots of steps, but if any of it helps someone out then it was worth it!
Related content


Comments: 34

 (Smile)")


Thank you for the favorite and the comment! Seems like you are a big dragon fan so that means a lot! Nice of you to take the time to write something kind too. A lot of people favorite without commenting (which is ok) but I always appreciate comments too!
👍: 0 ⏩: 0

This looks so awesome! Those months of work really paid off. I have done a bit of sculpture recently, and it's gratifying to know that what I would have done to tackle this project is the same process, but I just don't have that kind of talent or drive to tackle a project like this. Kudos, this is amazing!
👍: 0 ⏩: 1
Thank you! Yes, I used pretty basic techniques but it was absolutely the most ambitious project I've ever done. I was so sick of it near the end, I was working on it just so I could be done and I wouldn't have to look at it anymore!
👍: 0 ⏩: 1
lol, I have had those feelings before too. But the end result was worth it! And you now have a kick ass toothless night light
👍: 0 ⏩: 0

That's amazing how you managed to make this. i love the glow 
👍: 0 ⏩: 1
Thank you! Getting the LEDs without ruining either them or the sculpture was definitely the hardest part!
👍: 0 ⏩: 1
That's sounds difficult, but it's amazing you did it anyway ")
 (Wink)")
👍: 0 ⏩: 0

Wonderful sculpture and the blue lighting really makes it something special and worth the time it took.
👍: 0 ⏩: 1
Thank you! I really hope so! It got really tedious near the end for sure. I think if I ever start another project this ambitious I will have to break it up with a few smaller sculptures!
👍: 0 ⏩: 0

That's amazing! I love the idea of casting the back plates in resin so you have identical pairs. It looks really good.
👍: 0 ⏩: 1
Thank you! That was actually mostly an added bonus. Primarily I tried out casting for his back plates so they could be see-through. The translucent clay just wasn't shining the light through enough.
👍: 0 ⏩: 0

This is awesome. How bright do the LED's shine in a dark room?
👍: 0 ⏩: 1
I would say they are about as bright as a small nightlight, actually. When the room is completely dark there is probably enough light to see things, but not to read a book.
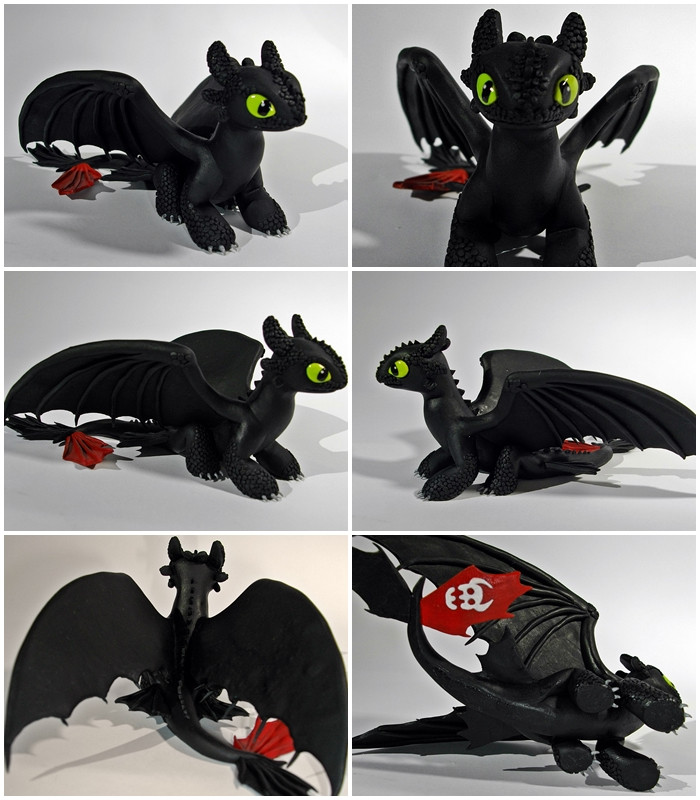
Here, I dug up an old picture of what it looks like when Toothless' LEDs are the only source of light. You can still kind of see the stuff on the desk behind it.
👍: 0 ⏩: 0

Wooww! This turned out so great! It's really beautiful *_* Makes me want to re watch the movie now (even though I saw it 3829382019 times XD)
👍: 0 ⏩: 1
Thank you! It sure means a lot coming from someone with your skill level! I really admire people who can do such realistic work. And you don't know how many times I listened to the soundtrack while I was making it!
👍: 0 ⏩: 1
My pleasure!
👍: 0 ⏩: 0

No problem!!!Keep up with the good work♡♡
👍: 0 ⏩: 0

Thank you! Maybe one day I will have as many awesome sculptures as you do now!
👍: 0 ⏩: 0
Yep, totally handmade! Thank you for the comment, I am flattered!
That's why I like sculpting so much, you can actually make a physical object. I tried drawing and painting for a while but it wasn't as satisfying to me. I'll try to get a making of post up soon so you can try it out of you want! It's not actually that intimidating if you don't start to do something so crazy right away haha.
👍: 0 ⏩: 1

Handmade...Wow just wow, It's really amazing that you are capable of making such things.
And that would be cool, I would really like to try it out! Doubt I'd turn out good the first time, but I can always try.
👍: 0 ⏩: 1
Don't worry about it! There's a lot of information on the internet about starting out. I sculpted little things on my own for more than a year before I made something I thought was good enough to show other people!
👍: 0 ⏩: 0

How cool is that?!? I love it when sculptures use LEDs and i think that is so hard to do. Interesting to read how you did it considering you can't bake the LEDs of course. There's even glow shining through the nostrils and the eyes, great work!
👍: 0 ⏩: 1
Thanks a bunch! It sure was a challenge and that's part of the reason it took me so long haha. I have no idea how people incorporate LEDs into hard-to-reach places like the head or hands. I definitely learned a lot though! When I feel ambitious I might try another one... but not for a little while!
👍: 0 ⏩: 1
Please make another one so i can look at it in awe aswell ")
👍: 0 ⏩: 1
If I get the inspiration I certainly will! But maybe not for a little while and definitely not until I find a good subject. Making one project a year isn't the greatest way to practice, and I definitely want to improve my skills before I tackle something this ambitious again!
👍: 0 ⏩: 1
Haha yes i agree, if a project drags too long it can be quite a pain.
👍: 0 ⏩: 0