HOME | DD
 xaotherion — Head rig example in Blender
by-nc-sa
xaotherion — Head rig example in Blender
by-nc-sa
Published: 2010-09-07 10:50:42 +0000 UTC; Views: 3418; Favourites: 5; Downloads: 13
Redirect to original
Description
ForHere's simply how I do it. This is one of three rigging methods available in Blender, it uses so-called vertex groups (the other two are envelopes and harmonic mesh deformer) and the one I use all the time.
In this method, each bone has its associated group of vertices. Within the group, each individual vertex can have different weight (or value) ranging from 0 to 1, which defines the strength of the bone influence on that vertex.
The weights can be assigned numerically or "painted" interactively in 3D. The colour code: blue for 0, teal for 0.25, green for 0.5, yellow for 0.75, red for 1. Of course, any value in between can be used as well and will display appropriate shade.
As you can see, I usually stick to the "full" values (0-0.25-0.5-0.75-1) to keep things simpler and more manageable. Only when it's not enough, I use finer-grained values.
A *very* important thing which initially gave me lots of confusion and can be difficult to grasp: the influence values (weights) of different bones are relative to each other, not absolute. For example, if you have a part of the mesh which is influenced by only one bone, it won't matter if you assign a value of 0.1 or 1 there. If there are no other bones interfering, all vertices with non-zero value will move all the way along with that bone. If you want some of them to be less influenced, you have to assign some other bone's influence on them.
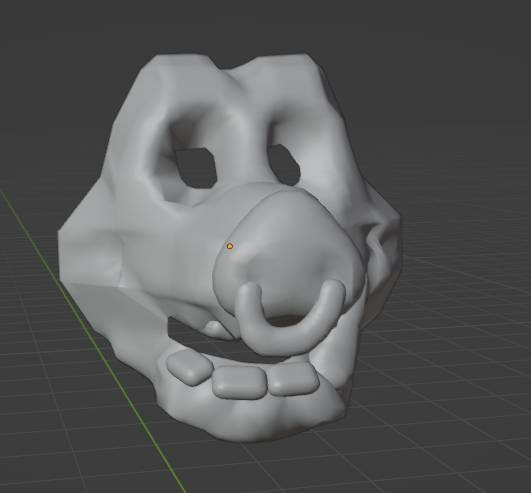
This is crucial in the area of joints: to make them bend smoothly, you have to make both connected bones affect the same verts in the joint. In the picture above, there's something like that in the ring of verts (aka edgeloop) which starts under the horn. The neck bone influences them with strength of roughly 0.5, and the head bone uses 0.75 in the same place. This allows the neck to bend smoothly. If there was sharp separation between areas of the bone influence, the mesh would bend in a sharp, unrealistic way, somewhat like a milk carton bent in two.
 (Wink)")
There's also an option labeled "Preserve volume" in Blender, in the armature modifier settings. Generally it should be ticked on, as it smooths out the joints even further.
In a nutshell: to obtain a smooth bent of a joint, the areas of influence of connected bones *must* overlap.
Fine tuning of values on individual verts may be needed as well.
OK, if this is still unclear, feel free to ask.
")
Related content


Comments: 11

Pretty nicely done though I gave up on that horror a long time ago... If there's something I hate, it's weight painting. The automatic weights work so well that I haven't done that in a long time. Of course it requires 5 times more bones to control the skin properly but damn that's easy. It usually also produces much smoother transformations and also makes rigging dense meshes so much more easier. I like to refer it to sculpting, it's highly inefficient but so easy.
I found the best use for that method in a combination rig. Detailrig works on small areas like the face and on the fingers/claws and so on... Then there's a main rig to move a mesh deform cage which moves the character body. Also the main rig has linked controls to the detail rig so that I don't have to worry about two sets of controls. BBB bunny rig for one uses that kind of setup. And I'm quite sure you know the results. Actually that's the rig where I ripped the idea from and it took some time to reverse engineer it but I say it's worth it. I also have some tips you could use for bones, if you'd like to hear them.
👍: 0 ⏩: 1

Of course. Go ahead, I'll be grateful.
Still, it's funny how "one man's trash can be another's treasure".
Such precise engineering-like approach suits my style very well. The worst thing for me here is that such work has to be re-done on each new mesh. I know that there are "pure bone" (no shapekeys) solutions to this, such as BlenRig, but I haven't check them thoroughly yet.
I feel that I'm quite efficient with the weight painting. Same for the shapekeys - I can set one up in a matter of minutes, but the problem starts when their number skyrockets (there are 112 of them on the Thornhound and 82 on the hyena
I'm also interested in the mesh deform modifier. I've read the theory, seen a few examples, but somehow can't get the bigger picture. In what way is it better than the weight paint? Does it eliminate the need to use so many shapekeys? Or maybe it's simply a way to quickly rig a complicated mesh, by adding a low-res, easy to manage intermediate layer between the bones and the mesh?
 (Smile)")
👍: 0 ⏩: 1
Ok... Well I REALLY don't like weight painting, though I wouldn't really compare it to trash either. The traeka model for example has tongue overlapping the the bottom of the mouth a bit and it practically has two tongues and even those overlap, so I have two options, put the bones in and hit the button, takes about 20 seconds... Or put the bones in and then use a better part of a week to adjust it, yeah I'm slow with it... The auto weights also give smoother results than I could have ever done with manual weighting. Also I use somewhat more denser meshes now, between 12000-18000 vertices per character, means more detailed control over the mesh and less weird distortions. And the auto weights don't really limit your options at all... It gives you almost the same amount of control without the need to lock the mesh... Means that you can change the topology for an example and then just redo the auto weights. Although I admit that the auto weights are sometimes a bit too smooth even but even then you can finalize the work with some manual weight painting. But for me, it really helped to lower the time needed to make a rig for the character and since I could now use much denser meshes, I can more easily use more detail on my characters. So I really suggest that you try it... But I have now exactly 417 bones in the traeka model and more is coming... So it does take some time to set up too but still it's faster than weight painting, to me at least. Also depends on the mesh complexity... Just take the "deform" option off from bones that you don't want to deform the mesh. it automatically leaves those bones out of the auto weighting then.
But onto the next thing. Shape keys are for the small movements like in the face and tweaks, not so useful for rotating elements like fingers. Bones are best used in rotating elements but can be used pretty much everywhere though not really so great in tiny movements like facial streaks or in general tweaks. Harmonics are used pretty much purely on the large movements, it's possible to use it with facial movements but usually it's not worth it. Harmonics can be a bit tedious to get started with and it requires some getting used to it. But what's it good at is, it saves time when there's usually much less vertices to work with, I mix it with auto smoothing too... But what it's really good at is the smoothness of the skin. For fat characters, it's a must [link] . For skinnier characters, it can be used to a bend and move the skin like in the traeka mesh I showed you earlier. Turning the head and neck also effects the skin in back too. And this [link] would have been near impossible to rig with smooth movements like that with traditional bones, at least in a day. Here's an example of a cage and the cage I used on renamon. [link] The more closer the cage is to the surface, the more precise it will be, the farther the cage is from the skin, the more rounded the transition. See the Pixar presentation too. [link]
But what tip I wanted to give you was that you can use bone segments with the tongue. Also works nicely with arm twists. In 2.49, Seek the "Segm:"-slider in "editing" buttons -> Armature Bones tab. You'll need to be in the B-Bone mode to see it. Basicly it divides the bone into smaller pieces that deform the mesh more roundly. It's best uses are on tongue, spine, tentacles... I use it on lips, eyelids, eyebrows, around nostrils, tongue, spine and on arms. Just take the in and out to 0.0 and it's only twisting, makes it real easy to do a hand twist. That's seriously one of the best rigging features ever.
Ok. I think this should give you some ideas.
👍: 0 ⏩: 1
Ok, thanks. The automatic weight painting may come in handy, especially if it gives results that can be further modified. Once, I've tested the "bone heat" option in 2.4x (I think it was before 2.49?). The results posed rather nicely, but when I needed to make some modifications by hand, I ran into a problem. Especially with a complicated rig, the weight ranges on the verts were weird, often very small, less than 0.2. So they were difficult to modify, even with the custom colorband it was hard to tell what's exactly going on. It was limiting my options indeed. That's why I learnt to do all the painting by hand, and was using it ever since.
The shapekeys: of course they can't substitute bones for rotating parts of the mesh (in fact, the shapekey itself moves the verts in a straight line only). I use them mostly for:
1) The facial expressions - seems easier for me, though I've made some simple tests using bones for this and I like the results: they are bit more difficult to set up, but the bones aren't limited to moving the verts in straight lines, as shapekeys do. By the way, I really like the effects of traeka's facial rig. Was it made by just placing the bones in appropriate places and using the automated painting?
2) Corrections of the joints at sharp angles - weight painting alone can give good results for rotations smaller than 90 degrees, but larger bends cause the "collapsing joint" problem. I sometimes add shapekeys for smaller bends too, like 50 degrees, depending on what's needed in that particular case. And to make the joint look good in its entire movement range, it's sometimes needed to add as much as six of them.
I thought about that a bit more now. Seems like I'll have to pay more attention to the topology, and less shapekeys will be needed. Because in my hyena model I've used the hand modeling technique from here: [link] , and these hands don't need *any* shapekeys. Contrary to the rest of the model.
3) Significant soft tissue displacements, such as the shoulder area or the knee. Some form of correction is necessary there and I use shapekeys for that.
The harmonics seem more clear to me now. Looks that they are much like a customizable lattice, which just moves the mesh within it, automatically taking care of keeping the overall shape as well as small details in place (like the fur tufts on renamon's chest, which would be really work-consuming to paint my way).
I used the b-bone for Thornhound's spine. Your b-bone tip can be useful too. Especially for the arm twists. I had my own solutions to these things: the arm twist can be accomplished using a construct of two bones and (surprise
For the tongue, I use a complex but precise solution: a chain of bones connected using offset parent option and with targetless IK. So the tongue can be manipulated in a few ways: like a standard IK chain, or the individual bones can be rotated, or pulled apart to stretch the tongue out, and even in such stretched state the chain will still act like IK one.
Besides, I recently poked around Luxrender. I won't have much use of it with my PC, but maybe it will interest you: [link]
👍: 0 ⏩: 1
Bone heat in 2.4x, I guess that's pretty much exactly the same thing as the auto weights in 2.5. But you will need to tweak it by other means for it to look good. And I haven't do any manual weight painting in a long time. So no, traeka rig is deformed fully by that auto option. What comes to that weighing influence thing, you will need a lot more bones to really work with it. But after you get into it, it's usually just about deleting the influence from areas than actual weight painting as it has it's own little scheme going on, mess around with the weights too much and only thing you get is some bad behaviour. So you can just pretty much forget the idea of doing large scale manual painting afterwards. Only thing I can really recommend is deleting weights from areas that you wish. Ok. Why it's not recommended is because there will be more bones. Imagine you had to manually weight over 100 bones in the head, all quite close to each others, how long would it take to weight all those and how much tweaking that would take. (In my case it's something like 45 vertices per deforming bone.) Those weights are already tweaked so I can only recommend deleting weights and even then in a limited scale.
And I must warn you that more bones -> more weight groups -> more CPU time needed -> less fun it is to work with it. I'm hitting the cap with the traeka rig I have. It's smooth to work with in 64 bit blender (like 30 frames per second) but the 32 bit is quite some slower for some reason (about 15 frames per second). Those are with textures on, with solid faces it's smooth in both. Would be nice if blender's bone deforms would be multi core though. At least for one rig it isn't. Perhaps I'll need to build a proxy...
So while the workflow in traditional method is weight paint -> test -> tweak paint -> test... The auto weights it's more like, set the bones -> parent with auto weights (heat) -> test -> tweak bones -> re-parent -> test and then on the end, optionally tweak with weight paint. I can't really recommend going into much detail in this method though so be prepared to do the smallest stuff with shape keys. But the overall smoothness that comes out of this thing is truly something different. And not needing to do weight painting was a gift from heaven for me... So it's really worth a shot. Can take a couple of tries to really get it but still...
The arm twist thing with two bones was my solution too... Last time I used with buwaro but it's easier, faster and just more plain simple to use bone segments in there too. Though I already used segments around the eyes and lips (like in the bunny rig), I just didn't really thought about all the possibilities. You should consider that one too.
The harmonic coordinates system (or mesh deformer modifier if you didn't figure it out already) isn't 100% precise (though I feel that 2.5 is doing somewhat better job on that). So you can expect the teeth to be slightly off from the gyms if you directly parent those into the head bone while the head is going by the cage, which is going by the head bone, and then turn the head. In a worst case the teeth will get eaten by the gyms. This is not really a problem though if you keep the teeth stationary and bind them to the same cage. The slight error is not usually viewable by naked eye and so isn't going to be a real problem, but it's worth a mention. I think it makes the character more alive anyway so...
I'm not particularly interested in Luxrender. I've tried a few others but I don't think those are really worth my troubles.
Also I've been studying python and in 5 hours (studying included in that time) I made a script that makes "Copy Transforms" constraints to all selected bones so that those bones copy the movements of another armature's similarly named bones. I needed that to copy the local movement from face and toe bones from the main rig to the detail rig. There's 153 of those... Would have been a tedious task to do it manually for every bone. Well it certainly wouldn't have taken 5 hours but now I can use that script in the later works too... Also if I need to change any setting for large amount of bones in the future, I know now how to. I think I just fell in love with python... And I love how deep it runs on blender 2.5.
👍: 0 ⏩: 1
OK, it took me a while to respond, but I've done some thinking in the meantime...
Why still 2.49? Well, making pure technical tests to check the nice new features is one thing, and actual pictures meant to be posted are another. My few recent works were made with modeling speed in mind. Making them as quick as possible included no messing around with different interface.
With a grain of salt, we could say that I'm an „conservatist”, that is, when I learn to use something, I squeeze as much as I can from it, and move onto something else when I feel that the old way of doing things has reached the limits of its usefulness.
Being so used to the previous version can give funny effects. An example: recently I've found a really cool weapon design and I thought it would be a good occasion to start using 2.5 for a work that could be submitted here. I recalled reading something about n-gon implementation in Blender. It would be great to use it, as the weapon's geometry is somewhat wacky and complicated. But there are no n-gons in 2.54 yet. OK, so let's use the standard way, with quads. I did it like this, blocked out the main geometry, but the gun's shape required cutting many additional edgeloops, and... What the heck, where's the knife tool? So I just loaded the geometry to 2.49 and quickly finished that part of the gun. Well, later I came back to 2.5, started a thorough search, and found that cursed knife
I still can't find the settings responsible for the texture-based control of the fur parameteres. The control itself works at least partially, files made with 2.49 display mostly OK. There are some errors still, like strands going in strange directions, and it seems that fitting my old models to 2.5 would require re-combing of the fur. I don't want to do that right now, who knows if the algorithms won't change even further with the final version and I would have to re-comb yet another time in such situation. It's much better already than it was with the alpha version though, which apparently couldn't handle my „shapekey madness” and displayed geometry errors. All in all, the textures seem to influence the fur, but I can't find any buttons for that in 2.54...
Regarding the rigging methods: 18000 verts is really much. I agree that painting them by hand will be no good and that more advanced methods are needed here. And here's the difference between our „modeling philosophies”. I admit that I was having problems with keeping the topology in order. Because of this, my current models are low-poly compared to yours: 4441 verts on the hyena and only 2486 on the thornhound, using harmonics on that looks like an „overkill”. And it is much simpler for me to build a loose geometry (with easier to manage topology), paint the weights by hand and re-fit the mesh with shapekeys, than start in high polycount right away. Sure, there's a lot of work to be done, but it is split into small, manageable chunks.
Speaking of the topology, I think I learned to make it mostly „clean”, keeping the basic edgeloops in place, so I should be able to try more dense meshes now. I am working (finally!) on another anthro model and I'll try to make the vertex count about twice as much as on the previous one. Hopefully it will work, provide nicer deforms and maybe lessen the need for so many shapekeys. Still, the work on it is going really slow.
However, I have a feeling that there's more than meets the eye when it comes to the topology. I've seen a few small but useful tricks in some tutorials and it makes me wonder if there are some „hidden ways” to make it even better. In other words, specific body parts seem to benefit from shaping the geometry in a specific way that goes beyond the simple „keep everything in quads” principle. Anyway, it's more a feeling than solid knowledge right now. I have yet to find some thorough descriptions on that matter, if there are any.
Well, maybe I would find something already, but my internet connection seems to be dying. I'll have to change the provider and then we'll see.
I have a suggestion to the teeth & gums problem. Try the vertex parent. Parenting the teeth to appropriate verts in the gums should cause them to move in a correct way along with the jaw.
Congratulations for making a working, useful script. I looked into Python once, but I'm no programmer right now. It is on the list of things I'd like to learn, but there are always other, more urgent matters.
👍: 0 ⏩: 1
Oh yeah... I understand. Using harmonics in a human shaped mesh with less than 10000 vertices would be a bit of a overkill indeed. Same goes for the bone heat, if there's only a small amount of vertices, it's just not worth it. But in the future if you go for dense meshes, it's easier to go for the heat... Hmm... My perverse imagination makes that sound so wrong...
Now that you mentioned it, I just remembered (and checked) that the texture to fur functions aren't really working yet. Neither do the child simplification in animations (bad flicker). And now that I'm on it, the texture backing isn't stable at all and I use 2.49b to do that every now and then (though 2.5 is usually more than 10 times faster with ray AO...), so that's fair enough. Perhaps I should have formed the question a bit better because what I got out from your works was that you haven't even really tried working with 2.5 yet... So, thanks for explaining. Btw... hit space and you'll find everything you'll ever need. N-gons are part of B-mesh project. It's a new vertex handling core for blender, It should make things a bit more easier to handle in some areas and also make subsurface triangle problem a bit less visible. But most of the time N-gons aren't really so useful as the mesh is still made from triangles only so you can just use triangles in parts that you wish, gives more control. Quads are most used because they fit perfectly to be used with sub-surfaces and they don't mess up the wireframe too much.
For topology, there's pretty just one rule. Make a manageable mesh as poseable as possible with the most correct transformations. How to achieve that can take a while to learn. Basically though, the edgeloops should go linear and vertical on places that deform much. So if you need to stretch an area vertically, make the edges go like this # and not like X. In practice, follow the muscles. See this video, [link] Well the head topology you made, isn't bad but could be better. Though what really matters is the end product. Buwaro I made has a horrible topology on the head but I managed to hide most of it. If you wish to learn some tricks, you could start reading about E and N poles... [link]
The vertex parent is a no go on that tooth thing. I think it would be even more inaccurate in multiple ways but the main ones, there's no rotation nor scaling (I think, haven't checked lately on newer revisions). Teeth are organic and part of the character and should go with the mouth, so if they cluster even a bit, it can give away the illusion... Well... I think that it wouldn't look good if the head stretches and the teeth don't. And It's just easier to hit 4 buttons in a row anyhow... Like I said, worth a mention but not a problem, just something that you need to know. ")
Ok... Will go tackle some vertices now...
👍: 0 ⏩: 1
Easier to go for the heat? I wish you wouldn't say that, cause my next critter will be a female, it can be a problem!
But pervy jokes aside, I'll have to suspend the modeling for a time and digest the topology info that you've shown me, as well as some others, there seems to be lots of useful things.
Unfortunately, videos are no go for me, until I change that provider. Well, this is just internet in Poland... I've heard that, when Finland declared internet access as a civil right, our government issued a "confidential" document saying that something similar will be possible here around 2030! 
Back to topology, quite a few errors can be hidden indeed. My hyena model has pretty much random topology in many areas, though I avoided tris as much as I could and generally kept the edges in # pattern. However in the animation it looks right. But even if hiding the errors is possible, it would be much better if there was nothing to be hidden.
Just to be sure: did you try parenting the teeth on 3 verts, not on just 1? Three-vert parent should inherit rotation as well as location. However, I've made a simple test in 2.54 and v-parent really doesn't cooperate too good with mesh deformer. I guess that's the price for the deformer's great smoothness, the verts in the mesh are moved in relation to each other, even in areas quite far from the deformation's original place. So even if the v-parent keeps the teeth by the respective vertices, these vertices themselves are spread apart or squeezed together, which in turn affects the teeth. Well, that's how it looks on a simplistic mesh and cage, even with heavy subdivision. In "real" modeling conditions it may be different. But this is just for information, if you say that it can be solved by binding the teeth to the same cage as the main mesh, then it should be OK.

👍: 0 ⏩: 1

Yeah, I prefer no yiff, I see it too much already. :/ Talking about pervy... My sister showed me one video that really is something else. That gave me the biggest WTF feel I've ever experienced. If you want to see it and have time to wait for it... [link]
But yeah. The best way to learn topology is to download some character and do a retopo over it. That way you only focus on the topology and not need to worry about the shape. I think I have understood some of that already. Here's my progress. [link] [link] All the coloured loops or lines I consider to be major in some way. The blue line around the head just tells it's a C type head topology. The loops around eyes are quite self explanatory, closing eyelids could be a bit hard without those, depends on the case though. Same for the mouth loops and nostrils. Loops around eyebrows should bring those up a bit as in earlier models I had problems getting the expressions out properly. That should allow me to bring the inner part of eyebrows down and the skin should bend more naturally and those should also be seen more properly. The purple lines tells me where the eyelids corners are and define the most of the look on the nose. Let's hope this setup works when I get to rigging. It's perhaps not the perfect topology but I don't know what else to do for it... The model will get subdivided one time before going to rigging.
Well you learn something new every day... It indeed does inherit the rotation when doing 3 vertice parenting. And vertex parents work just fine with mesh deformers, buwaro had mesh deformer cage to move the body, the rings in his ears were vertex parented. I just tried it again in 2.54 myself and seems to be working. Sure you got it right? Or perhaps it's just a temporary bug... I like to keep myself up to date and download a new build from graphicall every now and then.
Multiple objects can indeed use the same mesh deform cage. The cage is calculated for each object and the cage is just a mesh. If you need to attach something to the character, the easiest way is to bind it to the same cage as the character. Like belt and other tight clothing, or teeth. If the thing should be loose, then by other means. But yeah, I say vertex binding the teeth works as an example but to not seriously consider.

👍: 0 ⏩: 1
I'm happy to announce that, after some search, I managed to find a decent internet provider. 3.5M/1M for about 10€ per month (cheap, but note that people here earn a sh*t compared to more advanced countries). What's best, he removes the limiter late at night, last Saturday I got whooping 14.6 MB/s download. And even as there were some malfunctions today, he handled them promptly.
And the video... ZOMG, what's that supposed to be?!
About the mesh deformer, don't worry, I'm pretty sure I screwed the cage and it's not a software issue. In fact, I only made a few simple tries at it and I'm consistently getting the same result. The deformer is *much* too smooth, mesh deformations affect even the verts in remote areas, way beyond the right place. Guess my test setups are too simplistic and therefore work wrong. Anyway, it's not in the center of my interests at the moment, it will surely have its time, but not now. The topic of the month is topology.
You've got some pretty clean loops on your model (and I really like Xadri's new looks), right now I'm doing worse at this. Still unable get it right completely, I managed to "narrow down" my problems though. Well, I always used the edgeloops in important areas, like mouth or eyes, kept the edges in # pattern, avoided tris etc. But there was problem with keeping things "clean", the loops were there, but unevenly spaced, in areas between important places they frequently tripped on poles, their flow was disturbed, things like that. Still, somehow it all worked better than it looked in the wireframe.
Now I can partially alleviate this. As I am working on the new model, I can see that the loops on the torso, under construction currently, turn out much smoother than on the face, which was modeled a few months ago. Guess I'll retopo my own model eventually, no need to download someone else's.
With the Thornhound I got away from such trouble by keeping the mesh sparse, regular and manageable, but in the end it was too simple and needed the 100+ shapekeys to deform right.
The main problem remaining is finding the right number of verts for different loops. For example, the mouth and eyes loops can have so different number of verts that there are many poles or loop discontinuities in the zones between them. So there are loops around the mouth and eyes, but loops going *from* mouth to eye get interrupted. Or the number of verts in head and neck loops seems OK, but later it turns out that it's not enough for the torso. In other words, I can't maintain the model "all in loops", like some of those shown on the web; I need to "sacrifice" some loops to keep others and again, the outcome tends to look messy. OK, I hope you'll get this, don't know how to describe it more clearly... Just imagine my descriptions are edgeloops, and you'll see.
As a final note, I got into using 2.54 for some actual modeling works. Well, what can I say, I like it. When guys restore full functionality of 2.49 and merge it with all the new goodies, the result will rock. Right now it seems to have a few small errors and personally I find them annoying. I was modeling the gun and needed to place some really precise cuts. And now what, the knife tool went completely freehand. It will be great for organic models, maybe retopo, other things, but what to do if I need specifically the old "Exact" knife mode, with axis and verts alignment? And edgeloop cuts aren't always much help here, can't find the "Proportional" mode in which the new loop was completely aligned to one of its neighbors and not interpolating between them. Well, on occasions like that I simply loaded the file into 2.49.
What happened to the mouse gestures is even more disturbing. I got accustomed to using them all the time and now all I've got is the move command, no more rotate or scale. Well, it could stay like it is, I could go around without scale & rotate, but who invented the fact that the gesture is now invoked by the right mouse button, not left?! Congrats, now it's mostly useless, as trying to invoke the move command when there are other objects nearby ends up with random selecting and grabbing one of them, usually not the one I want. Will have to check through the options, maybe there's some switch...
Not to complain too much, other aspects are working fine and after looking at the new interface for many hours, I'm finding the old one looking really... well, old.


👍: 0 ⏩: 1
Yeah I think I know some the problem. We had a guy working in our farm some time ago. I talked with him a few times and he told he moved in here from Estonia, if I remember correctly. While cheap is usually a good thing in here, it's a bad thing in there. I make something like 8€ per hour (almost the minimum and when I was working in an amusement park, it was double in every holiday) while he told me his father worked for something like 1,5€ per hour. Though to compensate a bit, usually stuff is somewhat expensive in here. When a candy bar costs something like 1,50€ and a pair of socks 4€ you don't look that 500€ bill on your hand for long. People here like to talk about travelling to Estonia for some cheap stuff... World isn't perfect indeed but lets hope things will get better for everyone.
The mesh deformer has it's tricks. Read this page for more details if you wish. There's quite some. [link]
For topology, it's about learning.
I heard the cut tools weren't so great to begin with so I don't think they are going to fully implement the old functionality. For organic models it breaks the loops too bad so I really never used them. For mechanical models it could have worked better indeed... New one is under development though. See here. [link] Not in the trunk version yet.
Mouse gestures are gone I'm afraid. Though cool concept, mostly useless. In all seriousness, in all 7 years I've used blender, you are the first person I've ever heard was really using them.
Well, here's the reasons. Not everything is yet working so great but It's coming along quite nicely. And yeah, the old really does look old.
👍: 0 ⏩: 0