HOME | DD
 XiceGfx — Basic signature tutorial
Published: 2006-02-13 19:08:39 +0000 UTC; Views: 148055; Favourites: 341; Downloads: 3280
Redirect to original
Description
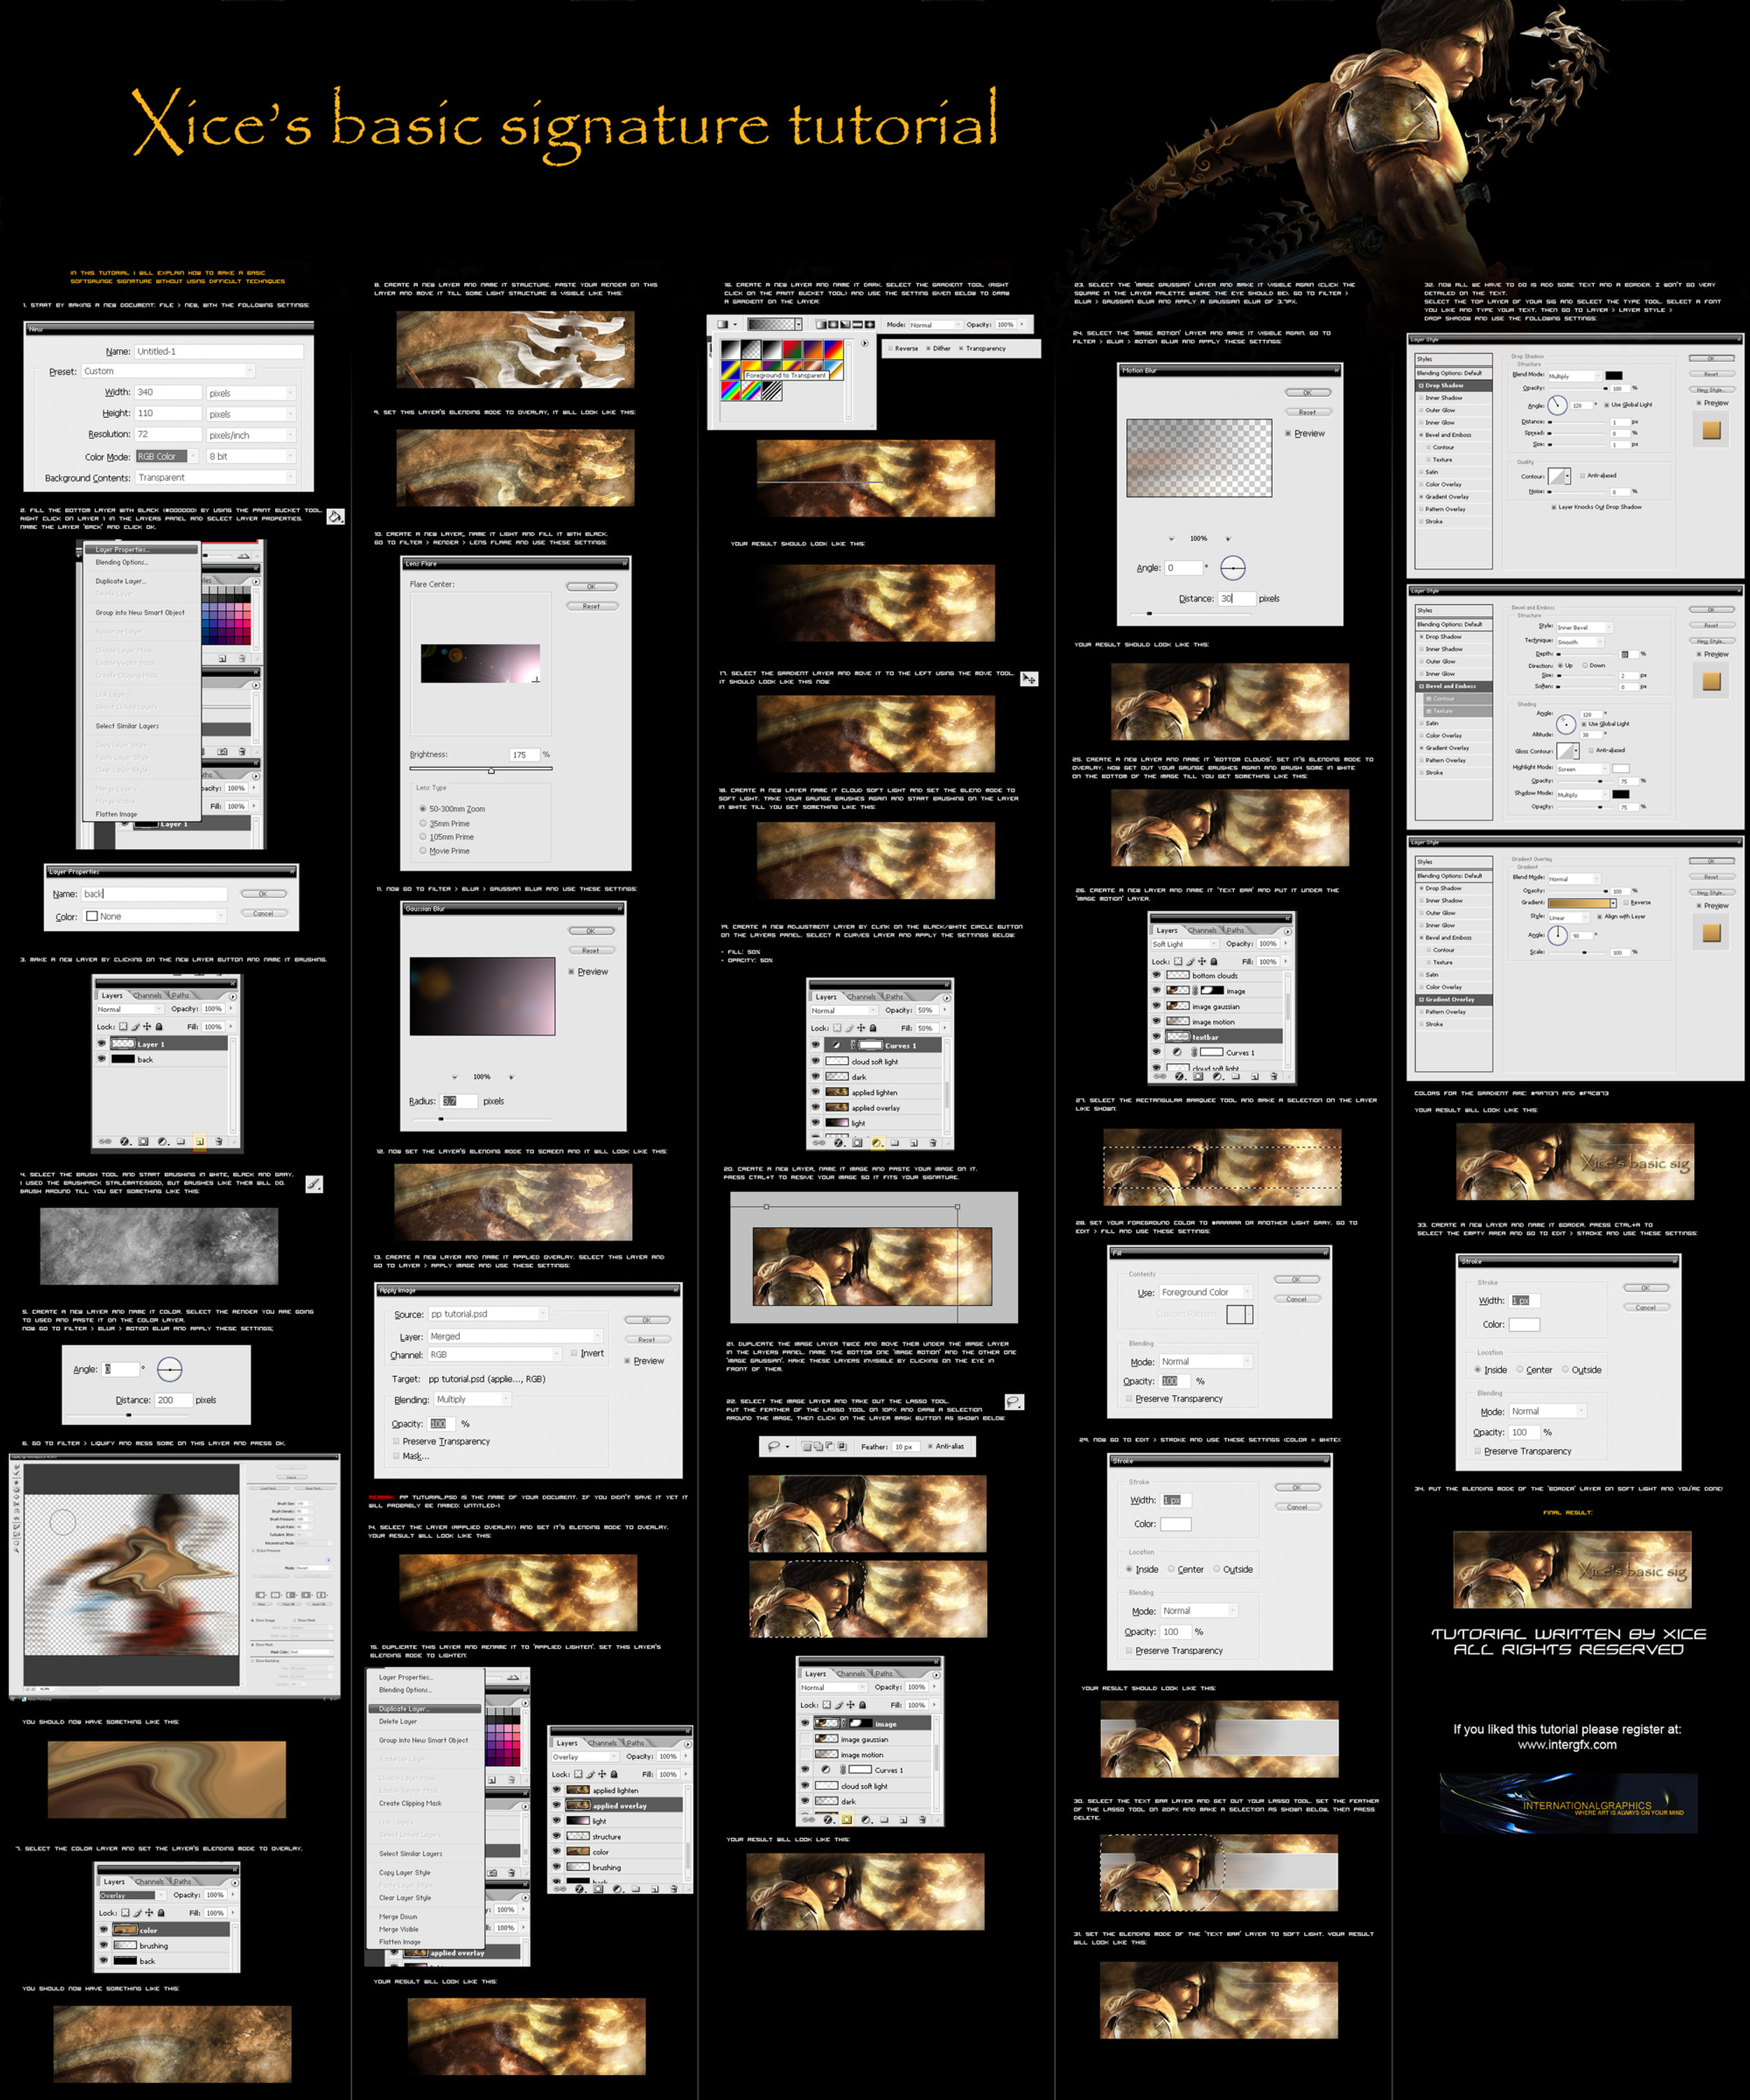
A tutorial made for people who aren't very experienced in signature making.It took me a few hours to make.
If you like it please visit [link]
note: this site doesn't exist anymore
Related content


Comments: 220

can't view it: "page not found", check your link
👍: 0 ⏩: 0

great tut but im having trouble on steps 11/12 after i use lens flare/gaussien blur (same settings as you have shown) the light is way to bright
am i missing something?
👍: 0 ⏩: 1
did you put the blending mode to screen?
Also if the light is too bright you can lower the opacity of that light layer.
👍: 0 ⏩: 0

woot... i wish ps 5.5 had all the features u used here tho... i had to omit some of the steps coz i couldnt do it
")
👍: 0 ⏩: 1
hmm.. i think you need photoshop 7 or higher to use all the features in this tutorial
👍: 0 ⏩: 0

hey man your tutorial helped out alot cheers for this
hope u can make more hehe
")
👍: 0 ⏩: 1

thats a nice tut man many members will love it!
👍: 0 ⏩: 1


Great job, Xice! ^_^ I'ma have to give this a shot at some point.
")
👍: 0 ⏩: 1


Yay, finally a decent sig tut!
This one rocks, it's the best signature tut I've seen in a long while
Wonderful, congrats!
Merry Christmas ^_^
And thanks for the tutorial


👍: 0 ⏩: 1
Thanks i'm glad you like it so much, i really appreciate the fav too.
Merry Christmas.
👍: 0 ⏩: 0

This has to be one of the most amazing sig tutorials I have ever seen. I finally know how to make a good sig!
My result: [link]
I followed the tut exactly (with the exception of the text), but now I can apply these techniques to web design and other things too!
Thanks so much <3

👍: 0 ⏩: 1
Thanks a lot for your comment and 
I really appreciate it, i'm glad you learned something from this.
I know the text isn't explained well in the tutorial  (Wink)")
Nice sig you have there, i like it  (Smile)")
Grtz Xice
👍: 0 ⏩: 0

omg, this tutorial really helpful, pls check my 'Pomo Sig', a sig that i just made for my fren with references from ur tutorial. Thanx alot man!!
👍: 0 ⏩: 1
you're welcome, your sig turned out nice, i'm glad this tutorial has been helpful to you
and thanks for the
👍: 0 ⏩: 1
no problem, and thanx for your comment.
I guess I had used a not too bright colour to overlay on top of the grunge background.
👍: 0 ⏩: 1
Yeh, you know, methods always give different results and it's not always very good, i've experienced that myself.
I like that Az-1 sig though, it's a bit more flashy, but that's fine.
👍: 0 ⏩: 1
thanks man! that means alot to me!
👍: 0 ⏩: 0

This is good! I learned a lot from it. Very good job man
👍: 0 ⏩: 1

I cant find renders like you used there, there is only like C4d renders, and for games. [link]
Sadness
👍: 0 ⏩: 1
hmm.. i'm sorry but i guess you'll have to look better or register on [link]
👍: 0 ⏩: 0
Okay thank you very much, ill try to find something. By the way, the last link doesnt work.
👍: 0 ⏩: 1

Xice Nice tutorial you made, very good. Im very new at making sigs, and stuff. But where do you get all your renders from ? Homemade or ? Those renders i got, there is a black background, which takes forever to cut out. So i wondered where you got the one you used in the tutorial.
Thanks.!
👍: 0 ⏩: 1
Hey, thanks a lot for your fav
some useful links for you:
planet renders: [link]
gamerenders: [link]
renderworld: [link]
You should be able to find something you like there.
👍: 0 ⏩: 0

Hey Xice, Great tut 

There is no apply image in my layer dropdown menu, what photoshop are u using? Im using photoshop CS and its not to be found, i really hope u can help me out
👍: 0 ⏩: 1
Apply image can't be found where you're looking.
What i mean in step 13 is that you go to the menu 'layer' in the top menu bar and in that menu click on 'apply image'.
I hope this makes things clear for you now.
I'm glad you like the tutorial and that you're trying it.
Grtz Xice
👍: 0 ⏩: 1
Oh, that't excacly where i looked, but maybe I didn't make myself clear because of my bad english (I'm sorry) but in the Top menu bar under the category "layer" the "apply image" just isn't to be found, I'm still wondering, what version of photoshop you use? I'm using the rather old CS version, but i'll get CS2 soon, will that solve the problem?
👍: 0 ⏩: 1
I have the CS2 version maybe apply image didn't exist yet in CS.
What you can also do is select all (ctrl+a) and then go to edit > copy merged and paste it on a new layer.
👍: 0 ⏩: 1
Ok, ill try that, thank you for the quick answer... i think ill get CS2 tomorrow anyways
👍: 0 ⏩: 1

Apply Image is in the menu "Image" in Photoshop 7
👍: 0 ⏩: 0

Very nice tutorial. But I wasnt sure how to do step number 8.
But, here is my result
[IMG][link]
👍: 0 ⏩: 1
nice result i like the car
as for step 8, you can't do that with every image .. only with images that contain a structure that is usable.
👍: 0 ⏩: 0

sweet tutorial !! ima try it later ^^
👍: 0 ⏩: 1
thanks
and thanks again for your
👍: 0 ⏩: 0

I tried it, and I'm pretty happy with the outcome. I didn't have anything good on my render for the structure step, so I just used a c4d. Here's what I got:
[link]
Great tutorial, I loved it
👍: 0 ⏩: 1
nice result, i'm glad you like the tutorial
👍: 0 ⏩: 0

Can you give me a link to that structure render?
👍: 0 ⏩: 1
<= Prev | | Next =>