HOME | DD
 Ausrif — Finder Sidebar for Explorer
Published: 2009-01-12 08:03:41 +0000 UTC; Views: 78094; Favourites: 91; Downloads: 23226
Redirect to original
Description
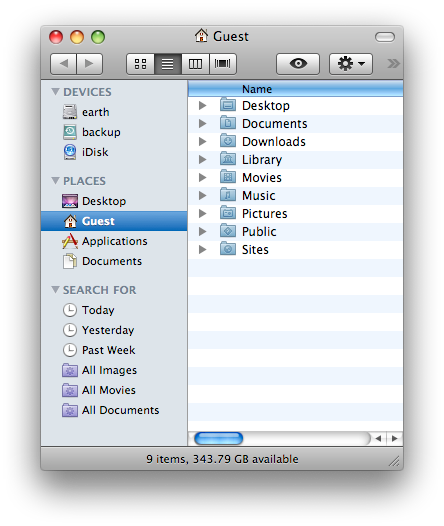
The sidebar steps up.Leopard brings new power to your old friend, the sidebar. Items are grouped into categories: places, devices, shared computers, and searches — just like the Source list in iTunes. So with a single click, you’re on your way to finding what you need.
Now you can have the same for your Windows operating computer! You might still not be able to rename your USB Flash Drive (or Removable Disk as Windows calls it) to your desired name, or have the search feature now included in Leopard's Finder but it will make your Windows Explorer Sidebar to Finder's Sidebar.
==========================================
THE BASICS
==========================================
You should not start customizing any other things if you do not even have the basics fully customized to look like a mac. This part will let you customize basic things like icon sizes, background color and text colors.
Once you installed FindeXer, go to View>Explorer Bar and select FindeXer. It will appear on the left, you'll notice that the icons and the configuration is not Leopard like. Right click it and select Findexer options.
Make sure your preferences is the same as shown below:
Make sure the following boxes are checked: No Titbar ! / Load FindeXer in Every Explorer Window by Default / Enable HotTracking. On the General tab, locate General Appearance and click Custom Color on the Background Color section. Set the color values to:
Red: 214
Green: 221
Blue: 229
Under Items tab-Data to be Displayed, select Use Both (If Available) and under General Appearance, use the following settings:
Item Size: 20
Item Font Color:
-Red: 60
-Green: 60
-Blue: 60
Item Font:
-Font: Lucida Grande
-Font style: Bold
-Size: 8
Open the Separators tab and use the following preferences under Separator Properties:
Line Style: Solid Line
Line Thickness: 1
Separator Width: 100%
Separator Color:
-Red: 214
-Green: 221
-Blue: 229
==========================================
ICONS AND DEVICE NAMES
==========================================
After getting the basics all covered up to look like those in Macs, start adding shortcuts and modifying them to show like those shown in the Leopard.
First of all, to add a shortcut just drag and drop the original folder or a shortcut to the FindeXer sidebar (this will not move or delete your folder, it will automatically make a shortcut of it.) Right-click the shortcut you wish to modify and select Edit. In the Name box, insert three spaces before your actual drive or folder name. This is done to force the drive name away from the icon similar to the Leopard Finder. Next, use any of the following default Mac OS X Leopard names:
Microsoft Windows------------Mac OS X Leopard
Local Disk (c:\)-----------------Macintosh HD
Other Local Disk (d:\)---------idisk
User Folder---------------------[User Name]
(My) Documents---------------Documents
Program Files------------------Applications
Desktop-------------------------Desktop
Recycle Bin----------------------Trash Can
Computer-----------------------[Owner's name]'s [computer name (e.g. MacBook, iMac, etc., for PC it's PC)]
More names can be found throughout Apple.com [link]
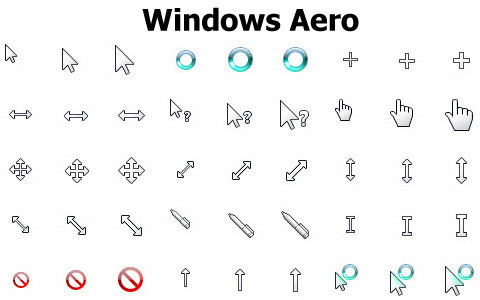
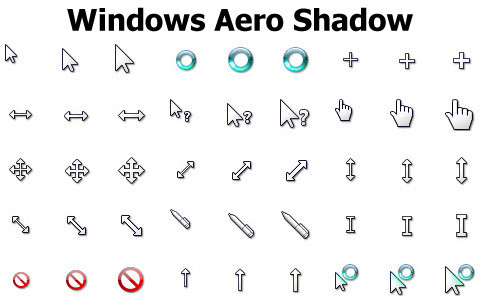
Check the Use Custom Image box and select the appropriate image or icon file from the file I have uploaded and after selecting an icon, click OK.
==========================================
EXPAND AND COLLAPSE BUTTONS
==========================================
Have you ever noticed that there are four expand-like buttons which allows users to see or hide shortcuts in that section?
Create four new shortcuts on the FindeXer sidebar by dragging any folder or file. Click Edit and erase everything that is in the Path bow so the box becomes blank. This will make the shortcut direct to your Computer. Next, check the Use Custom Image box and use Arrow01 if you are making it for an expanded style and use Arrom02 if you are making it a collapsed style. Select the Name box and change it to any of the following (make sure that neither one of these four shortcuts have the same name):
DEVICES
SHARED
PLACES
SEARCH FOR
Place these shortcuts where it is suitable or where it is shown here: [link]
==========================================
CREDITS
==========================================
RaatsGui
==========================================
Feel free to comment below.
Please tell me if you want to suggest a software or an application, I will try my best to get in the tutorial and you will be displayed in my CREDITS section. Please add this to your favorites if it helped you and don't forget to visit and check my userpage display for more transformation tutorials.
Related content


Comments: 64

Yes.. very good man but the expansion buttons don't work really ...ummm.... this in the only miss of this tutorial
ok that was awsome
👍: 0 ⏩: 1

I know, I can't find an extension for Findexer than can equip it with that feature. I'm still searching
👍: 0 ⏩: 0

do you know of anyway to make explorer look like finder for vista?
👍: 0 ⏩: 2
Sorry about my last comment, I accidently clicked send. what I meant to say is that ~ryaniss0beast said that it works good on vista
👍: 0 ⏩: 0
I'm still looking for more resources, for now try Finger XP: [link] , I don't know if its stable for Vista but ~ryaniss0beast
👍: 0 ⏩: 0
if you want it to be just a line, just click indexer options and select No frame on the -Set FindeXer Frame menu, that should fix the problem, if it still shows, I'm afraid there's nothing I can do.
👍: 0 ⏩: 0

K very nice and informative tutorial...but did you figure it out how to make the separator betwen Explorer and FinderXer be 1 pixel thick and black ?
Because i didint find only a way by changing the background of the wallpaper and changing the color of the Button/Dialog of my WindowBlinds skins.
👍: 0 ⏩: 1
I don't get what you mean, could explain it with more detail to me or show me a screenshot of your problem. It would be vey nice and helpful of you if you had both.
👍: 0 ⏩: 0

Wowwww!! awesome tutorial man!! I am currently using this configuration and I love, Thanks for this great tuto man
")
👍: 0 ⏩: 1

So the arrow buttons don't actually work, they are just images?
👍: 0 ⏩: 1
Actually, when you click it, it takes you to the My Computer in XP or Computer in Vista, but its in there only for looks.
👍: 0 ⏩: 0
<= Prev |