HOME | DD
 Blackbird97 — Kairi Icon Tutorial
Published: 2008-05-18 23:24:42 +0000 UTC; Views: 31503; Favourites: 239; Downloads: 1613
Redirect to original
Description
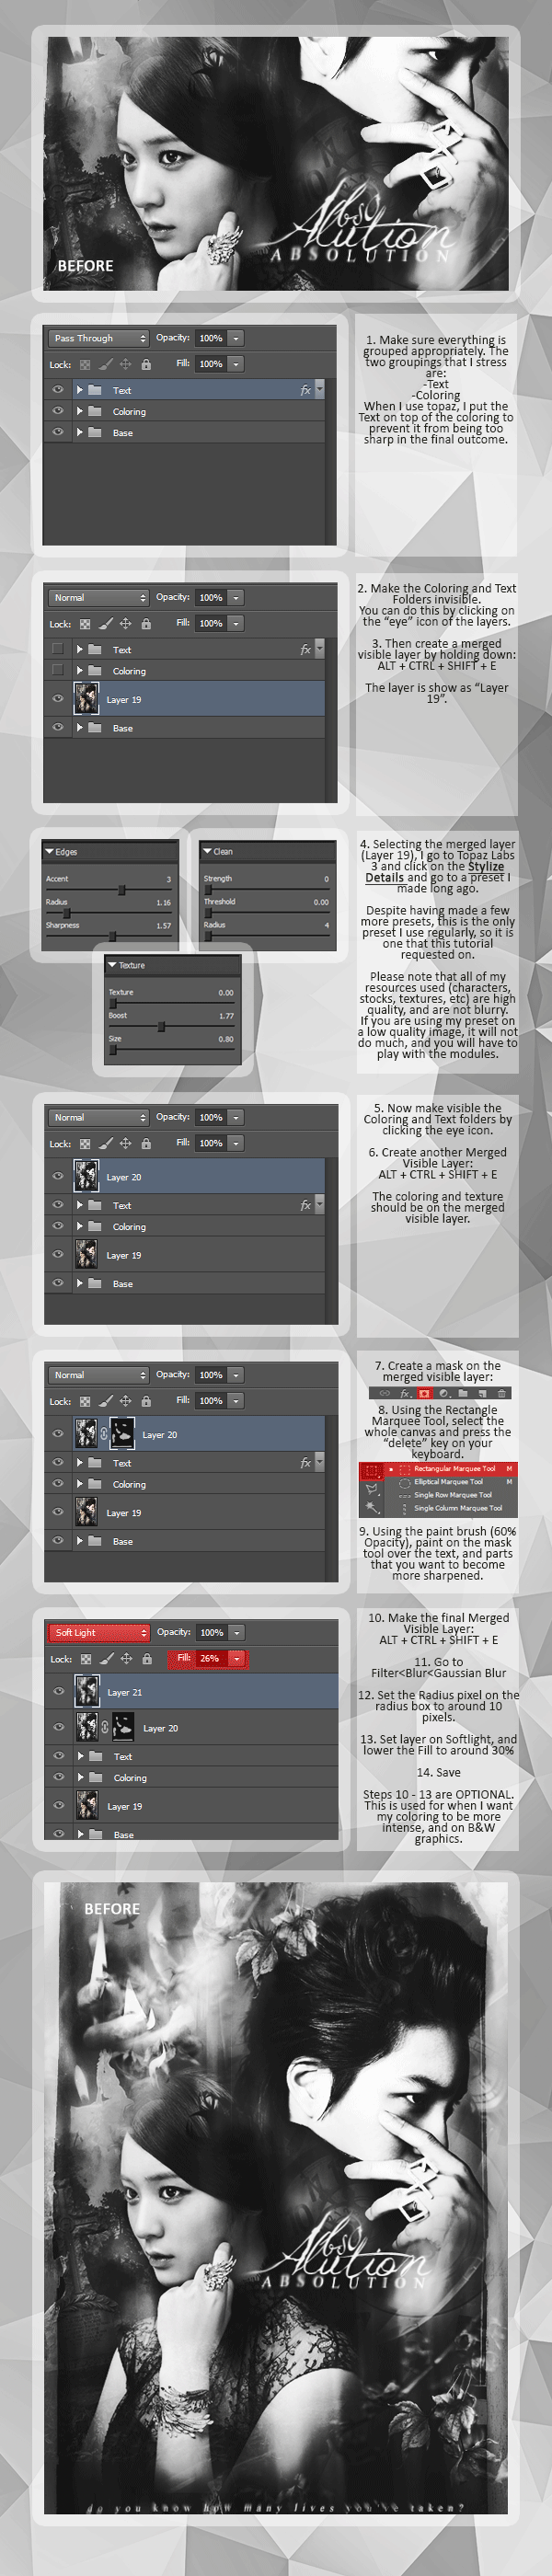
Just a simple tutorial for making a simple icon. Designed in PhotoShop CS2. You can find this and more at [link]Credits:
Kairi Image copyright Square & and Disney
2 Textures used from FEEL Designs
[link]
[link]
And I want to see your results, so post them! ^^
Related content


Comments: 47

love this! am i doing it right? [link] tell me if i need to fix anything, i'm barely a newb in this ^^
👍: 0 ⏩: 1

It might be a little bit on the small side, but it looks fine from what I can tell.  (Smile)")
👍: 0 ⏩: 0
I'm not sure what you mean. Do you mean how do you get the textures? You can simply paste in the tutorial itself after saving it to your computer, and cropping off what you need.
👍: 0 ⏩: 1
AvatarIsMyLife In reply to Blackbird97 [2012-01-29 22:35:59 +0000 UTC]
No, I mean what site or app or window do you go to do do all of this? Like, do I need to buy something or can I just look up a link and do this all? I'm new to deviantART and the whole computer animated stuff, so I don't really understand where I have to go to fix up and icon the way you put it in the tutorial.
👍: 0 ⏩: 1
Oh okay! This was made in Photoshop, and image manipulation program. That's a program you have to pay for, and it can run pretty expensive. However, there are free alternatives out there, such as GIMP, which is able to do many steps outlined in this tutorial and has tutorials that are specifically for it as well.
👍: 0 ⏩: 1
AvatarIsMyLife In reply to Blackbird97 [2012-02-03 20:25:31 +0000 UTC]
Oh! Thanks! Can you give me the link to that? I really want to try making my own icon for once instead of having someone else do it for me or me making a crappy one on a banner website. Thanks again!
👍: 0 ⏩: 1
[link]
It can seem overwhelming when you first start using it, but stick with it and you'll come to love it. Just google or search on dA for "gimp tutorials" or "gimp icon tutorials" and that should keep you busy. Also, many Photoshop tutorials, when it comes to icons, will also work for GIMP, if you know your way around the program
Also bear in mind that GIMP was the go-to for freeware image manipulation back when I started years ago, so there might be a better alternative out there I'm unaware of, so keep your eyes open. Photoshop is really the best way to go though, if you ever get the opportunity to obtain it.
👍: 0 ⏩: 1
AvatarIsMyLife In reply to Blackbird97 [2012-02-05 14:15:15 +0000 UTC]
Thank you so much! I'll go try to find that right now!
👍: 0 ⏩: 1

I think my outcome was quite good ")
[link]
👍: 0 ⏩: 1
Looks good! Glad you enjoyed the tutorial.
👍: 0 ⏩: 0

thank you so much for tutorials, i am gonna try, just question you wouldn't happen to still have the 2 texture image files would you? The links are broken.
👍: 0 ⏩: 1
Right, I mentioned in a comment before that you can actually save the tutorial itself to your computer and crop each of the textures out for use. If you need larger versions, I didn't have any to begin with, sorry, but I'm sure some searching on dA for various textures will come up with something. Good luck!
👍: 0 ⏩: 0
thanks for the awesome tutorial. i really need help to learn .
👍: 0 ⏩: 0


ACTUALLY NEVERMIND I WENT AND *ACTUALLY READ THE COMMENTS*.

👍: 0 ⏩: 0
When you say "make a new layer", do you mean to duplicate the old icon layer or will an empty layer work?

👍: 0 ⏩: 0

You wouldn't happen to still have the 2 texture image files would you? The links are broken
")
👍: 0 ⏩: 1
Yup, I have them on my comp somewhere, FEEL designs went down quite a while ago. Anyway, if you're just looking for those two, you could just crop them out of the actual tutorial, how it was intended when I provided them, or I can PM you a link to a zip file with the sets that I'd compile.
👍: 0 ⏩: 1
Oh a link to the Zip file would be great thanks
I wanted to use them for a signature so the copped ones wouldn't fit too well ")
👍: 0 ⏩: 1
Oh, well the originals I downloaded from FEEL were already 100x100. :\ You know, they're not too hard to make though if you want to try it yourself. For the first just blur an image with whatever settings you like and then use a texture like the second to get that flare effect. And to make one like the second, take a circular brush and adjust the scatter and opacity jitter settings, then blur it to your liking. Sorry I can't be of more help. xDD If I see any bigger ones like those I'll let you know.
👍: 0 ⏩: 1
Ahh it's okay ^^
I added in some C4D's in their stead ^^
This is the signature I got ^^
[link]
👍: 0 ⏩: 1
Wow, it's so crisp! I love it.
👍: 0 ⏩: 1
Thanks! I'd love to see your result. ^^
👍: 0 ⏩: 1

Ch-ch-check it out.  (Wink)")
👍: 0 ⏩: 1
Neat, congrats on your first icon! Maybe a little too oversharpened at the edges, but really great for a beginner. Hope you learned something from the tut, and continue your designing!
👍: 0 ⏩: 0

Sure, just remember to link back.
👍: 0 ⏩: 0

This was a very nice tutorial! I was able to come up with this:
[link]
👍: 0 ⏩: 0

Hi there,
Thanks, great tutorial! I was just wondering if you could tell me the name of that font you used, I love it and have been looking for it everywhere but can't find it! Thanks so much!
👍: 0 ⏩: 1
Ty. ^^ And no prob. The font is called 'Jane Austen' and it can be found at Dafont here: [link]
👍: 0 ⏩: 0

Awesome work!
I just don't understand steps 5 and 6. Can you be a little more specific on "make a ____ layer"? Like, it doesn't let me do the saturation thing on a transparent layer, and I'm a bit confused, so I'd be honored if you could explain that to me
👍: 0 ⏩: 1
Go to "Layer>>New Adjustment Layer..." and choose from there.
👍: 0 ⏩: 1
Well I feel silly.
This is an awesome tutorial :3
👍: 0 ⏩: 1
Thankies. ^^ Hehe, I'd love to see your result if you decide to try it!
👍: 0 ⏩: 1

^^ Will do. Probably will try it sig-side first. :3
👍: 0 ⏩: 0
