HOME | DD
 Blackout-Comix — Celestia WIP How-To Tutorial Part 2

Published: 2012-10-11 05:14:44 +0000 UTC; Views: 8541; Favourites: 196; Downloads: 112
Redirect to original
Description
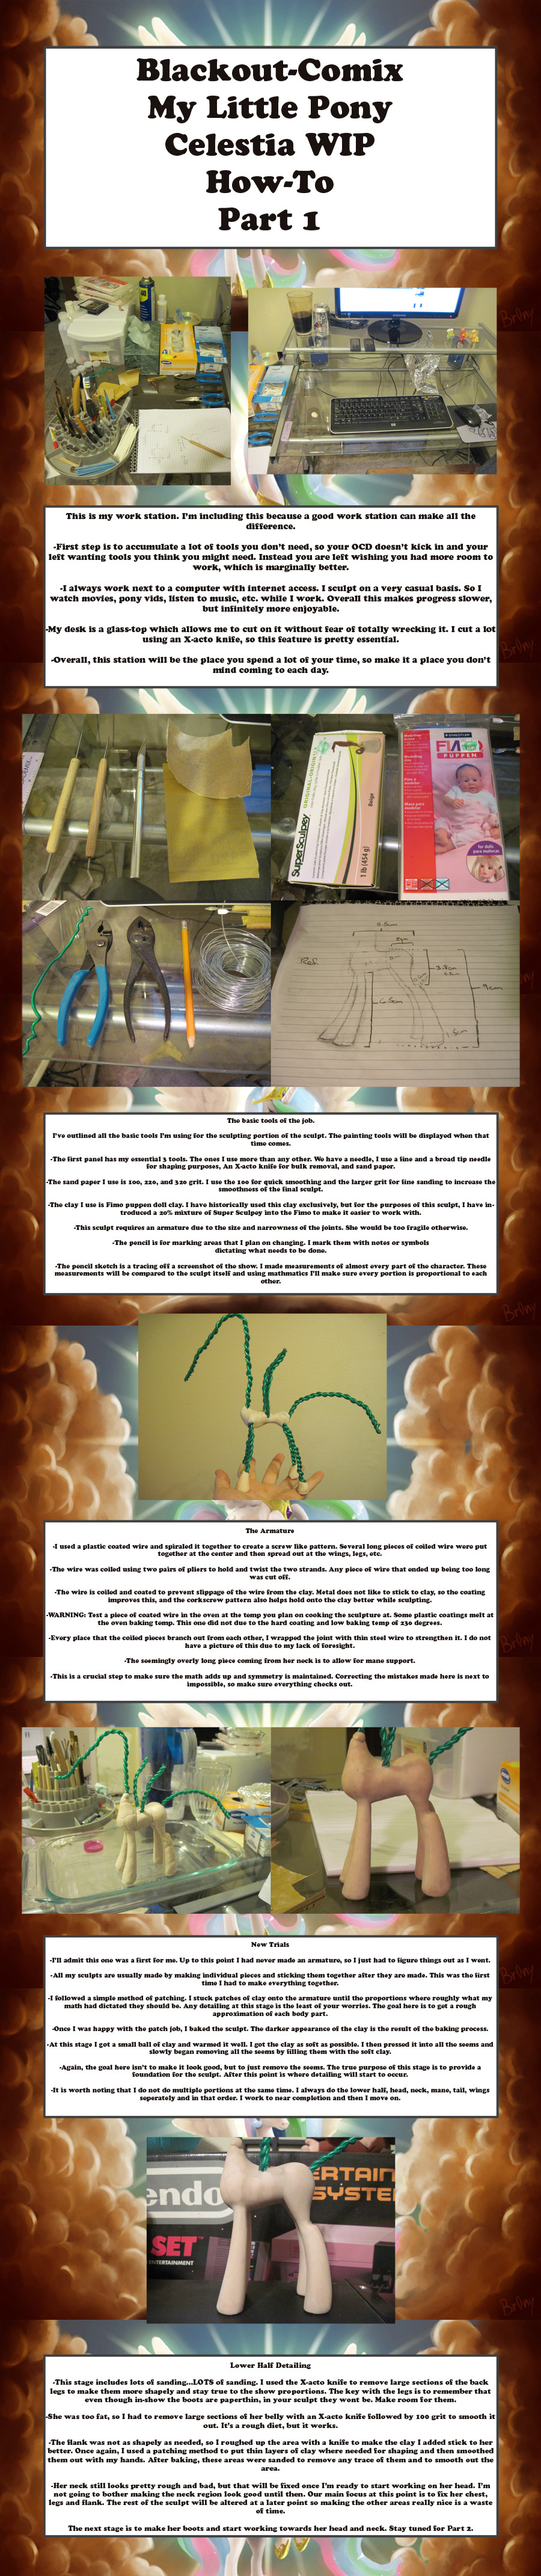
Today I have the second part of my upcoming Celestia sculpt. She is nowhere near done, but she's coming along nicely.I have been asked repeatedly to make a tutorial and since she's going to be my most involved and complicated sculpture to date, I figured it would be the perfect time to just get everything out. These multi-part WIP submissions should include everything I do when sculpting. I do not know how many parts this will end up being, but I'll keep making them until she's done.
I wasn't quite happy with this stopping point for Part 2, but there's going to be too much happening next to fit it all into a Part 2, so I decided to end Part 2 here.
If you have any questions feel free to ask.
Part 3: [link]
My Little Pony (C) Hasbro
Sculpture by
Related content


Comments: 30

I didn't try it yet,but you are making an awesome job!
👍: 0 ⏩: 0


Hello! I am a bit confused as to one step of your process. Do you bake Celestia again and again as you add those fine layers. You discuss adding the layer to smooth out the seems and then talk about sanding, but certainly you can't sand unbaked clay. So super-sculpy can be baked repeatedly? I am about to start my first project with it and I find these tutorials very interesting!
👍: 0 ⏩: 1

That is one thing I could have made more clear. The Fimo and Super Sculpey can be rebaked again and again as long as it cools completely between bakings. Super Sculpey has a tendency to burn for thin pieces, but the Fimo never does. This sculpt introduced a 20% mixture of Super sculpey into the Fimo. This made the Fimo easier to work with, but still maintained the full properties of the Fimo, ie strong, flexible, and doesn't burn. With this blend, I add small layers to the baked sculpt and bake it again. After baking, I sand down the area and add more layers of clay and repeat until I'm satisfied. The only trick is to make sure the the sculpt isn't too thick as to crack and cool enough before being rebaked. Hope that helps.
👍: 0 ⏩: 1
It did help! I only have super-sculpy to work with. Can I do the same or should I definitely go by some fimo? I am still new to the different clay types.
👍: 0 ⏩: 1
If you are wanting to have thin pieces such as a horn or spikes, then using my techniques will probably result in burning it. Part of the problem is that Super Sculpey bakes at 275 while Fimo bakes at 230. Fimo's unique nature coupled with the low baking temp never result in burned clay. If you want to avoid any issues with thin pieces, then I'd recommend picking some up, if you decide to use my techniques. If you are just wanting to practice, then I wouln't bother, but if you are wanting to make a full finished work that contains thin pieces, then I would. There are ways to prevent Super Sculpey from burning with thin pieces, but it's a huge hassal that involves wrapping the thin pieces with damp tissue paper for each baking.
👍: 0 ⏩: 1
I definitely need to experiment. Can you remind me again Im sorry. Was it fimo or sculpy that made up the base? And fimo or sculpey used to smooth. After that I am done with questions and will totally buy fimo today when I get paints from AC Moore.
👍: 0 ⏩: 1
I used the Mixture (Fimo/sculpey 80/20) for everything. I spent a good deal of time creating a large stock pile of the blended clay and used it for every aspect of the sculpt. If you have any more questions later, I'd be happy to answer them.  (Smile)")
Best of luck.
👍: 0 ⏩: 1
Ohhhh I see I see. You combined them to get the best of both properties and not have any burning or extreme bad stuff happened. I misunderstood that but reading back I see you said a 20% mixture etc. You are so obliging with your questions, it is very becoming
👍: 0 ⏩: 1
Absolutely. It's having your cake and eating it too. Best of both worlds they say.
Thank you. I try to help wherever I can.
ps: Just because it's a possible question later, use the bake time/temp for the Fimo. Even though you've added Sculpey to it, don't change the bake time or temp.
")
👍: 0 ⏩: 0

These are fantastic tutorials! (I've used the foil centers for the Luna I'm working!)
👍: 0 ⏩: 1
Thank you!
I've been asked by a lot of people to make a tutorial and since this is going to be my most complicated sculpt to date, I figured I'd just get it all out. Some people seem to be benefiting from it as well, which is great to hear.
Also thank you for the watch. I really means a lot!
👍: 0 ⏩: 1
The "Watch" was a no brainer! Your work and tutorials are going to change my work significantly!
👍: 0 ⏩: 1
Thank you! It's great to know these tutorials will be of use. If there's any questions you have that aren't answered by them, please feel free to ask. I always try to be available.
👍: 0 ⏩: 0

Lol, I'm trying to follow along and make my own Celestia. So far: wire structure with basic legs. So basically i've spent the last day fussing with the legs. I'm happy i saw how you used a foil core, otherwise i would have done a thick clay head! D:
👍: 0 ⏩: 1
Glad I could be of help. Don't worry about some steps taking a whole day to do. I cannot tell you how many times I wasted days just fussing with a single detail. You should send me a link to your Celestia when you're done. I'd love to see it.
👍: 0 ⏩: 2
by she, i mean my celestia, yours looks amazing.
👍: 0 ⏩: 0
totally just gave up. She looks awful, haha.
👍: 0 ⏩: 1
Mine did for the longest time too. I just kept working at it. Don't give up. I'm sure your next one will be better.
👍: 0 ⏩: 1
i had baked the celestia and realized no amount of xacto or sandpapering could fix it, so i scrapped and am now working on a luna.
👍: 0 ⏩: 1
Don't know if it would help or not, but I did basic ponies for the longest time. It was only recently that I even had the courage to attempt Celestia or Luna. If Luna doesn't work out well, I'd suggest trying the same techniques on a basic mare like Applejack. I personally would have found Celestia overwhelming earlier on. Either way, wish you the best of luck with Luna.
👍: 0 ⏩: 1
I've tried basic ponies too, but it just didn't work out and i haven't a clue as to why not. Funny to believe that Luna is surprisingly easy to me. Then again, i'm only up to her boots and necklace...
👍: 0 ⏩: 1
That's great to hear. I'm glad she's going well. You'll have to send me a pic, I'd love to see her.
👍: 0 ⏩: 1
Well here she is so far... [link] I can assure you she looks much better in person, and she still needs her wings and tail.If you can offer any advice that would be awesome, as this is one of my first successful pony sculpts.
👍: 0 ⏩: 1
Thank you for sending me the pic.
First thing I need to know though. What clay are you using? Any advice I could offer hinges on this question since each clay I've encountered acts differently from all others. After knowing that, I'll be able to offer some advice.
👍: 0 ⏩: 1
I'm using sculpey original. I am a little worried about how her ear is slightly burned.
👍: 0 ⏩: 1
That's the problem with Sculpey Original and Sculpey III clays. Baking them repeatedly is usually not a great idea. Even Super Sculpey has a tendency to burn with thin pieces. The Fimo clay I use never burns and as long as it cools completely between bakings, can be rebaked again and again. It wasn't until I made the jump to using Fimo that I really began to notice an improvement in my sculpting. The real trick to getting polished results is repeated bakings with sanding and small clay additions inbetween, which requires a clay that can really handle it.
👍: 0 ⏩: 1
Thanks! I'm almost out of sculpey anyways, so my next Micheals raid will include lots of fimo...
👍: 0 ⏩: 0


You do a lot of math!!! That's crazy!
But it's sure worth it!
👍: 0 ⏩: 0