HOME | DD
 BlazeTBW — How To SA Style Pt 2: Coloring

Published: 2007-03-06 23:21:56 +0000 UTC; Views: 32726; Favourites: 888; Downloads: 0
Redirect to original
Description
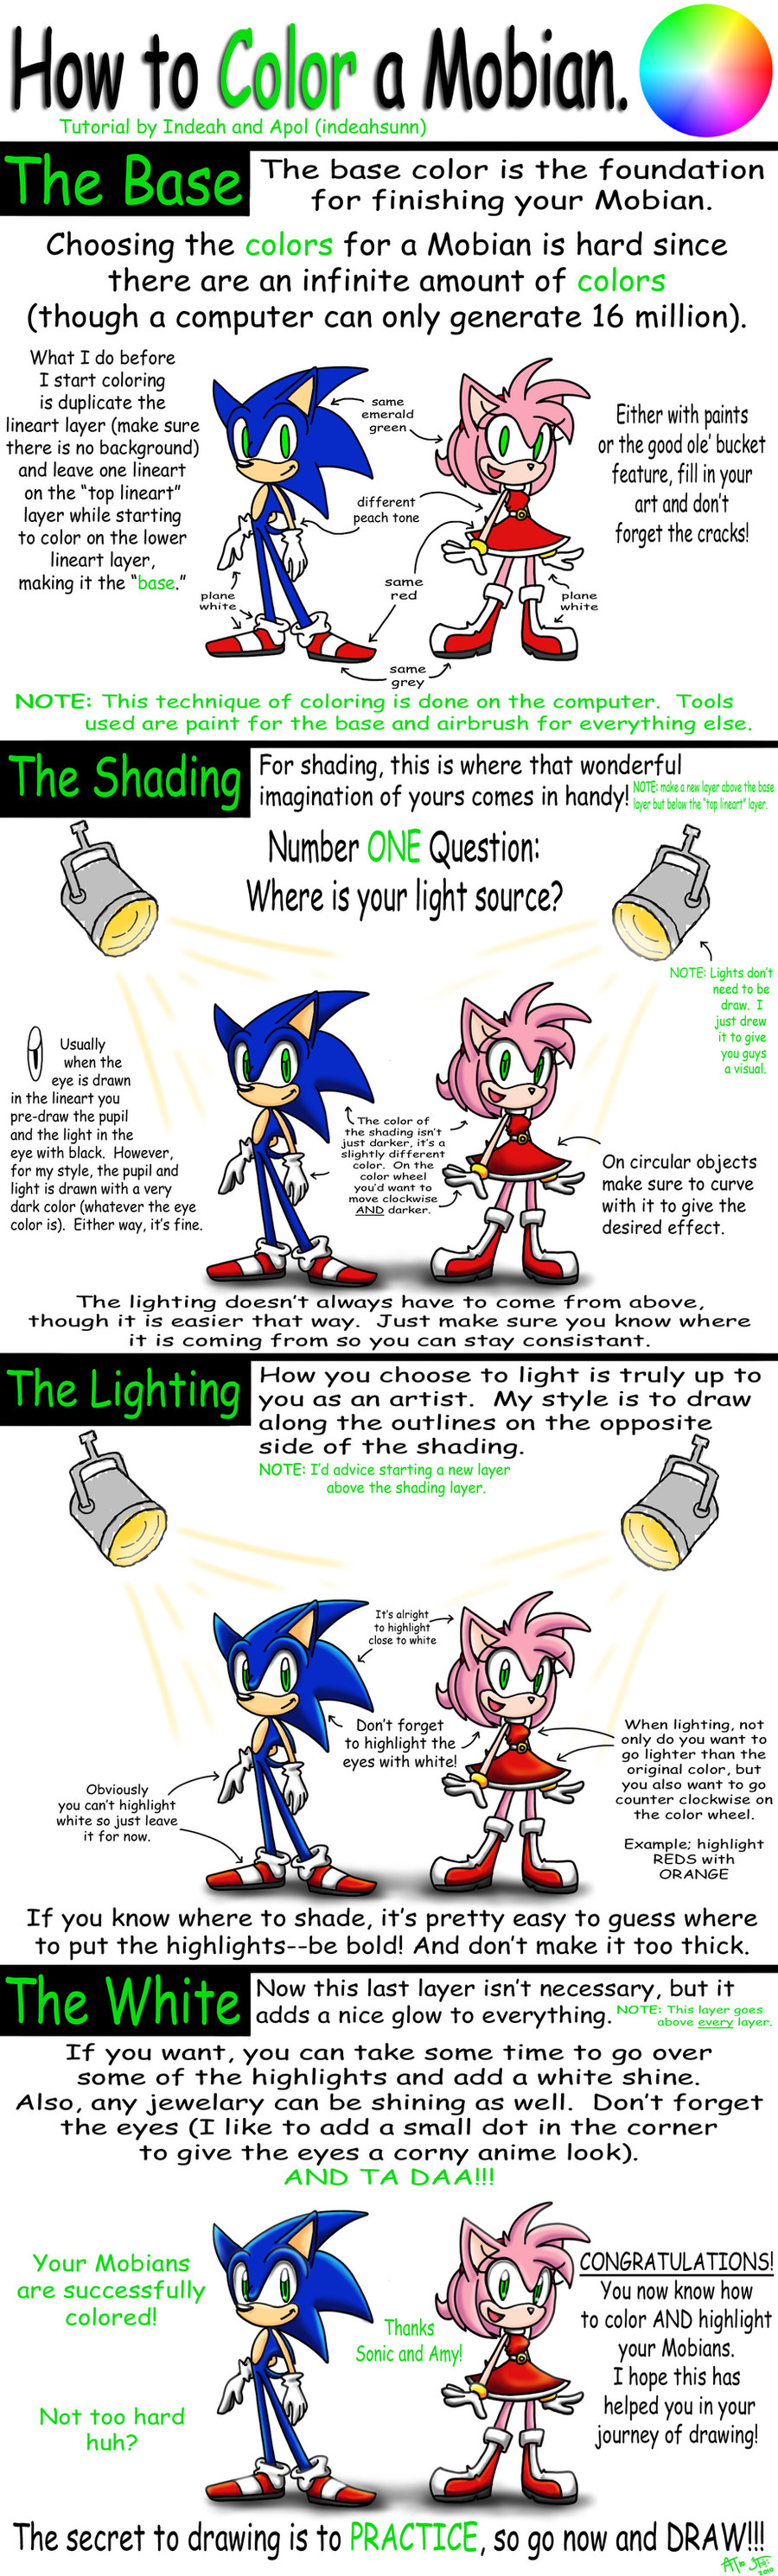
I would've had a preview pic here if I knew how on the new submitting page. But because it is a PNG file...it no let me... until I figure it out. For those that do use this tutorial at all or find it useful, please by all means fave it.
After a long...long...long time a waiting (and me putting it off) PART FREAKIN' TWO!!
Please do not steal the pictures of Silver.
WARNING: It's alot more words than part 1.
Again...I advise you read it through first before putting it to use. I tried to make it as easy to understand as possible. So those that are super-advanced in Photoshop CS or higher...don't bug me.
Also...I didn't make that change like I said I would in Part 1. If you don't know what I'm talking about...
 that's fine and dandy!
If there are pieces of this tutorial you do not understand, please refer to Part 1 of the tutorial.
Click here to view Part 1 - How to Outline SA Style
If you're still lost and Part 1 didn't help, feel free to ask.
Tutorial ©
Style © Yuji Uekawa
Silver the Hedgehog © SEGA/SonicTeam
Related content


Comments: 258

As it says in the description in part 1, you have to click "Download" to see it.
👍: 0 ⏩: 1

Wait what? I tried to go to part one, but it gave me a 404 error. I don't know if it's just me being stupid?
👍: 0 ⏩: 2
Sorry about that, I had it in storage. It's back up now.
👍: 0 ⏩: 0
Huh...strange. I've never encountered that before. I'll check in on it.
👍: 0 ⏩: 0


I've having a real hard time with the highlights in my artwork. Whenever I try to use the pen tool to select an area for highlighting, and color it in with the brush (like what you have shown above in your tutorial), it NEVER wants to highlight. When I go to paint the highlight, the color either won't show up (except on a different layer other than the the one I made for highlighting), or the color won't stay in the selected line(s) (it keeps spilling over the lineart and covering it up at the same time, kind of like that example you showed in Here's the Difference!). I want to get it so where the color will say within the lineart and the selected pen tool lines, but nothing's working, and I've tried looking on youtube and other tutorials, and doing what you suggested here. Do you know what I'm doing wrong? I'm a beginner at this sort of thing, and I'm at my wit's end trying to figure this out....
👍: 0 ⏩: 1

What program (on the off chance it's not Photoshop) and version are you using?
👍: 0 ⏩: 1
Oh no, It's photoshop all right, version CS6 to be precise.
👍: 0 ⏩: 1
👍: 0 ⏩: 1
Well, to tell you the truth, I actually started coloring before I came across my little problem, and so no, I haven't grouped my layers in the order like you described above. But I don't have that many yet, as I had to delete a few due to problems, but if I aline my layers in that order, then I have to apply/add clip masking? I'm not sure what that is, and sorry if I sound like I don't know what I'm talking about here, I'm a fresh newbie when it comes to digital art

👍: 0 ⏩: 1
 (Smile)")
The clip-masking can be done at any time, all that does is mask off the layer above it to only affect the area from the lower blow it. In a nutshell, if the lower layer has a square, but you make something that's bigger than the square in a layer on top of it, then group it, it'll show everything from the above layer, but restricted to the shape square (not a folder, but it'll be under Layer > Create Clipping Mask ).
...
If not then,
👍: 0 ⏩: 1
Okay, I'm not entirely sure if I get that or not, but that won't stop me from experimenting and trying it out! ")

Okay, I'll talk this down to a science here, so you can (hopefully) follow along easily
I get out the pen tool and make a path, selecting an area slightly within the black lineart border where I want my highlights to go, and leading the rest of the path outside my lineart where I connect the ends to make a full complete path (where it gets ride of those little square dots as soon as you connect the other end). Sill on the pen tool, I then right click and click "make selection" in the options menu that pops up, and click "ok". And then I get the black-and-white moving line, or the "marching ants", as you say. If I try to color in that path line(s), nothing happens. No color, no highlights (and I'm on a layer that I have titled for that purpose, yet nothing). This has been going on for a while now, and I have no clue in the free world on how to fix this.
👍: 0 ⏩: 2
Ok let's see...from what I've read around, it looks like when you turn your path into a selection, that selection had become inverted. An inverted selection will basically let you color/manipulate anything outside of the selection.
A simple fix would be Select > Inverse. A way to avoid having to do that all the time though has to do with what you do before you plot down your points.
According to this answer I found- [link] it's a simple fix.
As far as I know, when you're in your pen tool doing your path, you have 4 settings that are the following and what they look like as buttons on top where you would adjust your brush size (when you're not right clicking):
- Add to path area (+) two squares together
- Subtract from path area (-) an invisible square in front of a solid square
- Intersect Path Areas two invisible squares making a smaller solid square between them
- Exclude overlapping path areas two solid squares making an invisible square
The above are buttons listed from left to right in that order.
When you're making your path, you may have it set on the 2nd one, and you just have to change it to the first one, and you shouldn't have to keep going to inverse your selection whenever you use it.
👍: 0 ⏩: 0
And oh, I might want to add I DID try selecting that "load path as a selection" button, but alas...nothing happened
👍: 0 ⏩: 0

Cool ,this will be perhect for this Rouge outline I'm doing! Finally...I can shade the SA way.
6 years later, and this tutorial is still useful.
👍: 0 ⏩: 1

...and that it's some how not completely outdated lol.
👍: 0 ⏩: 0


Your tutorial was extremely helpful!
👍: 0 ⏩: 1
👍: 0 ⏩: 0

I love you I love you for making this!
I finally understand Photoshop colouring! Thanks for actually making a tutorial and not just putting a bunch of pictures and assuming everyone knows what you're saying, like most "tutorials"!

👍: 0 ⏩: 1
|D; I'm just happy people are still finding this useful after 5 years lol
👍: 0 ⏩: 1
It's amazing how long it's been around ^-^ Thank you again!
👍: 0 ⏩: 0

when we're doing the first and second step of highlighting, are we on the outline layer or the fur layer?
👍: 0 ⏩: 1
When you have your shapes of where the highlights are going to go, and they are as a marching ant selection, according to this tutorial you should be on a separate layer altogether.
The highlight color and the darker part of the highlight would be on two separate layers, completely separate from either the outline or main body/fur color layer.
👍: 0 ⏩: 1

Um wow thats cool i really like that highlighting is there a way you could make it simpler? like i got confused when you were explaining it
👍: 0 ⏩: 1
I've never used GIMP so I wouldn't know how different it is.
👍: 0 ⏩: 1
Oh wait so that wasn't for GIMP? oh sorry
👍: 0 ⏩: 1
S'right~ We all misread here n there.
These tutorials were originally meant for Photoshop, however I don't doubt that there are some similar tools in GIMP to achieve a similar effect~
👍: 0 ⏩: 1
yeah thanks
👍: 0 ⏩: 0


How do you get the sketch on the program? I can't draw on Paint or any computer feature really...and do you need photoshop for this?
👍: 0 ⏩: 1
The sketch was scanned in.
This tutorial was made for using Photoshop 7 and newer, but other programs and their tools can be used in a similar way. However not all programs are alike so it's more a matter of understanding the program you're using and adjusting accordingly.
It can be done in Paint, but it will take a lot longer and a better understanding of colors if you want it to look smooth enough.
👍: 0 ⏩: 1
How do I scan it in? Sorry, never done this before...
Okay, thank you!
Alright, great, I've been working with Paint for a while!
👍: 0 ⏩: 1
Well, usually you need a scanner.
However if you're really really really good with a digital camera (and can connect it to your computer)- and can find a well lit flat surface- and have steady hands- that could work too.
It will most likely not be as clean or visible as with a scanner, but it can be done.
Then you import the image into Paint and start your work. However in Paint you'll have your work cut out for you considering you won't have any layers to work with to make it easier on you.
All in all though, I wish you the best of luck in conquering that~
👍: 0 ⏩: 1
OKAY THANKS!
Whoops, sorry left caps lock on again. I'll try it out tomarrow, thanks for the tips and all that!
👍: 0 ⏩: 0

im still not understanding the "the final shading" its like really hard to understand
👍: 0 ⏩: 1
In short, you're doing a bit of "flat shading".
New Layer > Set layer to Mulitply > Use a plain brush or which ever with a gray-ish or other color of choice.
And ref from official SA style works to get a better idea in terms of placement.
👍: 0 ⏩: 1
ohh i see so what should i put that under my outline or my colors?
👍: 0 ⏩: 1
Under your outline and above your colors- kinda sandwich-like~
👍: 0 ⏩: 1
hmm... i see do i group it with something like with my outline?
👍: 0 ⏩: 1
Technically you don't really have to group it with anything, it can be stand alone.
But don't group it with the outline or else things won't turn out how you want them to most likely.
👍: 0 ⏩: 1
so just put it between color and outline?
👍: 0 ⏩: 1
well thank you so much for helping me you have a golden heart you know anyways thank you
👍: 0 ⏩: 1
Well I wouldn't say that, but it helps that you were patient with me~
Hope it works out for ya.
👍: 0 ⏩: 1
oh it will thank you! thank you so much! ^^
👍: 0 ⏩: 0

| Next =>