HOME | DD
 CanineHybrid — Darts/Pattern Guide for Creature Suits
Published: 2013-08-16 12:15:30 +0000 UTC; Views: 23366; Favourites: 402; Downloads: 84
Redirect to original
Description
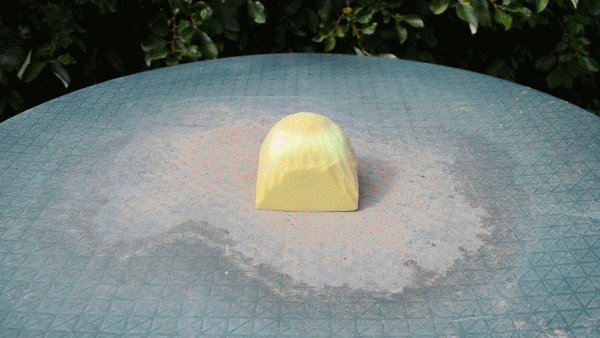
This was a gif that and I made as part of our Beginner Creature Costume panel presentations we host at fan conventions. I thought I'd share it here to add to a collection of useful tips and tutorials for people unfamiliar with the art of costume making. This is a demonstration of what happens to duct tape patterns on round surfaces.Darts
A dart is a sewing pattern term referring to a triangle shaped notch that when sewn together helps provide a three-dimensional shape to a garment. Many sewing patterns include these notches on key areas, particularly at the bustline in women's clothes, to make them more fitted.
One of the most difficult tasks in constructing a creature costume, the head in particular, is figuring out how to sew together the fabric so it fits perfectly on such a unique and organic shape. This is accomplished with seams and darts, which without a visual example or experimentation, is difficult to explain. The concept is this: your fabric is a flat plane of cloth that needs to wrap around a 3D surface, therefore the goal is to translate your patterns from something that is round to something that is flat in order to cut it out of the fabric.
There are many tutorials that cover how to pattern a head, but I'm going to share a few of the basic tips:
1) Duct tape is used to duplicate the surface area of your mask, foot, whatever you've sculpted that you want to cover in fabric. Duct tape is sticky and can stick to or damage your foam sculpture when you go to remove it, therefore it is recommended that you put down a protective layer of cling wrap first.
2) Use smaller pieces of duct tape to preserve more details and be very careful not to tape too tightly or it will compress the foam, making your patterns come out too small.
3) Clearly label each and every piece with a useful name, L/R, and arrow for nap direction (direction the fur fibers lay, from the tip of the nose down the body and out of the limbs) Using white duct tape and color coded sharpies can make it easier to read and plan your pieces. Be sure to take a photo of it in the taped stage for reference on how the pieces fit back together.
4) When transferring the patterns to your fabric, make sure you lay the piece with the shiny side down and the sticky/cling wrap side up. This is because the shiny side represents the side that has fur coming out of it, and you're drawing your pattern on the backing of the fur.
There's no universal way to pattern a head, here are a few different examples:
Unfortunately, your sculpture is unique to your project alone and you can only understand the best way to pattern it after experience trying. You want to try and visualize where you might need a seam along an edge to make round shapes flat. Markings and color changes in the fabrics make forceful pieces and those should be planned out first, then decide how best to break up the shapes into flat pieces. Darts are much harder to pre-plan for and often just sort of happen after you've already cut your duct tape off and are trying to lay your pieces down flat onto the fabric for tracing when you find that it won't unless you are bunching up the fabric to fit it- that's when you need a dart to help make it flat.
If there are any more questions about it, feel free to ask below and I will help you out or add it to the description here!
Related content


Comments: 12


I was trying to make a pattern for my handpaws, and I struggled getting it to lay flat. I cut in several different places, trying to experiment to get it to lay flat, but it just refused. Is there a way to tell where you need to cut to get it to lay flat?
👍: 0 ⏩: 0

I think I'm struggling a little to thoroughly understand this. Any tutorial I've read or watched regarding cutting and sewing darts implies or tells you to cut them out in a triangle as opposed to a single inward cut from the edge of the material (fabric). If I'm to simply cut a single straight cut into the fabric, do I sew it back together upward, or just so straight across to the other side in order to get the curve? I apologize, maybe I'm overthinking this but understanding darts has been giving me a bit of trouble. I hope you can find time to reply!
👍: 0 ⏩: 0

This just opened a whole new world and way of doing stuff for me. O_Ô
HOLY FFFFFF this is genius!
Yaas thank you so much
Goodbye free time, my craft projects that seemed too complicated and impossible to do need me!
👍: 0 ⏩: 1

Hahaha- I'm thrilled to hear that! Best of luck with this new technique!
")
👍: 0 ⏩: 0


very cool way to show it. I have more troubles with darts for curves XD
👍: 0 ⏩: 0

")

Eeeeeee! I've been featured here, I feel honored ; u ;
👍: 0 ⏩: 0

At last helpful pictures and explanations on how to make a head. Thanks to this Im astep closer to being able to do costumes ^^
👍: 0 ⏩: 0

Im making armor for Baltimore Comic-Con but ive always wanted to try this! Yay! Thanks!
👍: 0 ⏩: 0