HOME | DD
Published: 2008-12-31 01:35:14 +0000 UTC; Views: 106934; Favourites: 1783; Downloads: 2193
Redirect to original
Description
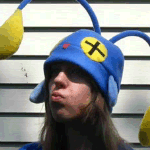
Pattern: [link]Basic fleece hat tutorial: [link]
You guys better love me for this, because this took waaay longer then it should have. T_T
This is for my curved ear-flaps, but feel free to make them square, long, pointy or whatever tickles your fancy.
 (Smile)")
Tutorial (c) clearkid, Do not republish without permission.
Related content


Comments: 187

👍: 1 ⏩: 1

👍: 0 ⏩: 0

Hello and thankyou for your tutorial! My question is I would like to make a "Gnome Hat" that comes to a soft point AND with a berber fleece brim & ear flaps (that are nicely rounded)....much like a Lumberjack Hat? I would like to sew this keeping it as simple as possible with perhaps the berber portion sewed inside just enough so when the hat brim/ear flaps is rolled up that you think the whole inside of the hat is lined with the berber? Am I asking too much here, do you think? Perhaps you could direct me to a simple hat pattern that could be blanket-stitched close at the back? Thankyou....
👍: 0 ⏩: 0

Thank you for this :3 I want to make a shiny Salamence-themed hat as well as one based on my dragon character so this is very helpful ^^
👍: 0 ⏩: 0

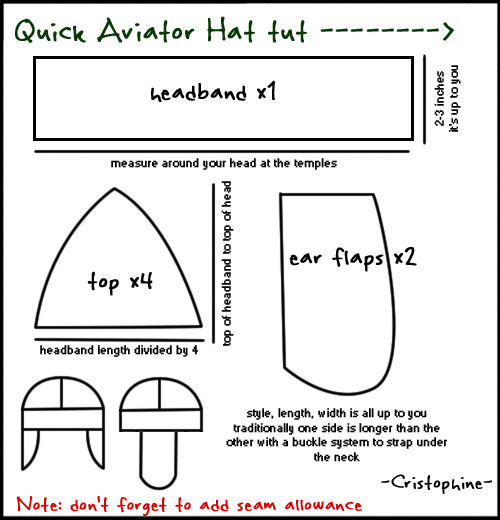
The pattern is made of 2 pieces, so it can be printed on a single sheet of Letter size paper. Once you've taped it together, treat it as a single entity called "the pattern". Look at the drawing of the fleece in Step 3 and you will see where the pattern is flipped "at the skinny end" to draw the other half of each piece. You will physically set the pattern down on the fleece 4 times, but only cut 2 pieces. Does that make sense?
Alternately, you could print the pattern page twice, and tape it all together so you didn't have to flip it to trace the whole thing.
👍: 0 ⏩: 1

Yes, I'm currently making my hat based on this tutorial (total begginer in sewing T_T) and it looks good :33
👍: 0 ⏩: 1

Cool I am a beginner as well
👍: 0 ⏩: 0

Thank you for your tutorials, they've helped me make a lot of hats. Im working on a jiggly puff one righ tnow.
👍: 0 ⏩: 0

So I clicked it, it was 100% so I am thinking I might have to blow it up to 110% to make it 12.5inches Cause its hardly even linking to 12 inches T.T
👍: 0 ⏩: 0

I have used your pattern to make many hats (Thanks!) and thought you might be interested to know that I just came across this blog and thought it looked like your work, so I hunted your pattern down again, and sure enough, it has to be your work she is passing off so cheerfully as her own--Tracy's Treasury.
[link]
👍: 0 ⏩: 0


Lol i'm making a Nepeta hat too
👍: 0 ⏩: 1


makin Nepeta hat for my cousin....its legit the night before the con XD
👍: 0 ⏩: 1
it worked! omg im so proud haha thank you for this!
👍: 0 ⏩: 0

Love the pattern and instructions! I worked all last night to make a dragon hat and im pleased with how it came out, well mostly, I added horns on it and although I stuffed them the fall to the side away from my head. Besides that im happy with it and ill add a pic as soon as I can. Thanks for the pattern for this and the hat!
👍: 0 ⏩: 0

Thank you for all your fleece hat tutorials/patterns.
I'm going to make an attempt at a hat sooner or later.
👍: 0 ⏩: 0

These tutorials are going to be so helpful when I make this hat [ [link] ] for my friend for Christmas! Thanks so much
👍: 0 ⏩: 0

No wait ")
👍: 0 ⏩: 0

can you posably send me the pattern for the top part of the hat?
👍: 0 ⏩: 1

Would the pattern for this make flaps like in your hat here? [link]
👍: 0 ⏩: 1

I love you for it. lol You are what started me making hats! ^^
👍: 0 ⏩: 0

I did something wrong, but, that's what test hats are for anyway. XD I see what I did and know how to fix it. (Well, not on the test hat, but, you get what I mean)
👍: 0 ⏩: 0


do you think i could make those ear-flaps longer? e3e
👍: 0 ⏩: 0

Quick question! Is the front pattern piece supposed to be smaller than the back? Thank you for taking the time to make this tutorial though c:
👍: 0 ⏩: 1


Thank you for the pattern and tutorial! C:
[link]
👍: 0 ⏩: 0

What does it mean, fold? I know that sounded a little stupid, but I've been making hats without ear-flaps for hours now and I'm a little sleepy..
👍: 0 ⏩: 2

Fold means that edge that says "fold" goes over a folded edge of the fabric you are cutting. That way, when you have your finished piece, instead of getting two pieces, you will have one long piece that is attached at the "fold" part.
Maybe this can better explain it...lol. :3
[link]
👍: 0 ⏩: 0
Fold means that edge that says "fold" goes over a folded edge of the fabric you are cutting. That way, when you have your finished piece, instead of getting two pieces, you will have one long piece that is attached at the "fold" part.
Maybe this can better explain it...lol. :3
[link]
👍: 0 ⏩: 0

Yay! This was really helpful for the hat I wanted to make! I adapted your pattern to make this hat [link] Thanks a bunch.
👍: 0 ⏩: 0

this is rlly helpful
im making hats to sell at otakon and i wanted to do 1 with earflaps but i thought itd b to hard
👍: 0 ⏩: 0

How do we do it so our hat looks like a bunny?
👍: 0 ⏩: 1
Oh wait,figured it out.
👍: 0 ⏩: 0
clearkid In reply to Airlesse [2011-07-06 15:29:21 +0000 UTC]
You'd sew a long rectangle into a tube, make a tassel and sew it to that to make the stings first. Then you'd take the tops of both strings and before you sew the front and back band pieces together, sandwich the end of the string between them with the tassel end flush with the bottom of the curved flap and the string sticking up out of the top not down. Then you'd sew along the whole thing and turn it right-side-out and sew it to your hat.
👍: 0 ⏩: 0

Oooh I have an idea.
Just matter of opinion <3 but I think it would work.
👍: 0 ⏩: 1

That's such a cool idea! Thanks for the help!
👍: 0 ⏩: 0

This was amazingly helpful! I got a near perfect beanie in the very first try, and I both altered the pattern and was working with difficult fabric. This is a lovely pattern, thank you so much for sharing!
👍: 0 ⏩: 0

If I get the money for fleece, Ill make one of these wonderful hats and link back to you love, Gahh i love sewing >w<
👍: 0 ⏩: 0

Aaaah, I get it up until step 6, then my brain just shuts down... what comes after folding the band right-side-out? I sort of get it but not really -slow at processing sorry-
👍: 0 ⏩: 1
| Next =>