HOME | DD
 dust-bunny — Sizer's Helmet Tutorial

Published: 2011-02-25 16:13:12 +0000 UTC; Views: 10077; Favourites: 189; Downloads: 67
Redirect to original
Description
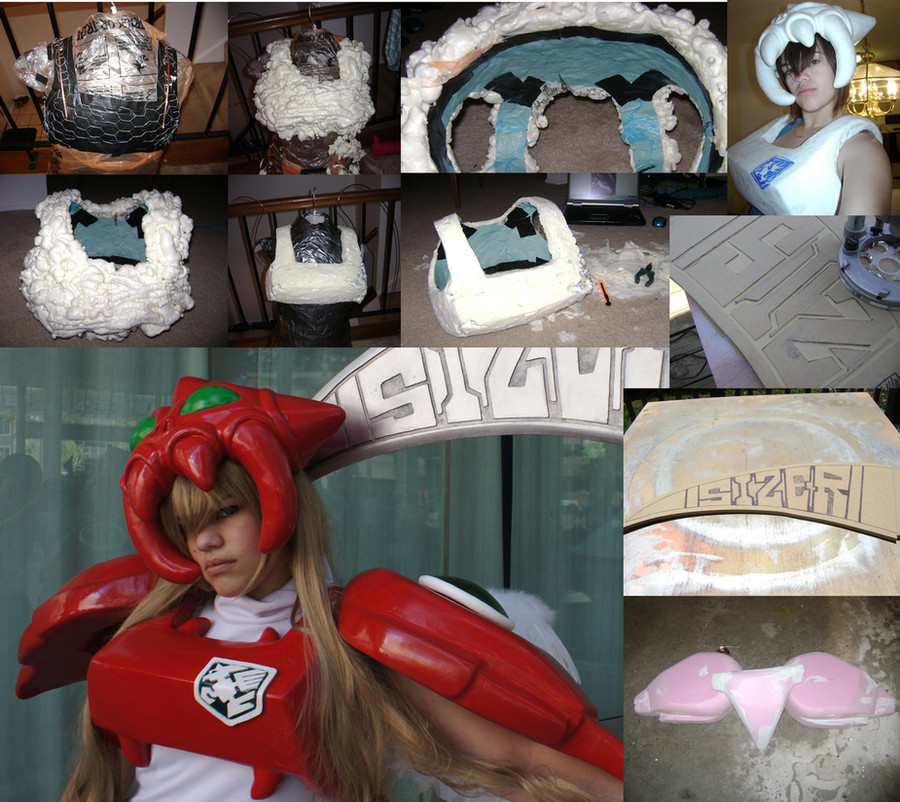
Here is a walk through of how I created my helmet "Stanley" for my Sizer cosplay.A few tips when working with spray foam:
1. Work in small bits, if you spray too much at a time, it will become hollow or may not dry on the inside.
2. You can spritz the foam with water to speed up the hardening phase. Do this between layers of foam to ensure you don't get a hollowed out mess.
3. Spray foam sticks to everything, make sure you wear protection and do it in a place like a garage or outside.
4. Spray foam can be removed from skin while it is still wet with acetone. If you get any on you remove it immediately.
5. You can buy in expensive disposable razor blades at your local hardware store. When they become dull use a new blade, dull blades are actually more dangerous to use then sharp ones.
Hope this gives you some ideas of how to tackle your next armor project.
Related content


Comments: 42

This is fantastic! I was just searching up helmet tutorials because I plan on doing Sakuyamon from Digimon season 3
I do have a question though- how would you suggest putting in like sunglass lenses into it and cutting away the foam into the shape?
Sakuyamon's helmet covers half her face and she has these black lense slits for eyes to see out of. I planned on putting a set of sunglass lenses in it to look out of. ^^
👍: 0 ⏩: 1

If I were going to do that I would probably remove the glasses from the frame, and then build the glasses frame into the helmet frame (with the wire and the at and the foam pieces) that way when I spray on the foam the glasses will hold a shape, and they you can simply carve away until you find the glasses frame and remove any foam from behind the lenses and clean out the inside, and then pop the lenses back in after you finish the clean up and decorating.
The other option would be to just make them helmet as if there were no lenses, then when you get the shape right, you can trace the lens shape to where you want it and carve out a hole to place the lens in.
It sounds like a really fun project, I will have to keep it in mind for some day!
👍: 0 ⏩: 1
Thank you for the options!!!
I'm very grateful. I may end up going with the second choice since it sounds much less stressful ahahahaha
thank you so much again ^^
👍: 0 ⏩: 0

That was amazing. I have not seen your work before and came across this tutorial. At first I was like, "Well this is ok." the final product blew me away! Great job!
👍: 0 ⏩: 1
Aww thank you. I often times feel this way about my work while in progress... Sometimes it is hard to picture how a project will turn out.
Thanks again for the compliment!
👍: 0 ⏩: 0

I went ahead and started on my project, and it is worth noting:
spray foam does not stick to the slick shiny side of poster boards.
")
👍: 0 ⏩: 1
Spray foam has trouble sticking to any slick surface, that is why in most cases I tried to use the rough styrofoam balls, or the less slick side. Sorry I didn't mention it, hope you are able to recover!
👍: 0 ⏩: 1
It's no problem! I got it figured out, luckily I had some fiberglass mesh tape so I applied that to my forms as fast as I could, and the foam hadn't dried in the nozzle so all went well.
It's a bit harder than I thought it'd be to get a nice even coat of foam on the base form. I have plenty of spots where the base is showing through, but it's probably nothing that a second coat won't fix.
I am using your tutorial and foam method to attempt a Megaman X costume for me and a Zero Omega costume for my fiance.
 (Smile)")
👍: 0 ⏩: 1
cool! I can't wait to see what you come up with. The carving is the fun part, when you see a bulbous hunk of foam transform into something awesome!
👍: 0 ⏩: 0
first off, very cool tutorial! thanks for posting it.
i just have a couple questions, you say to work by spraying a bit at a time, then adding more later.
is there some trick to stopping the foam from plugging up the nozzle?
the man at the hardware store said the can was a one time use thing. >.<
how sturdy does your frame have to be? would the thin cardboard from popcan boxes do or would it have to be sturdier?
Thank you soo much for your time!
👍: 0 ⏩: 1
The cardboard will work just fine, you just need something with some form to support the foam while it expands so you don't lose the shape of your final carving.
Also the man at the hardware store is right, it is a one time use thing, but in my experience the foam in the nozzle doesn't clog unless you leave it for a few hours. If you work in 30 or 45 min intervals you can keep using the same can. Normally I am spraying multiple pieces at a time (like a helmet, breastplate and sholderpads) so I use up a can every layer.
Sometimes you can also find multiple use cans, but I have never used those.
👍: 0 ⏩: 1

With all the model magic and wood putty edits, how heavy does this helmet rest? I would figure if there are alot of pits and crevices that adding on those putty leayers would weigh it down
👍: 0 ⏩: 1
Model magic and wood putty are both light materials, that Is why I chose them to build this helmet with.
I have not weighted the helmet before but I can't see it being more than 2 or 3 lbs, it is very light.
👍: 0 ⏩: 0
Cool! Would love to see what you come up with!
👍: 0 ⏩: 1

hey hey, If I can finish what I have in mind x)
👍: 0 ⏩: 0

Holy crap. That's crazy how it went from the lumpy stuff out of the can to such a smooth and professional look!
👍: 0 ⏩: 1
Haha, thanks. I think its pretty fun to carve that lumpy mess into something awesome, it is a lot of work. Thanks so much for noticing!
👍: 0 ⏩: 0

Great tutorial, dust-bunny! This technique looks to be awesome to make those things, I'm learning all I can about it to try it soon >:3
Good work! ^^
👍: 0 ⏩: 1
Thank you! Good luck if you try out the technique, it is a ton of fun!
👍: 0 ⏩: 0

thanks for the tutorial! I'm using it right now
Making a moving drill hat!
")
👍: 0 ⏩: 1
Awesome! I would love to see how it turns out!
👍: 0 ⏩: 1
It looks so craapy right now xD
But I'll fix it up when I get home~
👍: 0 ⏩: 0


Stunning! I love it >wI'd like to try this out sometime c: Thank you for the tutorial!
👍: 0 ⏩: 1
Thanks, hope it comes in handy for you. If you ever try it i'd love to see the result.
👍: 0 ⏩: 1
I'll make sure to take pictures C:! Going to try somethin this weekend~ Aha
👍: 0 ⏩: 0

Your tutorials are so helpful! Thanks for sharing your techniques
👍: 0 ⏩: 1
No problem. I hope it helps you some time!
👍: 0 ⏩: 1

I always wanted to use this stuff. I love your tutorial's! They are sooooo helpful.
👍: 0 ⏩: 1
<3 thanks! I remember you asking forever ago. I just never got around to making a tut for it. Excited to see what you end up doing with it.
👍: 0 ⏩: 0

Awesome tut! For some reason I thought your helmet was covered with vinyl - it' so shiny~

👍: 0 ⏩: 1
I have seen really amazing armor done with vinyl. I haven't been able to figure that out yet. Maybe next year.
👍: 0 ⏩: 0

Thanks! Hope you get to use it sometime!
👍: 0 ⏩: 1

I love the little face you drew on it. I was like "EEEP IT'S EATING HER HEAD!!!!" <3
👍: 0 ⏩: 1
lol yeah I though it was a necessary addition.
👍: 0 ⏩: 0