HOME | DD
 egressfromreality — Tutorial: Cutting and Prepping

Published: 2010-07-30 16:19:44 +0000 UTC; Views: 8434; Favourites: 136; Downloads: 99
Redirect to original
Description
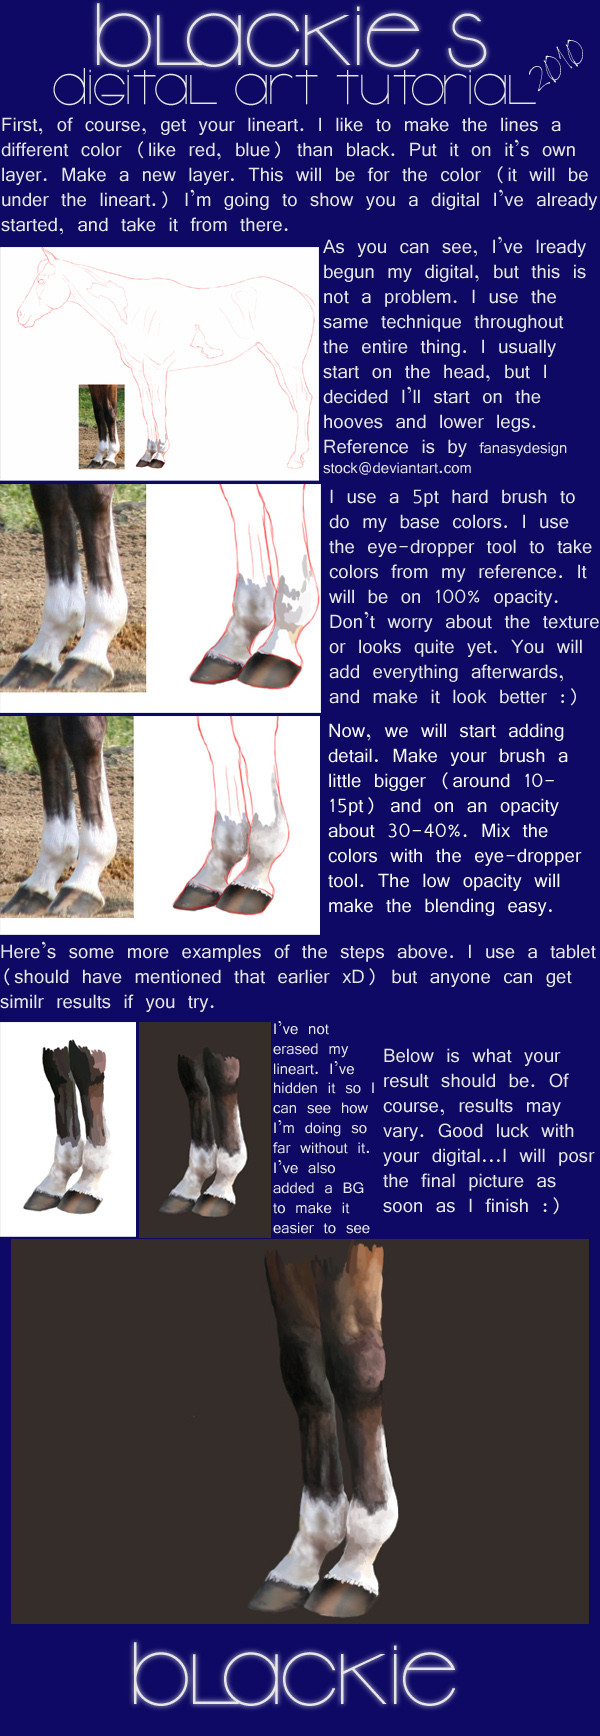
Part Two in the series "Photomanipulating in GIMP: a Walkthrough." This series chronicles the journey of one photomanip, and teaches you every step along the way to creating a complex and satisfying piece of digital art.Part Two deals with.. the ugly stuff, really. The end product of this tutorial might make you throw up, or cry, or both simultaneously, because it looks like very a sad cancer-patient-horse. In this tutorial, I've cut it out, took away all of its hair, repainted obscured details, and generally got down to the nitty-gritty with smudging and such. Beware.. It's almost 3500px. Click on the image or on the "Download" button for full size and readability.
I use a horse-based manipulation as an example, but this series is meant to be applicable to any genre and subject (Even though your human photomanip probably won't include any fur, let alone a mane and tail.)
This is my first tutorial! Do you liiiike it? The background is kind of wonky, because it's standard GIMP padding color and layer boundary. (It's a tutorial for GIMP, so why not make it look like GIMP too? Just kidding, I know it looks awful and I'll fix it eventually.) I included a bunch of little notes to the side and highlights on the text that color-correspond to highlights on the example image, so you can see what I'm talking about. Never seen that on a tutorial before, and I hope the reason for that isn't because it's annoying. Heh.. heh
Anyway! The rest of this series is still in the works, but here's the planned order:
Part One: Subject-Blending
Part Two: Cutting and Prepping
Part Three: Body Design, Coloration, and Markings
Part Four: Fur, Hair, Manes, and Tails
Part Five: Creating the Scene
Part Six: Bringing it All Together
Part Seven: Publication and Protection
Big thanks to *Jin-KStock , the photographer of the images used in this tutorial.
If this tutorial was useful, spread the word, but don't repost the image without permission, or claim as yours!
Any feedback is appreciated.
Related content


Comments: 15

This is really helpful! I just dont know how to get ride of the grass and that?
👍: 0 ⏩: 0

Really helpful...But how do you get a black white and grey layer?
👍: 0 ⏩: 0

Can't figure out the red overlay-delete-the-background bit. when i press delete it just deletes the overlay. Would it be possible to just erase it?
👍: 0 ⏩: 0

HUGE help! I will give you a link to my first piece using this tutorial when I'm finished! I've already got the horse done, just need a background
👍: 0 ⏩: 1
Here's the finished piece  (Smile)")
👍: 0 ⏩: 0

I can't find out how to get the "Layer" box open so i can see it all all times, any suggestions? or where do i find it?
👍: 0 ⏩: 0

I'm at the part with the red overlay, I can't seem to find that box on my vesion of GIMP...any ideas?
👍: 0 ⏩: 0

lol i dont have GIMP , i have photoshop, but im still gonna use this and see if it helps
thank you haha
👍: 0 ⏩: 1

")


Haha thanks, beastliness was my aim.`
👍: 0 ⏩: 0

