HOME | DD
 goldomega — Photoshop 3d Anaglyph Tutorial
by-sa
goldomega — Photoshop 3d Anaglyph Tutorial
by-sa

Published: 2010-01-10 02:19:11 +0000 UTC; Views: 35278; Favourites: 276; Downloads: 2237
Redirect to original
Description
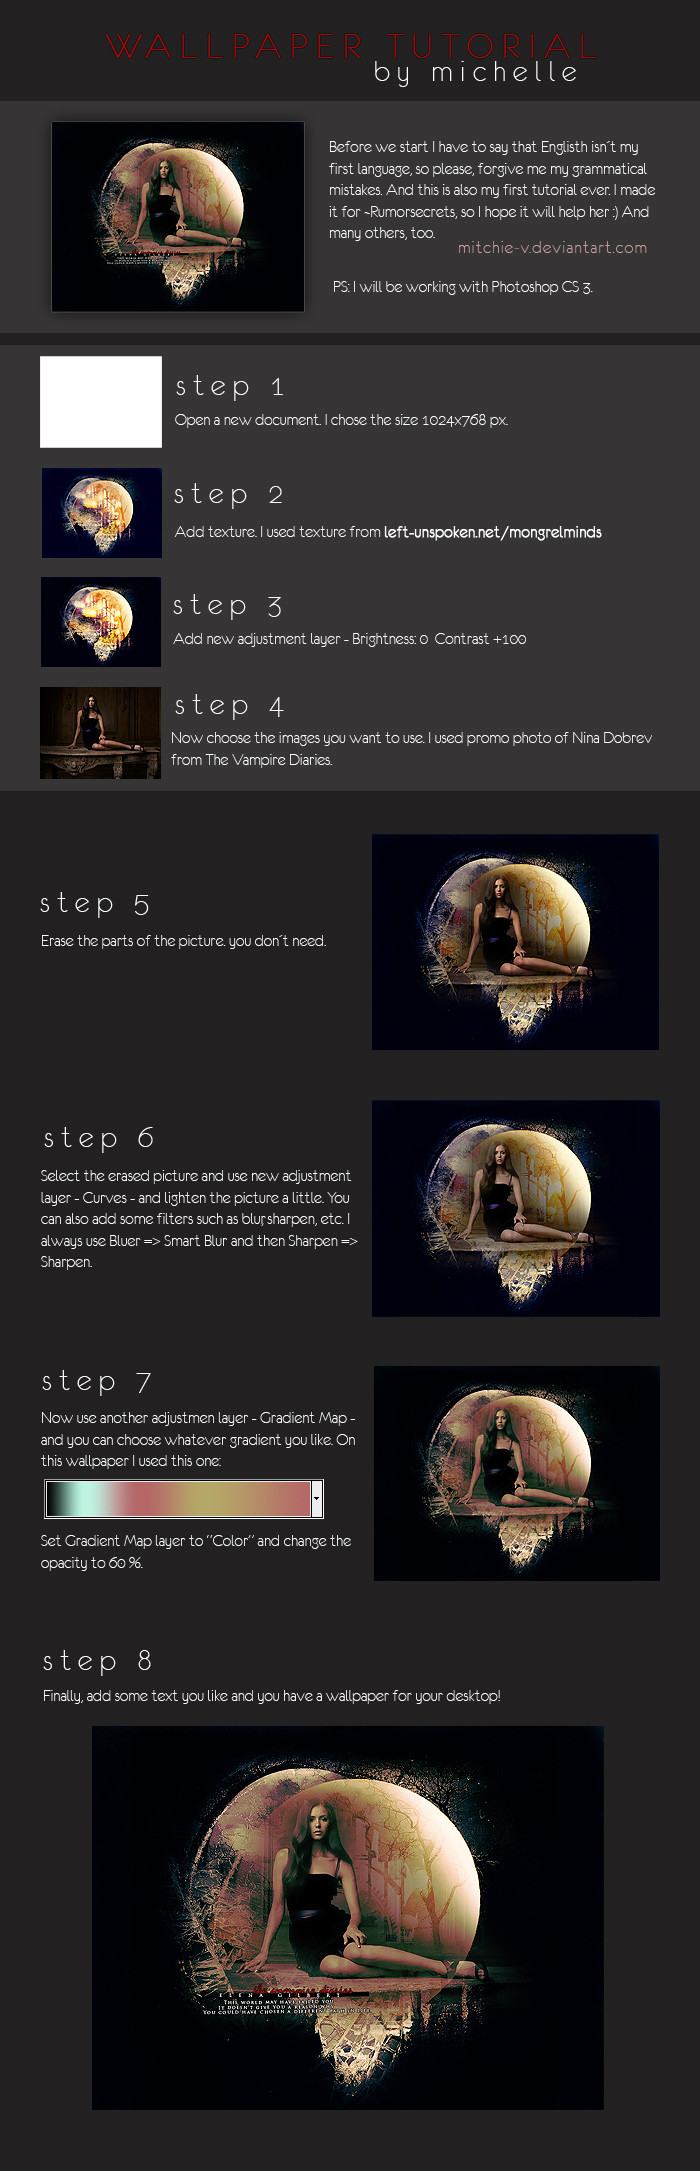
A detailed tutorial on creating a depth map and using it to convert a 2D image to a 3D Anaglyph in Adobe Photoshop. Viewing the end results requires red/cyan 3D Glasses.If you'd like to practice this technique, you can download the source files used in this tutorial.
Source Photo
Depth Map
You can find a few more examples below. Each has links to their depth maps in the artist descriptions.
Another Anaglyph made with this technique - featuring a person.
Another Anaglyph made with this technique - featuring a car.
If you make any anaglyphs using this technique and submit them as deviations, feel free to share them here. I'd love to see them!
One last note, you can skip the channel mixer portions of Step 2 if you are looking to generate full-color left eye and right eye views of your scene. You can use these with programs like StereoPhotoMaker to generate stereo MPO files. These full color 3D image files can be viewed on many 3D capable devices like Nintendo 3ds and many 3D TV models.
Is English not your primary language? Please translate my Text Only Tutorial to the language of your choice.
Related content


Comments: 117

Thanks for sharing This I have been wanting to learn more on this thanks.
👍: 0 ⏩: 1
")
Most welcome I tried and still having trouble but will keep at it
but so need to learn it so to help with some of my Art it's very helpful Thanks.
👍: 0 ⏩: 0


No problem. Hope you found it useful!
👍: 0 ⏩: 0

Very nice tutorial, and this is the genuine way for creating 3d anaglyphs.
Checkout my video tutorial on converting anaglyph 3d from a 2d picture.
I'm also using this same method of depth map, but I'm using GIMP.
👍: 0 ⏩: 0

First time trying to convert something to 3d
polligone64.deviantart.com/art…
👍: 0 ⏩: 0

depth map matters only ?
nice ..really nice  (Smile)")
👍: 0 ⏩: 1
Yes, for the purposes of this tutorial, the depth map defines how your separated color layers are distorted. You can also use this depth map with other Photoshop filters, like Lens Blur.
👍: 0 ⏩: 1
thanks ..your method is absolutely perfect...making 2d to 3d
very worhy for people who dont have stereoscopic camera
I did this job with this technique... take a look
👍: 0 ⏩: 1
Nice result! Glad you found my tutorial useful.
👍: 0 ⏩: 1
THANKS VERY MUCH...I'm hoping for more useful tutorials from you always from now
god bless you
👍: 0 ⏩: 0

Thanks, I hope you found it useful!
👍: 0 ⏩: 1

I hope, as soon as I get the 3d glasses (or make them)
👍: 0 ⏩: 0

This is fantastic!! I've always wanted since I was a kid to make 3D images.
Thanks for the tutorial
👍: 0 ⏩: 1
Thanks, I'm glad you found my tutorial useful. If you make any anaglyphs with this technique, feel free to share them here.
👍: 0 ⏩: 0

i looking for something like this very long... thanks for sharing
👍: 0 ⏩: 1
My pleasure. I hope you found it helpful for your projects.
👍: 0 ⏩: 0

Amazing tutorial THANKS A LOT! I have a question though, which i hope you can answer...... Ive created an A1 sized anaglyph on photoshop and using the glasses it works a treat when viewed on screen. However when ive printed it off at A3 size the effect doesnt work. Now, i know that the colours when printed dont match exactly with the intended colours ( they never do anyway),but is the colour a key factor in creating hte effect??? Also I havent tried printing it off at full scale (A1) yet (due to previous error), will it work? If i displaced the colour layers by 10 each way the effect worked on a 17" computer monitor but if that is printed at its intended A1 size, will that work???? PLEASE HELP THANKS IN ADVANCE XX
👍: 0 ⏩: 1
For anaglyphs, color is crucial in achieving depth. An improperly calibrated monitor or even poorly constructed 3D glasses can create ghosting and spoil the illusion to some degree, so it stands to reason that mismatched printer profiles, print settings or non-OEM printer ink or toner could also have an effect.
If you think your printer is to blame, I would make sure your print settings are at the highest quality settings and that they match the paper you're using, and always use OEM ink for crucial color jobs. If you still have trouble, maybe try updating your printer driver.
Others might not agree, but I've found in general that glossy paper often yields more intensely saturated colors than matte or semigloss, which can help your cause here.
I would also recommend before printing, select your zoom tool (z) and check the depth at various zoom levels. Don't forget to click "Fit Screen" up top and view the entire image at once. If there isn't enough depth zoomed out all the way, it won't in the print either.
👍: 0 ⏩: 0

You are awesome man I was looking for these answers thx
👍: 0 ⏩: 1
My pleasure. I hope you found it helpful.
👍: 0 ⏩: 0

This is simply the best anaglyph tutorial with one picture i've found
Great job
 (Wink)")
👍: 0 ⏩: 1
Thanks! Starting with two parallaxed photos or rendered images is ideal, but I find this method works well when you have only one source.
👍: 0 ⏩: 0

What if I want the subject to "pop out" instead of just push the background back?
👍: 0 ⏩: 1
Excellent question. I've been meaning to write a second tutorial about this exact subject. The depth map setup is very similar: use 50% gray for everything you want to be at screen depth and shade darker for the parts you want to extrude out toward the viewer. After you've separated your color channels, you'll want to use positive numbers for distorting the red layer and negative numbers for cyan.
You can even combine this original tutorial with the extrusion method to achieve depth in both directions. It's important that for anything that gets extruded toward the viewer, no part should touch or move outside the bounds of your image. It ruins the illusion of depth.
👍: 0 ⏩: 0

i try every thing about 3d Anaglyph Tutorial
but nothingwork
just your amazing tut work
thnx to you
here my try
[link]
[link]
👍: 0 ⏩: 0
i try every thing about 3d Anaglyph Tutorial
but nothingwork
just your amazing tut work
thnx to you
here my try
:thumb348882162:
:thumb348881477:
👍: 0 ⏩: 1
Great job. Very nice results.
👍: 0 ⏩: 1

Wow !! That's very awsome result .
I'll try this myself and see if I can get a similar result .
👍: 0 ⏩: 0

thanks a lot man that was really an appreciating thing thanks again.....

👍: 0 ⏩: 0

Oops, sorry, the link was for my gallery. here's the link to the picture [link]
👍: 0 ⏩: 1
Great result, glad to see you worked through some of this technique's limitations.
👍: 0 ⏩: 1
Thanks. And I really appreciate the comment on my chakram. I practiced first on a model's picture I found on the internet and the background and subject model were a lot more complicated than my chakram, so I had to have more greyscale range. But for a simple subject like a chakram I probably could have used even less than 50%.
👍: 0 ⏩: 0
Hey man, Thanks for the tutorial. I saw similar stuff out there, but yours was definitely the best.
Anyway, I would appreciate it if you can tell me what you think. Here's a [link]
By the way, I know in your tutorial you said to use no more than 50% white, but I found out that I can do it with even 100% white, which is what I used for the picture in the link. It allows for a much higher range of depth to play with. I just had to blur the edges to avoid sharp transitions because they made some parts of the picture double. I think that's what's called ghosting. Also, I usually use around -5 offset for the red channel and a little bit less for the blue channel. I found that a higher offset also creates this ghosting effect I was talking about and it gives me a headache to look at.
I would really appreciate your opinion.
Thanks.
👍: 0 ⏩: 0

Thank you .....so much..fot ur tutorials.....now i can make my own..big thanks
👍: 0 ⏩: 1


My pleasure! Hope it helped you out.
👍: 0 ⏩: 0

I'm very confused for this... sopposing I have 2 images... "A" the left one and "B" that is almost the same but more to the right... with image is supposed to be un red and one in cyan???
If in mi glasses I have cyan for the right eye, and red for the left eye... the DEPTH effect is caused by blue on right and red on left? and pop-up objects are caused by the inverse? (red for right image, and cyan of the left?)
👍: 0 ⏩: 1
I believe you're on the right track, yes.
If the pixels in your red image are shifted to the left, they appear further away, if they are shifted to the right, they appear closer.
Likewise, if the pixels in your cyan image are shifted to the right, they appear further away, if they are shifted to the left, they appear closer.
And yes, the red lens in your 3D glasses should be over your left eye and the cyan lens should be over your right eye. The red image affects what your left eye sees and the cyan image affects what your right eye sees.
👍: 0 ⏩: 1
Ok thank U very much, that's what I thought but I still find some really cool anaglyph pics on the web where the closer things are cyan of the right edge and red of the left edge of something =S like this for example: [link] I don't know, this pictures confuse me >_< but thank U and sorry for my bad english, I have to work on it :3
👍: 0 ⏩: 1
Not a problem! Allow me to explain based on your example:
The pixels that make up the trees in the background are further to the left in the red channel and further to the right in the cyan channel than the pixels that make up the men in the foreground. The pixels that make up the men and rock still separate and in the same directions, but not as much. Because the red and cyan pixels are closer together, they still recede, but appear to be closer to us than the background trees do.
The differences between what our left and right eyes see are what gives us the impression of depth, which is called parallax.
👍: 0 ⏩: 1
Oh... I have not thought about that... the rock and the guys look closer but actually that's not "POP-UP" effect... they're still "inside" the screen just closer than the background... Thak U so much! I'm a little obssesed with 3D
👍: 0 ⏩: 2
| Next =>