HOME | DD
 GriswaldTerrastone — Angled Gems and Odd Windows

Published: 2011-06-22 21:07:51 +0000 UTC; Views: 1541; Favourites: 28; Downloads: 99
Redirect to original
Description
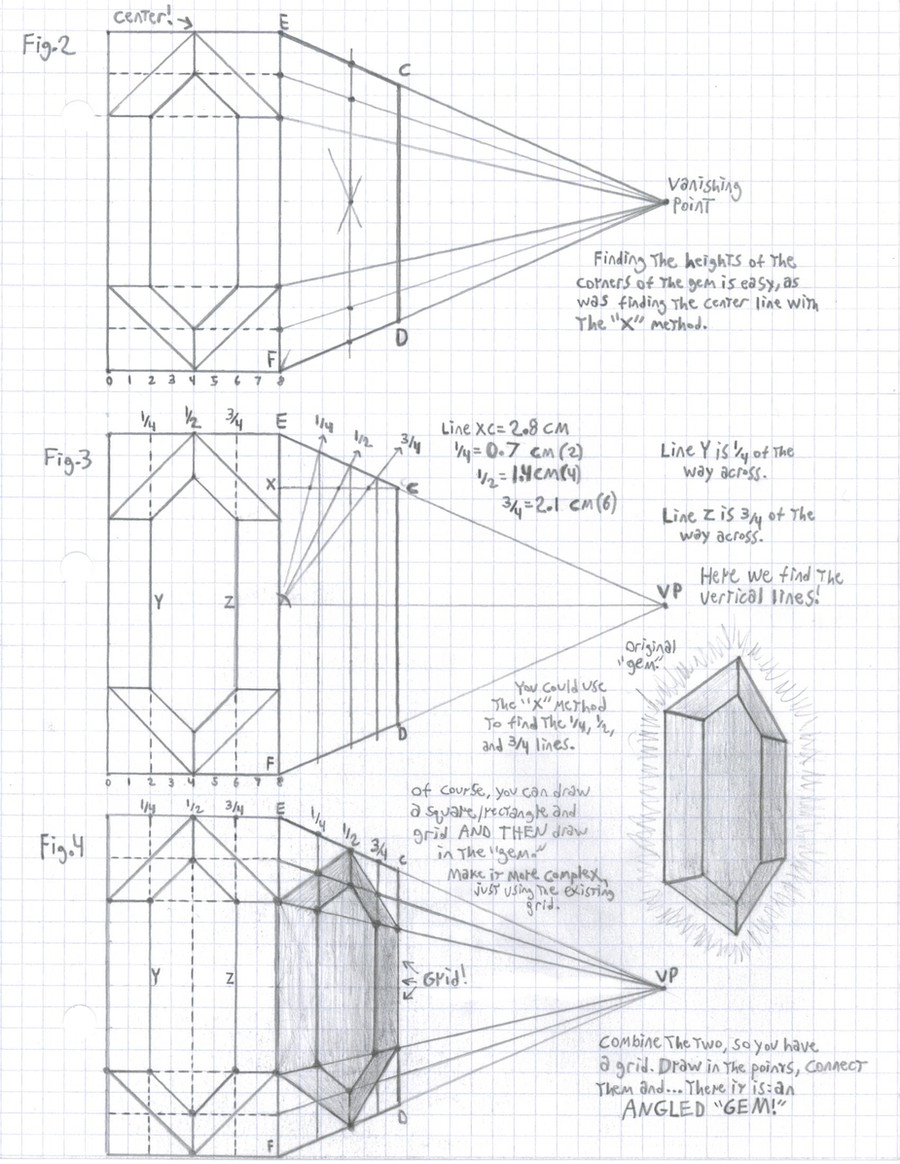
At first, this was simply going to show you how to angle gems, but I'm using this one instead (it's better).The original would have shown you how to do it, but with an already-angled wall- you'd take it from there by drawing a "grid" on the wall.
But this one goes a bit beyond that- it actually allows you to draw a "gem" (usually in a square or rectangle) as a true reference; that is, you can draw something like this from directly in front, and then angle that very image.
This means it's much easier to get what you want at an angle, since drawing it from a regular front view is easy.
Before starting this, if you haven't already, you should really first study pages 1VP 7 and 1VP 8, in the earlier part of this tutorial, since the heart of what is being done here is based on what was shown there: drawing squares and rectangles with a Single Vanishing Point ("1VP").
First, draw the "gem" you want. For now, don't make it too complex!
The next step, as a rule, is to draw a square or rectangle (depending on what the "gem" looks like) around the gem. This is to give you a "grid" later to work with.
What you should then have is something like the rectangle and gem in Fig. 1. This is your "reference," and is the thing you want to draw at an angle.
Next- and this is where pages 1VP 7 and 8 come in!- you have to figure out the proportions of the rectangle, if that is what you have (a square is no problem here). In this case, the rectangle is twice as tall as it is wide (16 spaces tall, 8 spaces wide on the graph paper I used here).
What you have to do now is to draw a vanishing point, and connect it to the corners of the rectangle, Points E and F here, as shown.
Now comes the tricky part: you know you want an angled rectangle, twice as tall as it is wide. Here Line E and F make up the left side, the vanishing point lines the top and bottom, so all you need is that one vertical line that would make up the right side...but where to put it?
If you were to turn Fig 1. on its side. so the vanishing point was above the gem, it would look just like the images from pages 1VP7 and 8- but if you don't want to do that, the "horizon" going through the vanishing point must be a vertical line, since this is sideways.
The vanishing point is nicely centered with Line EF, right over Point X, which is in the middle of that line.
Measure how far from the vanishing point Point X is.
Now, if you had wanted a SQUARE, you would have drawn a point on the "horizon" the same distance away from the vanishing point, which is where Point A is.
Drawing a line from Point E to Point A as shown, you would have gotten that dotted line- which would have given you an angled square.
BUT- since you want an angled RECTANGLE twice as tall as a square, you draw instead Point B, which is twice as far from the vanishing point as Point A. Connect Point E to Point B, and you can get...that rectangle!
If this seems a bit confusing, just turn the image on its side so the vanishing point is above everything- it will look just like what is on page 1VP 8! It will, really! Well, a bit more complex with the gem and all, but...
You now have only to draw in Line CD, and this gives you your rectangle.
At an angle.
You now have what you need for the rest- this was the tough part.