HOME | DD
 GriswaldTerrastone — Perspective Tutorial: 2VP 9
Published: 2010-10-29 22:21:58 +0000 UTC; Views: 21351; Favourites: 145; Downloads: 482
Redirect to original
Description
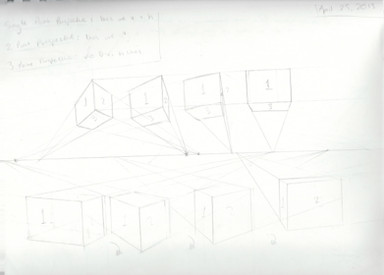
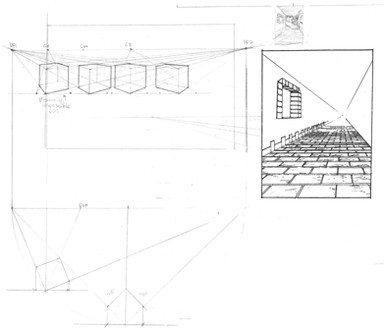
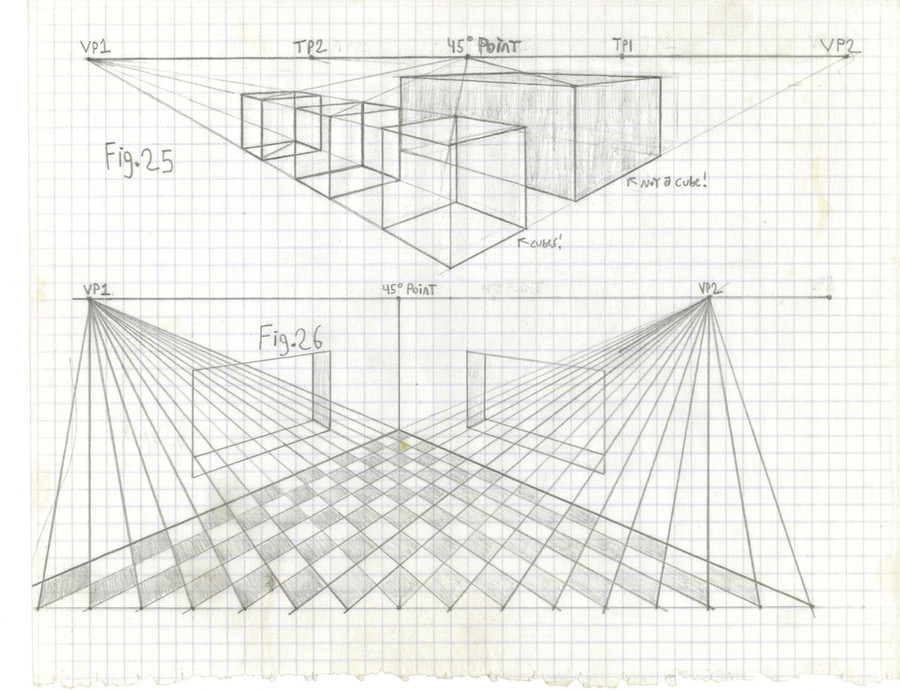
This page is just to show a couple of nifty things that Two Vanishing Points can let you do...For Fig. 25 I drew in a cube, the one in front of everything else. You can see that it looks more like a cube than the earlier ones, because the angles are not so exaggerated. If you compare the horizon here to the one used for the other cube, right away you can see that the two vanishing points are a good deal further apart.
It should be mentioned here that for the tutorials I usually keep everything on the page you’re viewing- but it does not have to be so. You can put your paper on a larger piece, and draw the vanishing points outside of the piece that will actually have the picture. Just be sure not to let it slide around- a bit of tape would do nicely. It also seems likely that a modern-day art program for digital artists can handle that easily enough, too.
There are two other cubes going towards VP1 here. Notice how they all share the same VP1 lines on the top and bottom? By doing that you can be certain that if one is a cube, then all should be cubes, too. A line from the 45 degree point will go through the front and back corners of those cubes, top and bottom, so you know they are squares.
In fact, by drawing a line from the 45 degree point through those lines coming from VP1 will give you squares, and something more...
All of those cubes are the same size! Look at the four lines coming from VP1. Now, look at the top and bottom ones...see how they "frame" the cubes? Whenever you do that you end up with objects of the same size, as shown here:
[link]
Another thing here is that, since the blocks were drawn as if they were clear, we know where they actually sit, and, unlike Fig. 14, which was just drawn randomly, here we can be sure that the shapes are apart. If you want to draw buildings in such a way, this would be very useful. Each shape here has a space around it, so a character could walk around each one.
Behind the cubes is a shaded rectangular block. It is aligned with the front cube especially with the lines coming from VP2; it is also taller, since a line drawn from VP2 through its top would go above the front cube. Mind you, the very top and bottom of that shaded block are squares- I just did not draw the front corner long enough to make it a cube; it is more squat than a cube.
If I had extended the front corner downward to make it a cube, then the image would seem to have a lower surface- thus making it look as if the cubes were floating. If I had extended the front corner upwards to make it a cube, then it would have its top above the horizon and it would look like something from the earliest part of the 2VP section here.
(And if you would like to know how to draw blocks so they are equally spaced apart, then read on- one way of doing it is actually shown on this page!)
Fig. 26 is another checkered floor, but this time using TWO vanishing points. For this example I centered everything nicely, but it all follows the perpendicular/45 point rules of drawing a cube.
All I did was draw a line below the horizon, making it parallel to it. Then, I drew in dots on that lower line, each the same distance apart, again nicely centered.
From there, I drew a line from both vanishing points to each of those dots. The checkered floor was the result. Notice how the squares look, as opposed to the first time this was done, with just one vanishing point? After that, I drew in the windows and that back corner, just for the effect.
You can try this floor off-center, if you like- that is, the line from the 45 degree point does NOT have to go straight down.
If you're wondering how to draw cubes or the like equally spaced apart, then the answer is shown in Fig. 26- look at any diagonal line of squares, and imagine each dark one as the base of a building, and each light one as a road or alley. The key here are the equally-spaced dots on that bottom horizontal line, and even if the line from the 45 degree point is angled instead of straight down, you'd do it the same way- just make sure to start from the point where that line touches the bottom line, like in Fig. 26.
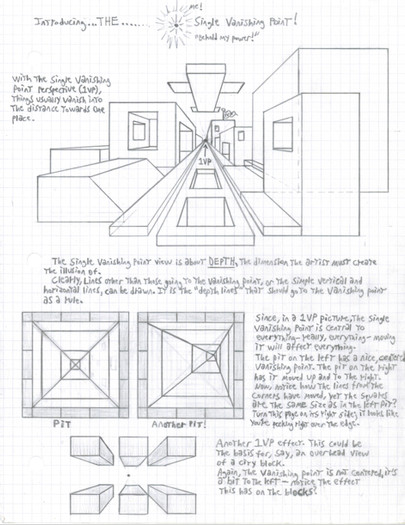
Now here’s an interesting aspect about all of this- it is impossible to draw such a floor with one vanishing point, but if you want a good, straightforward checkered floor with good horizontal lines as in the world of the single vanishing point, then you cannot get it with two vanishing points.
So now you have not one but TWO ways of drawing such things, each with a different look and style. Which should you use? That’s not for me to say, it’s entirely up to you! A third option is to tilt the single-vanishing point floor- what would be the result? Don’t hesitate to experiment!
