HOME | DD
 hibbary — Color over greyscale tutorial
#photoshop #tutorial
Published: 2015-11-12 15:26:57 +0000 UTC; Views: 11403; Favourites: 439; Downloads: 109
Redirect to original
Description
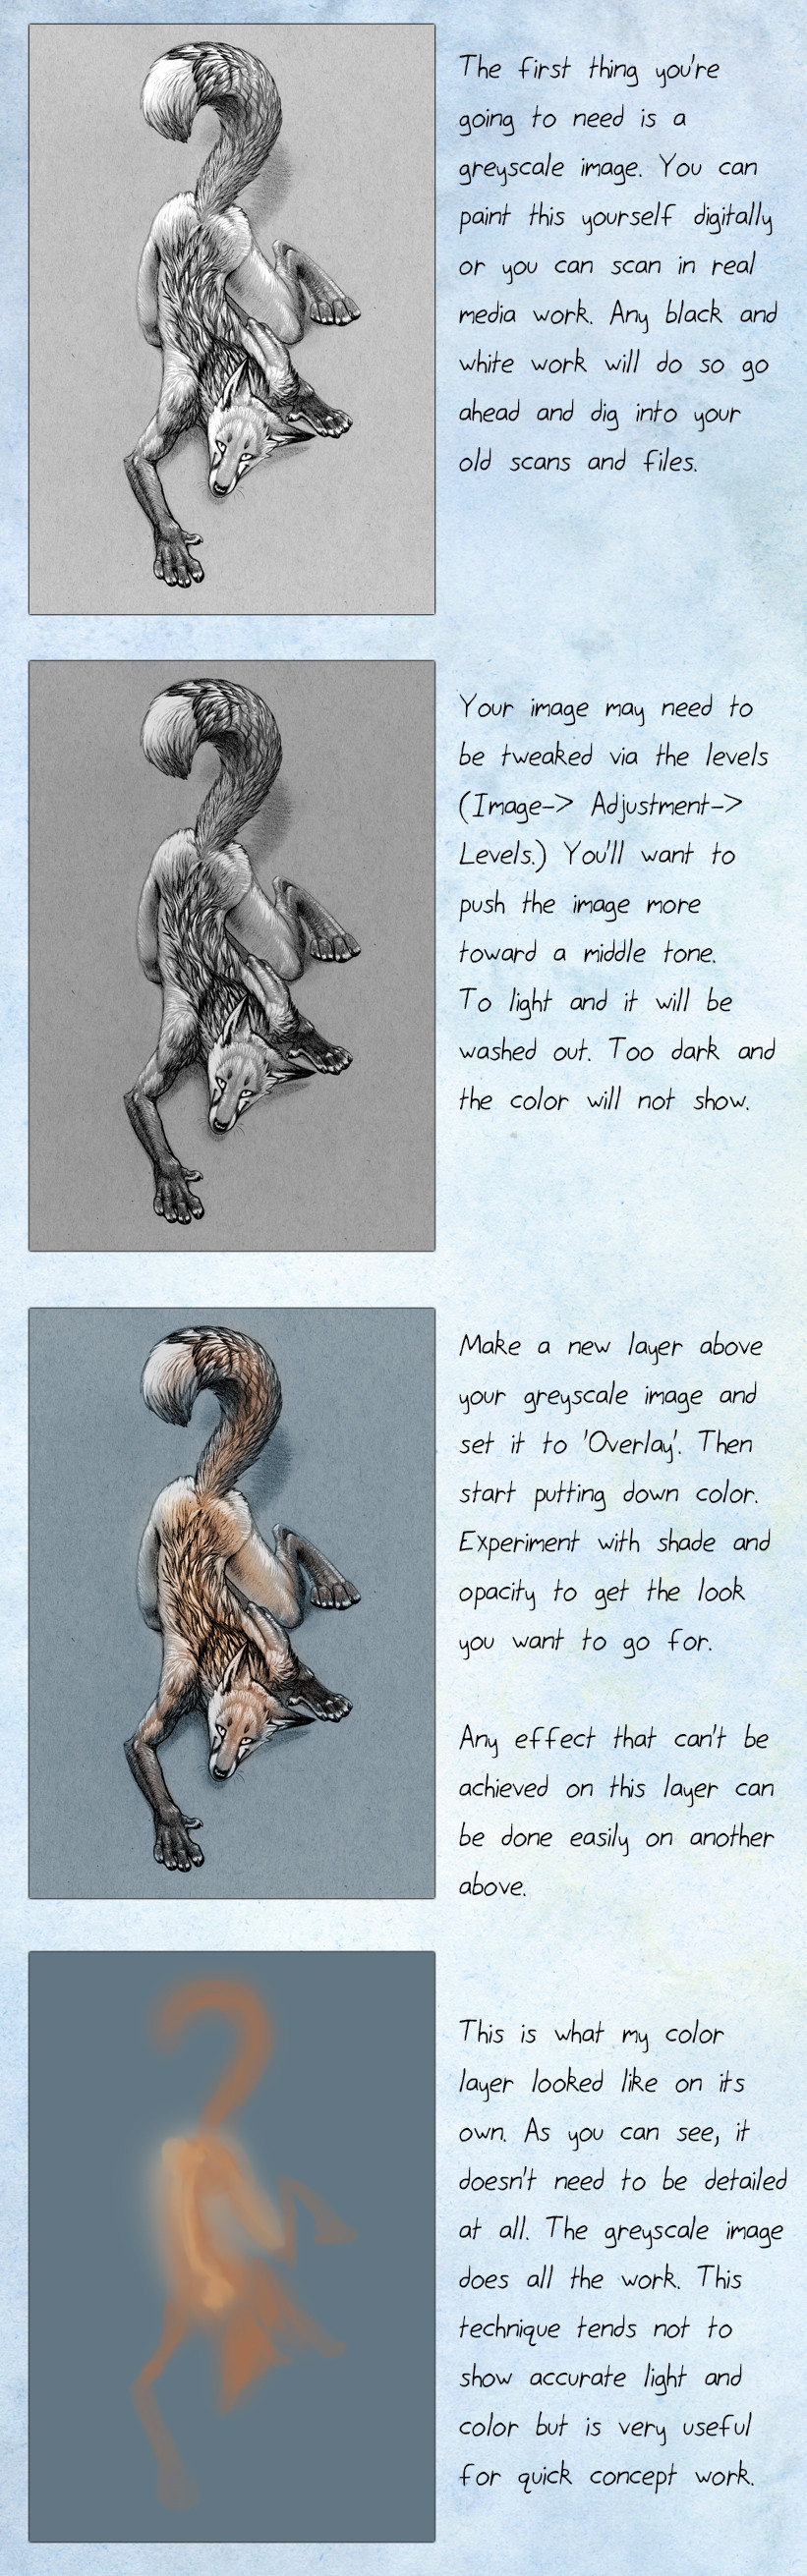
For even more tutorials go to my Patreon: www.patreon.com/hibbary?ty=cThis is something I've been playing with recently and I'm going to share my findings thus far. This is very simple, the very beginning steps. I'll be learning, and sharing, more as I go along.
Related content


Comments: 46

Hey Hibbary, love your work by the way. I'd like to ask you something regarding this method. I had been looking into it for a quite a while and what experiments I have tried have been "alright" but not really to what I hoped for. However as I dug around some more, I took notice of something rather odd with what I saw. It seemed to me that with all the speedpaint videos I've seen on youtube. Every artist who I've seen who shows this method have only shown it when the illustration has a dark background, or just dark in general. I know this question may sound stupid to ask, but could this method be used in other settings instead of dark?
👍: 0 ⏩: 0

Hey hibbary, I know this question isn't on the tutorial but I'd like to hear your opinion on it. What do you do when you feel stagnant in your art? Do you ever have times where it seems all you do is practice but you never seem to level up? Personally I'll try stuff like this on my art and whether its my 1st or 100th time, although I do see tiny insignificant improvement from years of doing it, I can never get it as good as my art is supposed to be.
👍: 0 ⏩: 1

I feel like a lot of artists feel this way when they are actually steadily improving. But it IS possible to go nowhere. It depends on how much you push yourself when you study. Getting art skill is like gaining physical strength. You have to push yourself into discomfort to the point that studying is feeling honestly kind of *hard*. That's where you are gaining the most knowledge. You don't need school but sometimes taking a class helps you to focus.
👍: 0 ⏩: 1
I've heard people compare it to exercising, but with art, I don't really know how to push myself. With exercising, I've experienced it first hand, you add more weights, more reps and change your routine, etc. But with art, I really don't know. Its such a mental exercise and I can't tell if I'm heading in the right direction. An example would be I do figure drawing every day (something a lot of people recommend because gesture drawing is a one of the fundamentals.) But looking back I see I've stagnated and my newer drawings are even worse. With exercising if my arms aren't strong, I'd do more exercises to help them, but with art, it seems everything is wrong and even when doing things consistently I still fail.
👍: 0 ⏩: 0

That's a really interesting pose and beautifully drawn fox! ^^
And thank you for the coloring tutorial
 (Smile)")
👍: 0 ⏩: 0

I've used this before but gotta admit, I prefer to use the "Colour" setting as it keeps the saturation more consistent and looks less like the colours got bleached.
OR you can have the coloured layer underneath with a "normal" style and the black and white on top with a "luminosity" style I think.
👍: 0 ⏩: 1
Color works fine. I like overlay because if I want to lighten or darken parts of the original base I can do that easily with the overlay.
👍: 0 ⏩: 1
I see. Indeed overlay puts more emphasis on light I guess while colour just.... dumps whatever colour you picked while having the b/w layer strongly override the lighting so to say.
In the end, it all depends on what effect you're really going for, as there are a bunch of layer effects that can be used for this ¯\_(ツ)_/¯
👍: 0 ⏩: 0


Wha? It was that simple?
Gotta try this method.
👍: 0 ⏩: 0

I always colour my drawings like this too! = D
👍: 0 ⏩: 0


Nice! I kinda figured this out on my own accidentally, but it's really validating to find that someone else does it too and that it's not a cheat. If that makes sense.
👍: 0 ⏩: 1
It's pretty much the industry standard right now. And to be frank, I hate it! ")
👍: 0 ⏩: 1
*laugh* I don't do it often but maybe not for that same reason? Mostly only when I'm not able to clean a piece up otherwise.
👍: 0 ⏩: 0


I personally don't like colored greyscale. It never looks as bright and colorful as when you draw with colors from the start. But seeing your picture in black and white is indeed useful, it really helps with contrast. I usually create an adjustment layer on top with 0% saturation, and turn it on/off while drawing.
👍: 0 ⏩: 1
I personally don't either, but admittedly it's MUCH faster. I find that laying color over a grisaille and then pulling out areas to work saturated color in can come out quite nice.
👍: 0 ⏩: 0

Why do overlay on top of the colors when you can just put the lineart on its own and put colors underneath of it? Overlay does weird stuff with colors and people who aren't familiar with it may go crazy. Like, you put light blue down and overlay turns it dark.
If you scan in an image, to get the black/grey lines on their own layer you just set the image to Greyscale in Photoshop (Image->Mode->Greyscale,) go to the Channels window, Cntl+Click on the square within the layer that says "Grey." This selects all the white space on the page. Then create a new layer, go to Select->Inverse, and fill Black into the new layer. Go back to Image->Mode->RGB color to set it back to normal once this is done.
All your lines will be on a transparent layer now and you can color underneath without have to mess with the blending options of the lineart layer.
👍: 0 ⏩: 2
Not everyone wants to do a cartoony style. It's about rendering, not linework.
👍: 0 ⏩: 1
I think you misunderstood. It doesn't turn a pencil sketch into a cartoon linedrawing. It just transfers your sketch from a solid, black and white, flat image, into a transparent layer with ONLY your sketch on it (there's just no white - it still looks exactly the same as you drew it.) That way, you can do true colors underneath the lines instead of Overlayed colors on top. I say this because I used to do my lineart the same way you are, except that instead of Overlayed colors on top, I set my lineart layer to Multiply and did my colors under it. In the end, it was sloppy for me because when I went to merge my layers, the Multiply layer would go back to being black and white and my colors would be hidden underneath.
👍: 0 ⏩: 1
And I think the art I chose for the project is confusing you. This isn't for sketches. It's for fully rendered black and white images. I just didn't have one of those at the time that I needed to make the tutorial. For an example of an image colored in this manner I'll direct you to: which wouldn't have possibly been done in the method you describe. Using multiply the colors would have been much more greyed out. With overlay you get that bright, blushy glow around the highlights. Mind you, I have been experimenting with this technique for all of a few days, so I haven't *quite* got the knack of it yet, but it's very useful for developing grisaille into color digitally.
👍: 0 ⏩: 1
And again, you're misunderstanding what I said ._.
With the thing I described, you aren't using Multiply on anything. Using Multiply is what I USED to do, like...back in 2002 when I was a nub and didn't know much about Photoshop. I learned the method I described so I could put my lineart on a layer of its own without any white on it whatsoever, as though I drew it directly onto a transparent layer in the first place. It doesn't have a white canvas embedded in it like a sketch on white paper.
koltirasrip.deviantart.com/art… My layers here from the bottom up were 1, The white, untouched Background/Canvas layer, 2, Oodles of base-color layers, shadows, highlights, 3, Lineart, and 4, The very top layer was a special effects Overlay layer. It's what gives the white parts of the picture a green/blue gradient.
I'm not saying what you're doing is wrong by any stretch, I just feel that it makes things more complicated than they need to be because if you do anything else to the image, especially in a layer beneath the Overlay layer, those colors will be distorted. I do colors on many layers so your method wouldn't work for me because Overlay has an aspect of transparency that impacts all the layers beneath it. Your Overlay method is no different than my old Multiply method, just more refined and with significantly better anatomy. It seems (from my understanding of the way PS's layer effects works) that your method is only viable if you do all our colors on a single layer. The white/grey background is the only thing stopping it from getting all weird. If you put an image or texture in the background, your wolf drawing would look like a stained glass window with the photo behind it, and your wolf's colors themselves would get extremely dark and burnt.
👍: 0 ⏩: 2
SORRY!!!! Donovan explained to me what you were trying to say and I finally got it. I was on a totally different page and not understanding what you were saying. I was getting lost in your process explanation. And I was super tired and frazzled while I was trying to answer these.
I meant this to be a one-shot tutorial for a single technique. Addressing transparency in greyscale would be a whole different thing. This is for bringing up a complete, one-layer greyscale image (like a grisaille painting), so transparency is a non-issue, and not a necessary extra step. It would be useful in certain situations, but that wasn't what this tutorial was about.
If I STILL don't get what you're saying I'm just going to put my pants on my head and go out and hit bones with other bones.
👍: 0 ⏩: 1
Yeah, I never meant to question what your tutorial was "about" per se. The technique just reminded me of something I was specifically trained to stop doing back in the day because of the problems it caused.
If you've dabbled with hand-painted cell animation, you'll recall how the lineart cell was on top, and it was on a completely clear cell, except for the lines themselves. The colored paint went underneath/behind it. Small details would get painted on first, then the wider areas behind that so the painter could get lazy if he/she wanted. I have a few hand-painted cells that were done like this. This is basically how I do all my artwork digitally, except that my lineart cell and color-paint cells are all separated, depending on the color or location on the canvas. It's easier to fix mistakes this way.
The way I previously tried to describe the greyscale transfer method was just a way I would've used to put my sketch on its own layer, so I could do my colors without worrying about resorting to a Layer Option like Overlay. I use Overlay ONLY as a special effect after the fact. You really need to know what you're doing with an Overlay layer to use it successfully (ie: you can't put anything under an Overlay layer except greyscale, because Overlay colors + regular colors = chaos.)
👍: 0 ⏩: 0
I take it you've never worked in the concept industry. The method I've described is very standard and rather than making it more complicated, it saves an immense amount of time. The art you linked to isn't tonally accurate. It's more cartoony, with the hard lines and minimum shading. Which is fine! But stylistically, if you want accurate rendering, doing it in greyscale is much, MUCH faster, and in the concept-art industry, speed is absolutely key. You have to work blazingly fast.
I personally am a big proponent of color-picking and painting traditionally, or in a traditional method, straight onto one layer. That is the most accurate way to get color and light quality down but it takes more time and more knowledge. When you're doing scene-work it's necessary but when it comes to character design, when you want high detail and color is just a side-note, this is the best way. The point is to have all the form and detail in and then throw a little color in as a reference point.
👍: 0 ⏩: 1

Maybe I'm being dumb here too, but I don't see where what he's talking about would be so different from what you did there. You still get shades of grey in the line art, the end result of getting rid of the white makes the line art or greyscale shading interact with other lower layers in Normal mode pretty similarly to overlaying the color layer or setting the greyscale stuff to multiply. The biggest drawback is that the greyscale layer has to be totally black (and thus gets its variation from transparency only) or you get that milky look, whereas other layering methods allow for color variation in the greyscale layer. Which I realize sounds counter-intuitive, but for example, authentic pencil scans in with a tiny bit of color variation you lose that way, which you might want. The vast majority of the time I'd still use layering methods like you did instead of white subtraction, but on rare occasions I've needed to get the greyscale layer to overlap layers in a multiply or overlay kind of way, but with actual transparency in place of white. In that case, getting rid of the white and so on did the trick.
And in case this is still confusing, because maybe I'm not making the distinction you are and I'm confused, here's what I see as the core point. The goal is to get the tonal information out of a greyscale layer. Black makes stuff black, white is no change, shades of grey make things somewhat darker. In that case, a layer effect that makes a grey pixel halfway darken what it interacts with, isn't much different from a 50% transparent pure black pixel. It's just whether that transparency in the greyscale layer is derived from a layer effect or built into the layer itself.
And regardless of all that, I sure agree that overlay style coloring is not the aesthetically ideal method due to looking so drab no matter what. All it has going for it is speed. And personally, the coloring step I'd like a shortcut the most on would be trying out different flat color schemes. Sure, you can easily block in the different colors on different layers and adjust them separately, but it's no good if you aren't even sure what parts of the character/object you want to share colors with each other in the first place. When that unsure, you pretty much gotta recolor the whole thing from scratch for every option, and that gets tedious.
👍: 0 ⏩: 1
Whether or not his method was 'that different' wasn't so much my point. Just that the overlay method is perfectly valid and widely used. And in fact, I don't even like it that much. I'm trying it so I can learn something, but when it comes to color accuracy and color creativity, hand-picking the pallet is really the ONLY way to go.
What makes this so useful in choosing color in character design is that you can do each color or color group on a separate layer and then just change those colors using the hue sliding scale. You don't need to recolor anything. You DO have to recolor if you're picking your pallet.
If what you're asking is why overlay instead of multiply, it's because overlay has the wider range of effects. You can either push something darker or lighter, depending on what color you use. Also overlay has the option of pure saturation whereas multiply never will if you have anything darker than bright white.
👍: 0 ⏩: 1
I'm not arguing with any of what you said, the Overlay method totally has its uses and as far as this type of coloring goes in the context you outlined, is the overall best solution. I also agree it does not yield nearly as pretty colors as working with color directly, it's just way faster.
I simply wanted to point out that what he's talking about- clearing the greyscale layer by selecting luminosity- doesn't limit the greyscale layer to pure black and white, but rather gives the full variety of shades of grey, and is pretty handy in very specific situations. Primarily when you want the practical effects of Multiply, (the end result can be virtually identical to not deleting the luminosity in the first place and just setting the layer to Multiply,) but need the luminosity (aka degree of white) to be actual transparency instead of simulated transparency. In other words, it can end up looking like Multiply but with the layering mode set to Normal. Mostly this is handy if you accidentally did some drawing on the wrong layer and want to unify it all again, or if you need true transparency around an object/character but also want to preserve the softness of the edges. If you go with Overlay or Multiply to make the white effectively transparent, the final flattened product will still have opaque white around the subject, and it can be very hard to manually clear the background while keeping the outer edges of the lines/greyscale layer looking the same as the inner areas.
This isn't about the merits of Overlay vs Multiply, just clarifying what KoltirasRip was talking about doing in the first place. Which doesn't end up using Multiply at all, thus I suspect there's some miscommunication.
👍: 0 ⏩: 1
OOOOOOOOOOOOOOOKAAAAYYYYYY yeah I didn't understand the process write-up. I was tired and busy and just didn't have the brain-power to visualize what he was saying. But the larger part of the reason is that it's not my job to defend a technique. He wanted to know why not do it X way, and my answer is a big, fat shrug and me saying: I don't know. Why NOT do it that way?
A tutorial isn't an attempt to force someone to do something one way. It's just an explanation of how to do something. There are a hundred thousand other ways to do things. This is specifically for bringing up a complete painting from greyscale, not a character or image element that requires any degree of transparency. So in the case of the tutorial, it's a non-issue.
Changing a black and white image to a transparent greyscale is super easy. It can be a step or it can not be a step. This is just a tiny mini-tutorial addressing how to do this one thing--using overlay for color. Making a transparency from a greyscale image would be another thing, for another time.
So what I should have answered in the first place was: Wu; you are asking the wrong question. Instead I got embroiled in a lengthy discussion that wasn't the point.
👍: 0 ⏩: 1
Yeah, that exchange was some good ol' miscommunication, plain and simple. Looking at the situation again from a fresh perspective fresh was all it needed, I'm glad everyone's on the same page now.
Though at the risk of ruining a happy ending, I don't think that guy's alternate suggestion had anything to do with forcing ideas. It's just discussing techniques, and what is a tutorial but a discussion of techniques? Granted, that other technique wasn't quite the same thing or a better way of getting the results you were specifically addressing, but there's no harm in the back-and-forth. If there is a better way out there, that might be how you find out. I've learned a lot of Photoshop stuff by reading other's arguments in similar contexts. And noticed how often people don't really disagree, they just misunderstood the other's intent. In which case, yes, the answer is very much wu. The questions itself needs to be reframed.
Incidentally, though I was familiar with the "mu" version, you're the only person I've ever directly communicated with who was aware of that word/concept at all. That's a pleasant surprise.
👍: 0 ⏩: 1
Yeah, no, I got that now
👍: 0 ⏩: 1

Wait, so what does that do if you have a lot of little shaded areas all over? That sounds like it would fill them in with black.
👍: 0 ⏩: 1
Nope, the image would look exactly like it does as a sketch. I don't know exactly how Photoshop does it, but I used to do a lot of pencil sketches with all different tones and qualities of graphite. The method to make them digital preserved the technique, texture, and tone 100%. I'm guessing it's because when you do the Cntl-Click on the "Greyscale" box, say the grey line is only 50% as dark as true black, then the fill black function will only do so 50%, making it the same shade of grey as the original line that was drawn.
👍: 0 ⏩: 1
Ah, so it probably couldn't be translated to other art programs... That's a shame.
👍: 0 ⏩: 1
It might, I just wouldn't know how to do it. Sai is the only other program I use.
👍: 0 ⏩: 0


I always wondered how people do those greyscale images, and now I found this tutorial!
Thank you for that, I´m going to try that out for myself
👍: 0 ⏩: 0

Whenever I tried to do this, the colors looked dull and faded and I had to paint over it anyway. Is that to be expected or am I just not doing it right?
👍: 0 ⏩: 1
You can get extremely bright color by doing an overlay layer on top. If yours is looking washed out it could be that the original image is too light? You have to have a middle grey for it to appear as fully saturated. Do you have an example I could troubleshoot?
👍: 0 ⏩: 1
Not currently, no, but thanks for the kind offer! I'll keep the brightness settings in mind next time.
👍: 0 ⏩: 1
If you try it and it makes no sense, lemme know and I'll arrange a follow-up tutorial based around it. I have been doing one every weds and frankly I'm running out of ideas
👍: 0 ⏩: 0


Nice tutorial!
I've always liked this technique and was able to finally do a decent rendering for inktober last month.

👍: 0 ⏩: 0