HOME | DD
 jeriweaver —
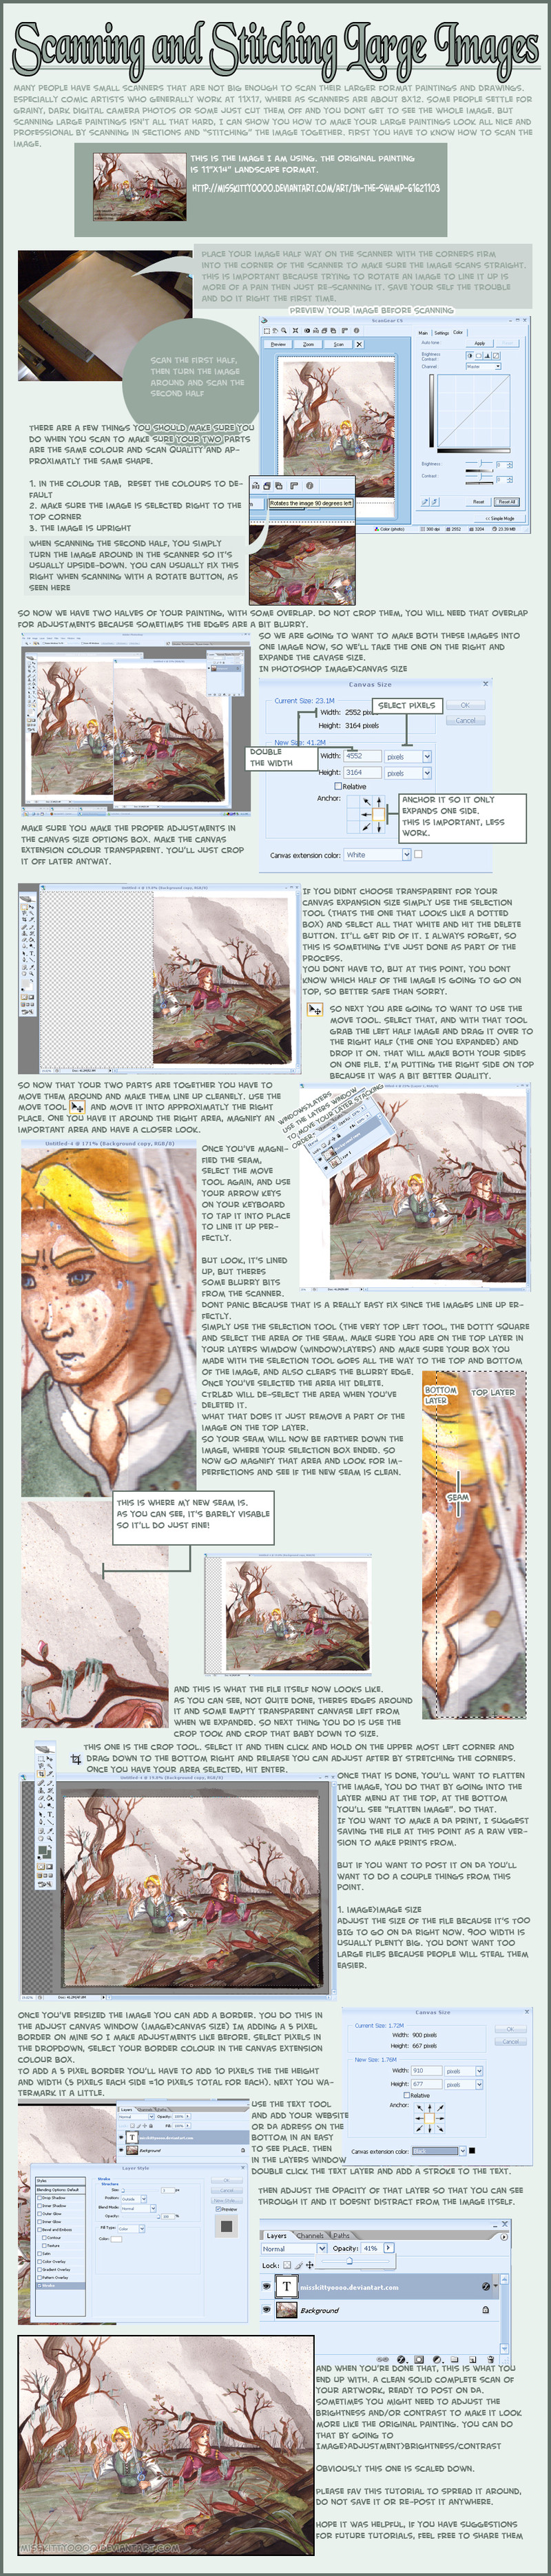
Scanning Large images
jeriweaver —
Scanning Large images
Published: 2007-10-09 03:27:42 +0000 UTC; Views: 35199; Favourites: 687; Downloads: 554
Redirect to original
Description
This is a tutorial on how to scan a large painting and stitch it together.Uses windows and Photoshop (but it should apply to most programs even if the menus are different)
Image used in the tutorial is here: [link]
so you can see how it looks in real size.
Any questions just comment.
Please remember that this is how I do it, it is not the only way.
I've used this method to scan images as large as 30" and stitched together using as many as 9 pieces.
~WaiLik reminded me of photomerge, I've used it before, it's really easy.
If you actually have Adobe Photoshop, try the photomerge tool file>automate> photomerge
Use the adobe help files to figure it out. You have to scan your pieces like in the tutorial still, just once you've scanned save them and use the merger tool.
I personally don't use it, because I've done it this way since before I even owned Photoshop and I'm a creature of habit.
It only takes about 2 minutes this way once your used to it anyway so it doesn't really save much time. You don't have to save your chunks like you do with the merger either.
If you are doing more than 3 or 4 chunks on most of your art you might want to see about getting Photoshop for that merger though.
Please don't save or redistribute, if you want to share it favorite the deviation or send someone the link to it.
Related content


Comments: 119

Wonderful tutorial! I've been trying to figure out forever how to sew scans together seamlessly. Thank you, this is ultra-helpful!

👍: 0 ⏩: 0

Thanks for the tutorial! now if only i could get back in to traditional art.
👍: 0 ⏩: 0

Thank you so much: I've needed this kind of help since I started drawing on A3 and failing miserably to scan it nicely!
👍: 0 ⏩: 0

")


A useful technique for matching up the two scans can be done if your artwork has borders. Ink registration marks beforehand at the overlap points in the borders...in the middle for any artwork less than about 16" (or about 40 cm) wide--or every 8" (20 cm) or less for even larger pictures. I tend to like a large overlap for a reason I'll explain below. Reduce the opacity of the top layer and match the marks--they won't match exactly because there's a little jitter in all scans that adds up when you're doing a big scan. Then return the opacity to normal and follow the rest of misskittyoooo's instructions.
If your scans have different qualities at the overlap, density, focus, color (and they will if your scanner's old and you've gotten too close to the edge), don't worry. When you select the area of the top one to delete (as explained by misskittyoooo above), feather the edge of the selection box and that will create a blend area where the top image fades into the bottom. If you have a large overlap, you can feather by 50 or even 100 pixels or more (as long as the overlap exceeds the area of the feather) and the seam between the two pictures will be completely invisible when you merge the layers.
👍: 0 ⏩: 0


this is so cool ill definately use this in the future
thank u

👍: 0 ⏩: 0


Its interesting seeing how someone else does this.
I am a high school art teacher and I like to keep a record of my students better work and so I do this a lot. However I use CorelPhotopaint and I tend to use a eraser tool to deal with that blurry part. My scanner actually tends to make that blurry part more like a darker part than blurry.
I have a number of traditional works of my own that I have done this with as well.
Great to see a tutorial done on this -- lol now why did I never think of that  (Wink)")
Well done on the tutorial and congrats on the DD.
 (Smile)")
👍: 0 ⏩: 1
oh forgot to mention most of what I do are in 6 parts as I only have an A4 sized scanner (21cm x 29.7). To scan a work that is A2 in size and have enough for overlap I have to do 6 scans of each work and then stitch them all together.
👍: 0 ⏩: 0

congrats on the DD, other DD giver.
👍: 0 ⏩: 0

Flawless Jepilope
I like it muchlies
I get asked this a lot, and explaining it makes me sleepy, so this will help me get through the day :3
👍: 0 ⏩: 0

I used already this technique for my comic pages in A3 format. I must say your tutorial is complete and detailed, it will be a great resource for people.
Of course, these tips work the same for The Gimp, which I use for my image editing needs.
👍: 0 ⏩: 0


<= Prev |