HOME | DD
 Kakarotho — Editing Sprites in Paint 2

Published: 2020-04-06 15:57:48 +0000 UTC; Views: 907; Favourites: 9; Downloads: 3
Redirect to original
Description
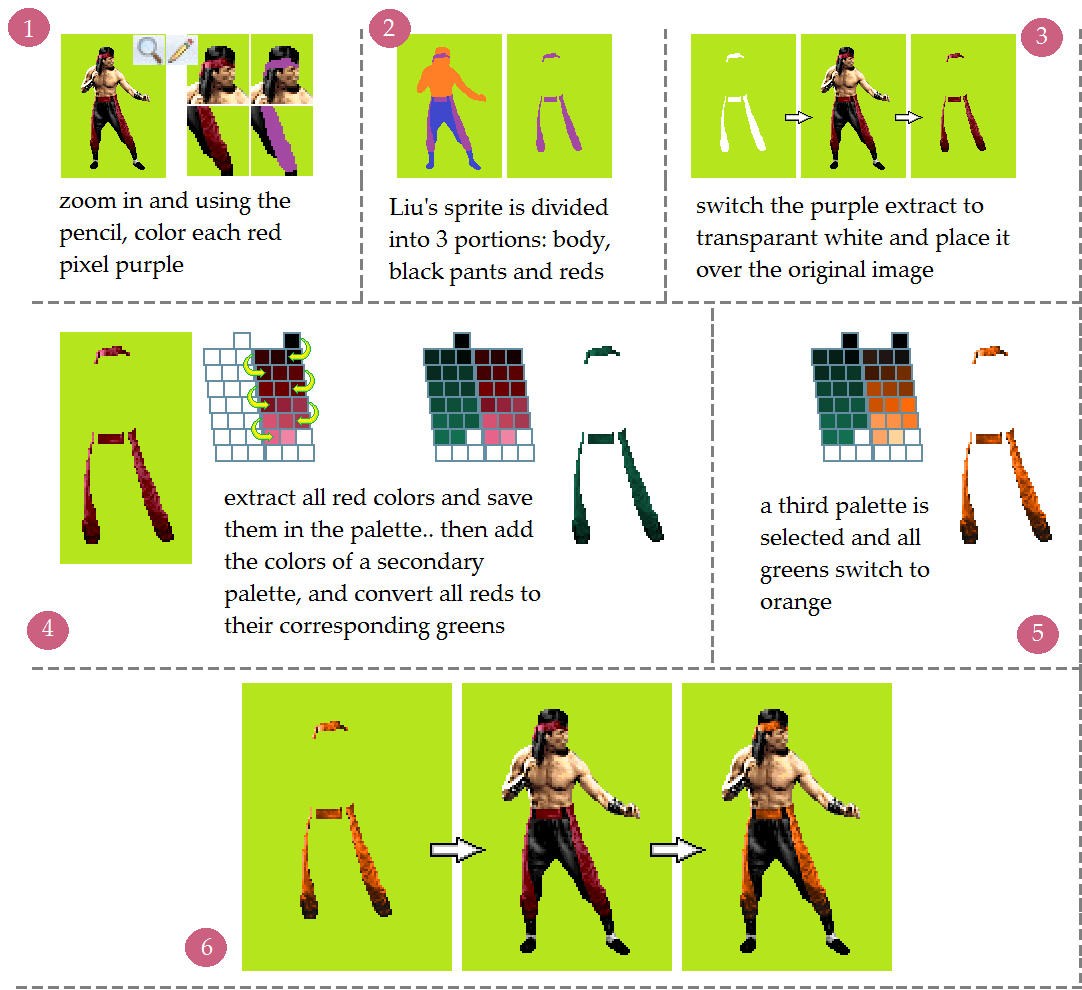
Follow-up tutorial showing how to edit sprites in Paint (or how I do it, anyway).1. We have the first Liu Kang frame from his MK3 stance animation. I'm going to make him orange instead of red. So first I zoom in on the sprite, and I'm going to divide the entire thing up in sections. Basically; I want to work on individual parts of the sprite, one at a time, so that I can focus on just the skin/body, or the pants, etc. To do that, I'm picking some random color that sticks out (purple in this case), and I'm turning every red pixel purple. I want a big purple blob to show wherever there's red in the frame. Just use the pencil tool for this and make sure you get all the right pixels.
2. So now all of the red pixels (and black ones that are really just very dark parts of the red due to a lack of lighting) have been turned purple. All of the black colors in his pants are turned blue, and I made his skin orange. I didn't do the hair, nor the arm guards or socks. Could've done those as well, but for now I'm not interested in working on those areas.
3. Enable "transparant" in "select" of your Paint toolbar. The purple parts can be separated, switched to true white, which will now be see-through because transparency is enabled, and when placed over the original Liu sprite, the red parts show up whereas everything else is blocked by the bright green. For working on a single frame, this might seem like way too much work, but when doing the entire animation, which has 9 individual frames, this process becomes necessary; even more so when adding stuff like clothing.
4. Here I'm extracting all red colors in their different levels of tones, intensity and brightness. I have a little palette board to place the red colors on. I save true black in the upper part of my raster, then work down to lighter tones. I put arrows to highlight where I place colors on the raster; going from dark to light, moving from right to left, then underneath the first three boxes, I go from left to right, and so on. The custom green palette that is shown I always use. This is an in-between palette. There are several reasons for using an in-between step like that, but the main reason is so that it's obvious and clear which colors have been converted, and which ones have not. For instance, if I'm switching a blue color to a slightly different blue, then I'm going to get confused in the middle of the process, because it's going to be tough to distinguish between blues; which blue pixel is original, and which one's new?? The same is true for Liu's red pixels here. I'm doing an orange palette, and it might be difficult to distinguish between original dark reds and alternate dark oranges. So this in-between, green palette solves that problem. There's yet another, similar problem that arises, even with the in-between palette, which I'll discuss in the next tutorial, but it's not relevant now. Right, so the image in 4 shows how all of the red colored pixels have been converted to their corresponding greens. Perfect.
5. Next, I handpicked some orange colors that I'm going to use. Pick the color selection tool in the toolbar, left click on the darkest green, right click on its corresponding orange equivalent, then pick the eraser tool, and while holding the right mouse button; move all over the image that has the green colored pants. All pixels containing the dark green color will switch to the orange, and you move down the entire palette; converting all greens to oranges.
6. We now have an orange pants. We can lay it over the original sprite, and Liu Kang's red pants and headband are now orange.


