HOME | DD
 liiga — Chain Tutorial
Published: 2008-07-17 01:21:54 +0000 UTC; Views: 123623; Favourites: 3690; Downloads: 1201
Redirect to original
Description
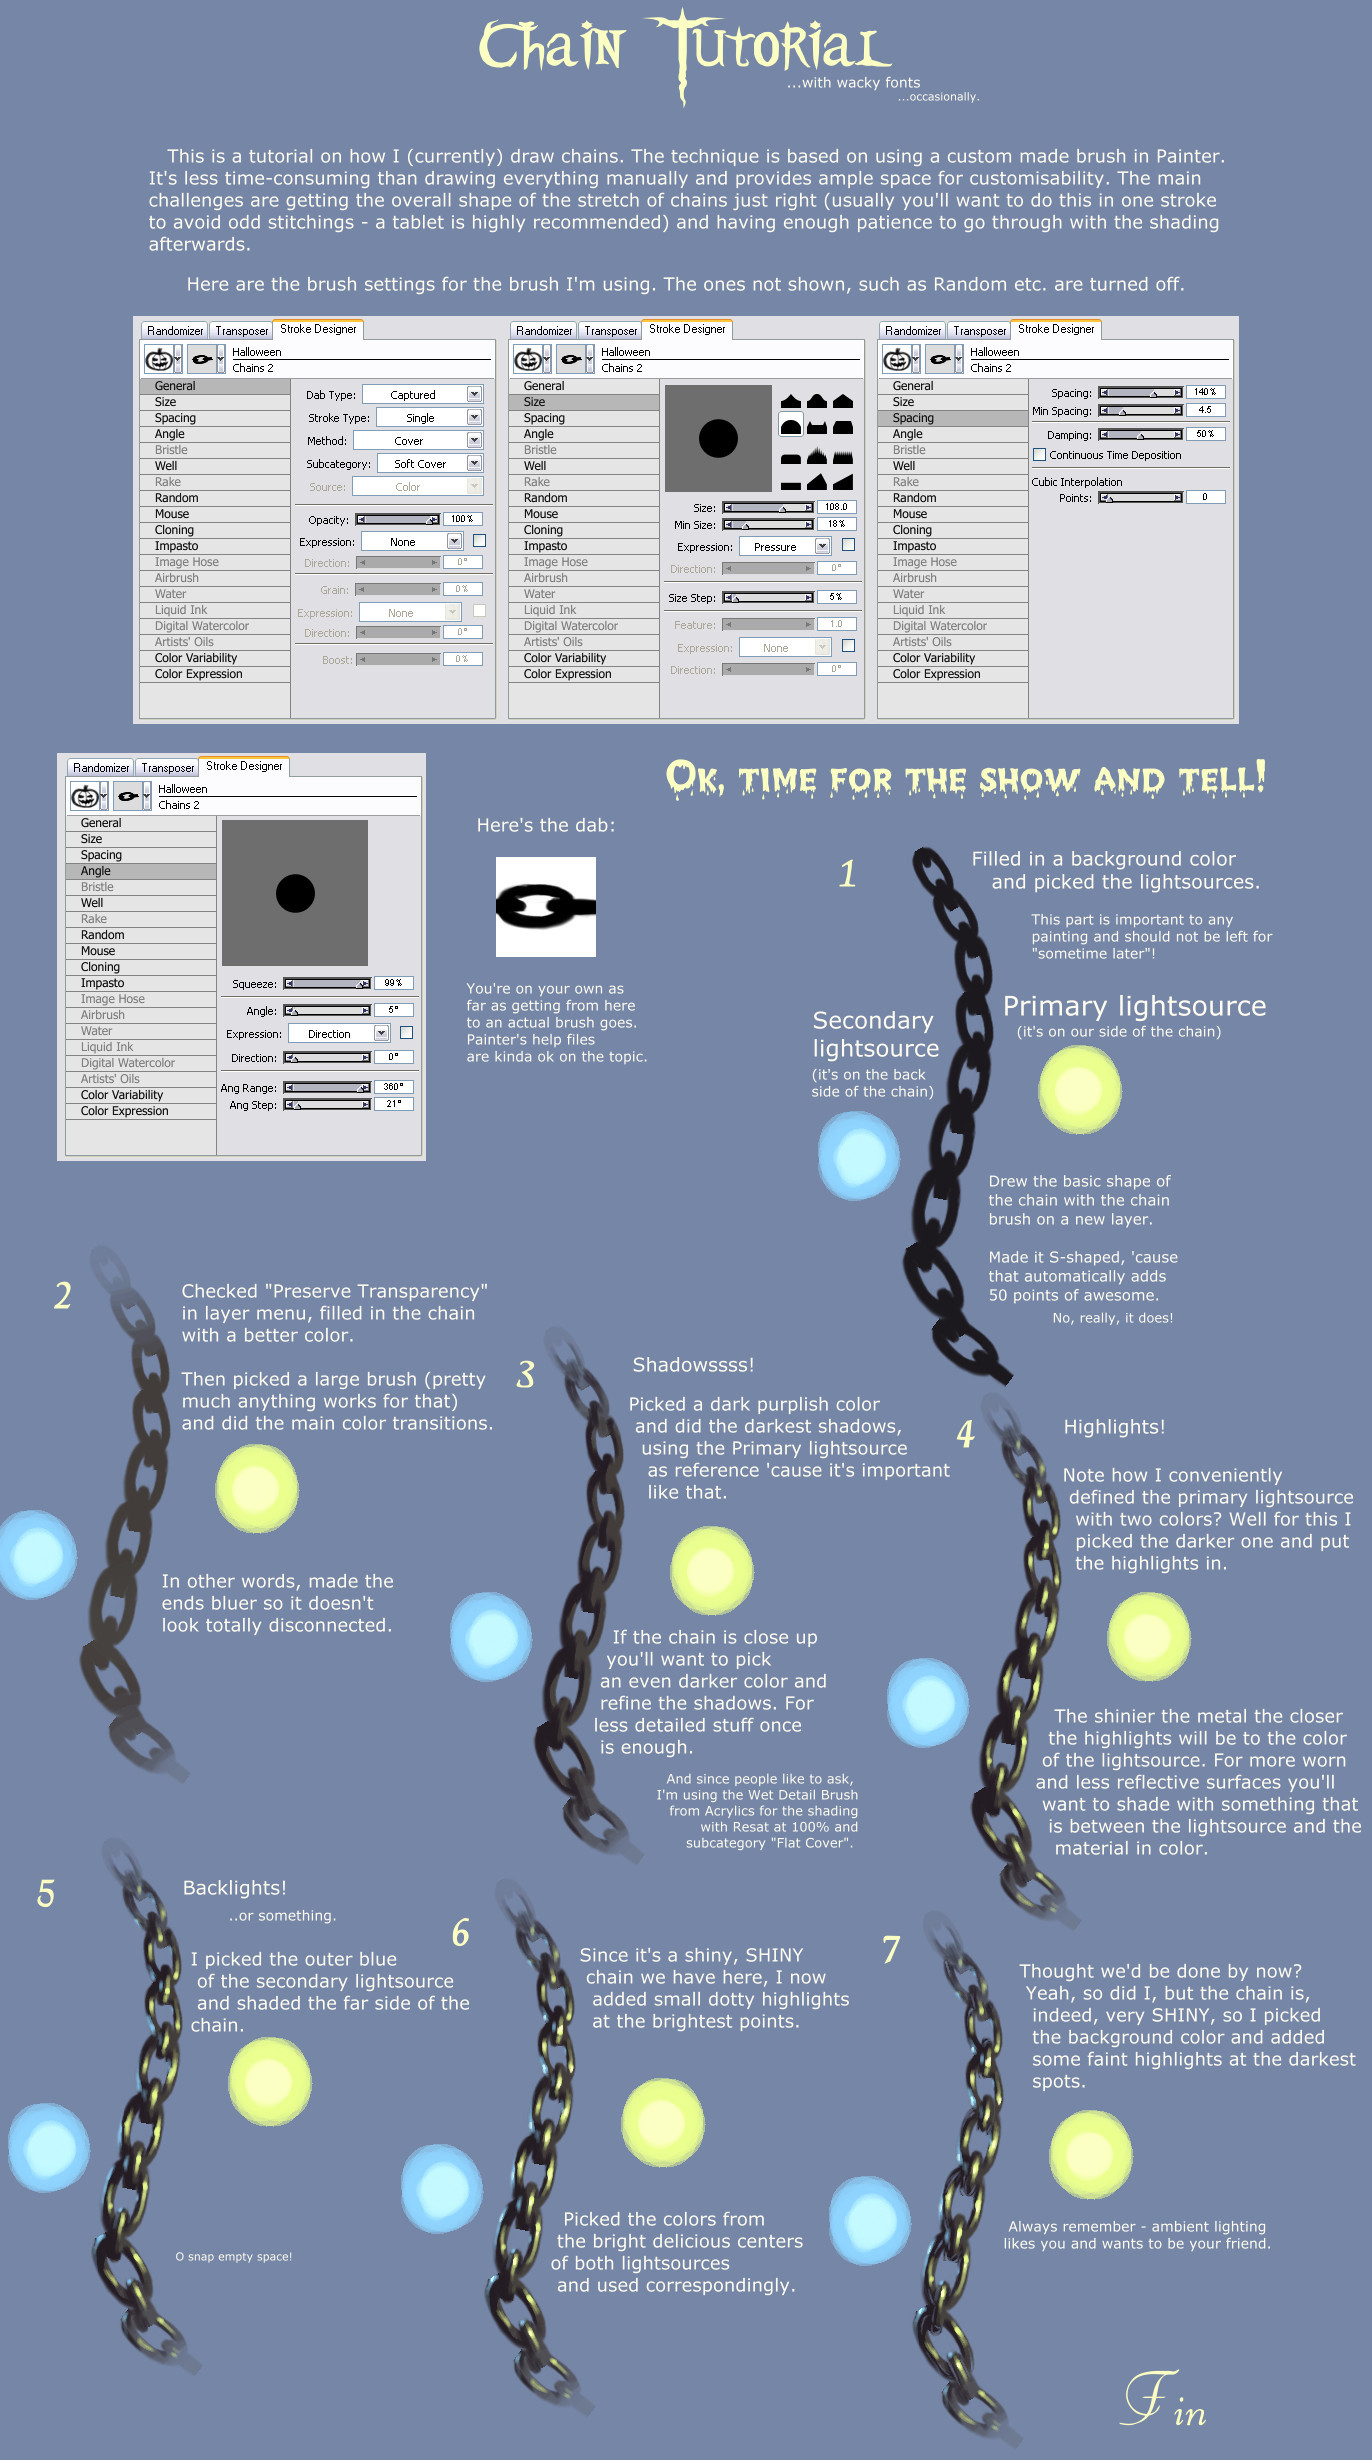
I had a tutorial on drawing chains up before, but it was so old, horrible and outdated that it made my eyes bleed so I made a new one.
That's pretty much how I draw all the chains lately. It's made with Corel Painter in mind, but you can probably replicate the process using other stuff such as Photoshop.
In step 2 I mentioned checking "Preserve Transparency". Just to be clear, that setting stays on for the whole tutorial. Really helps with getting highlights and shadows placed right, particularly for smallish chains where it'd be easy to miss them otherwise.
Oh and the brush settings are as they appear in the Brush Creator.
You can see the results here , for example.
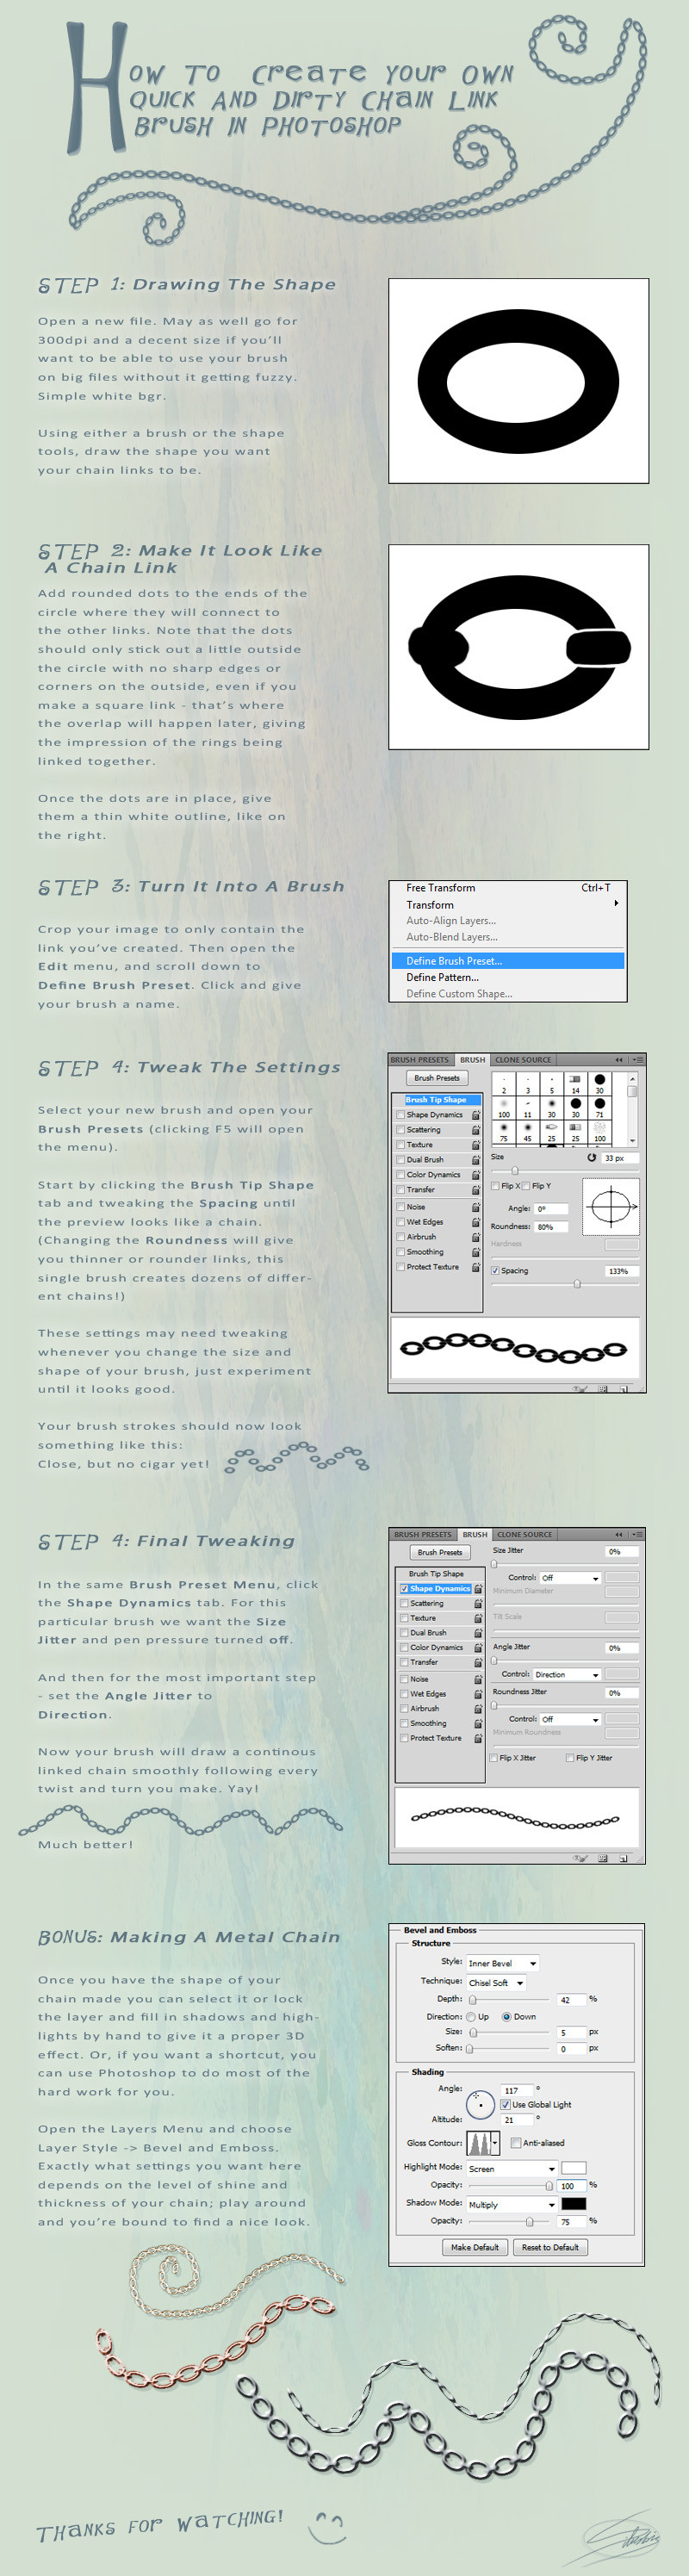
Edit: If you're a Photoshop user, here's advice for creating the brush as kindly provided by *cheshirepanda :
-Take a drawn chain image and 'Define Brush Preset'
-In 'Brush Tip Shape' under 'Brush Presets' Set Spacing to 201% (Or to what makes them evenly spaced)
-Under 'Shape Dynamics' under 'Angle Jitter', set drop down menu to 'Direction'
And theres the settings!
Related content


Comments: 140


Waa ;w;b I have searched for this kind of turtorial >w
To bad it wasn´t in SAI =w=
But still very helpful! x3
👍: 0 ⏩: 0

OMG THANK YOU SOOO MUCH FOR THIS TUTORIAL!!
I used it in photoshop, and was wondering if you would want to put this in Artists Comments for those who use PS?
-Take a drawn chain image and 'Define Brush Preset'
-In 'Brush Tip Shape' under 'Brush Presets' Set Spacing to 201% (Or to what makes them evenly spaced)
-Under 'Shape Dynamics' under 'Angle Jitter', set drop down menu to 'Direction'
And theres the settings!
Thank you again!
👍: 0 ⏩: 1

Very happy that it'll come in handy. I added your directions to the description, thanks!
👍: 0 ⏩: 0


I still dont understand how you made the brush/dab, without that i dont see how i can make the whole chain
👍: 0 ⏩: 1
This may be of use: [link] . (As well as some of the other stuff here: [link] .)
👍: 0 ⏩: 1
Haha still very confusing but i guess its just me, i'll have another go soon, thanks!!
👍: 0 ⏩: 0

")
")

Ahh this will help a hell of a lot
👍: 0 ⏩: 0


well, Photoshop SUX compared to what I've heard of Painter D:
👍: 0 ⏩: 0

This was very, very helpful, and quite easy to follow and use as well. Thank you so much <3
👍: 0 ⏩: 0


Thanks for the tutorial! It's pretty helpful for my next picture! ^_^ (although I have to draw the chains by myself D: oh well...--)
👍: 0 ⏩: 0

The reason I hate painter is sometimes their brushes are pixelized. Who would pay 400$ for some damn pixelized brushes? Anyways, back on topic, great tutorial!
👍: 0 ⏩: 0


aw, can you make a tutorial in adobe photoshop too...? i know there are lots of chain tutorials in the net, but most of them aren't great like this one D:
👍: 0 ⏩: 1
Sorry, I won't be able to since I don't use Photoshop. The underlying idea should be the same though, you just need to find the corresponding tools for making a brush that works the same way. I'm sure there are decent tutorials for making brushes in PS somewhere, like in good-tutorials.com .
👍: 0 ⏩: 0

this was really useful!
I managed how to get this effect on photoshop with your Painter instructions ><
thanks
👍: 0 ⏩: 0

Amazing. SImple and practical, thank you ^^
I am using a tablet at the moment
👍: 0 ⏩: 0

It seems veryyy useful :3 its better than just using the effects of photoshop to create the evil chain of terror.
👍: 0 ⏩: 0
No I couldn't even if I wanted to, because I haven't figured out how - and if at all - it's possible to export Painter's brushes. The tutorial has screenshots of all the settings and brush dab in Painter anyways, so if you wanted to duplicate this one it's not like a lot of work is involved.
👍: 0 ⏩: 1

hm ok.erm....i wish you knew how to creat brushes!!!hehehe erm ill look for at tortual.
👍: 0 ⏩: 0

sweet!!! i was looking for something like this!!!
👍: 0 ⏩: 0


Finally a tutorial on Chains. This looks very useful I'm going to give it a try one day
👍: 0 ⏩: 0

Whoa -- parts of the finished product look almost like bits of a 3D render!
👍: 0 ⏩: 0

thank you. this kind of tutorials are exactly what i need: not too intimidating, and simple to follow. I've tried in the past to follow complex tutorials (like painting a realistic human face), but now i see that i have to start small to really understand lighting and shading, and to gain experiment with the brushes.
i made this one [link] in photoshop. and i'm very happy with the result.
thanks again.
👍: 0 ⏩: 0

Quick stupid question, I was wondering how you an rotate the brush. I can never get them to rotate so I had to make a new brush every time.
Thanks!
BTW Your art kicks some serious ass. Right on.
👍: 0 ⏩: 1
Thanks! The rotation is determined under Angle. I've noticed that, at least with v9 of Painter, it might not work unless "Squeeze" is set to below 100 (99 works). The screenshot of my settings for the Angle tab is in the image.
👍: 0 ⏩: 0


I hope you gave us even more details on how to do so.
👍: 0 ⏩: 0

very useful if I ever get back to digital painting again
thanks for sharing your knowledge!
👍: 0 ⏩: 0


So there's a a help file in Painter that tell you how to create your own custom brush? o.o
Anyhow, great tutorial! I'm faving it
👍: 0 ⏩: 1
Thanks! That stuff is covered somewhere in Painter's Help section. If you search it for "brushes" it should come up somewhere. Parts of it are clear as mud, but the whole capturing the dab etc. thing it's thankfully pretty clear on, which is the essential part.
👍: 0 ⏩: 0

I like how that chain gets shinier and shinier for every step. Mostly chains in my mind are kind of rusty, but still thanks for making this, it's great Liiga.
👍: 0 ⏩: 1
You're welcome! With rusty chains you'd probably just make it not quite As shiny and if they're extra large, grab a metallic texture, put it on new layer, select the chain's transparency, switch to the texture layer, Cut the selection to a new layer and set it to Overlay, then adjust opacity. And of course throw out the rest. Works wonders for making objects look worn and rusty.
👍: 0 ⏩: 0


Good tutorial, very useful. at last something new for Corel Painter at deviantart among that all photoshop tutorials. good that someone thinks about painter users  (Smile)")

👍: 0 ⏩: 1
Happy to hear that it'll come in handy. Good luck with the project!
👍: 0 ⏩: 0

SHINEEEY!!!
wow, you really paint every tiny detail... it's impressive... I want to be like you!
👍: 0 ⏩: 1
| Next =>