HOME | DD
 LimitlessEndeavours — PDF Plaster Shell Mold Tutorial

Published: 2014-03-03 04:18:48 +0000 UTC; Views: 17556; Favourites: 372; Downloads: 979
Redirect to original
Description
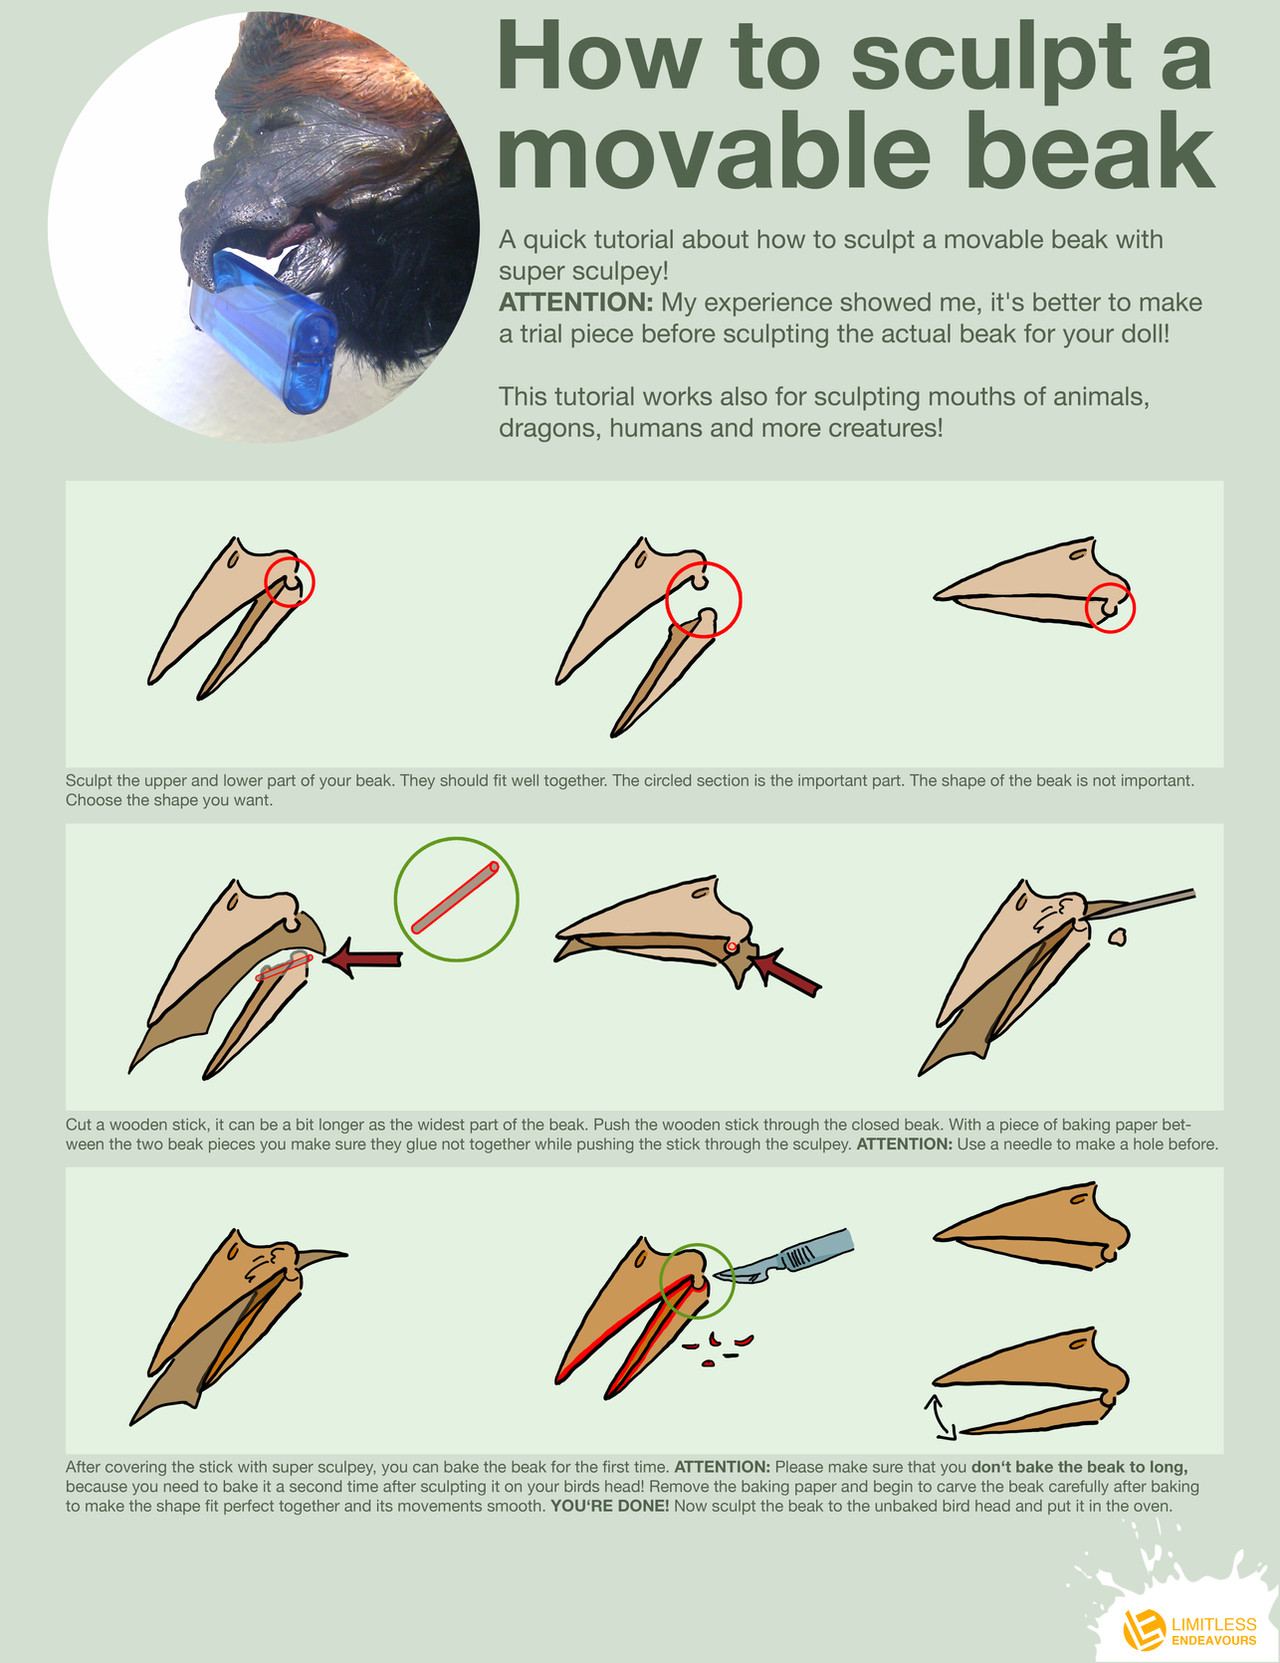
Turned out to be a long tutorial, so i decided to create a pdf instead the usual psd based file. This technique is besides for molding doll parts, also used to make mask molds. Masks for fur suits, carnival etc.
Check out Part 2 and learn how to cast with this mold:
----
Have you seen our other tutorials yet?
Related content


Comments: 24

I've got to ask because of the clay's color, are you using super sculpey in this tutorial?
I've tried to make a silicone mold with sculpey and it acts like the sculpey is a sulfur clay; it cures fine at the parts farthest from the center, but where it's touching the clay it gets all gummy and refuses to cure.
Is there any explanation?
👍: 0 ⏩: 1

That's interesting! I've recently had the same thing happen too. I thought I may have not mixed the silicone right but now I am not sure what to think. I checked the official sculpey webpage on which they state, that all products are sulfur free. I don't know if they changed the chemical makeup in any way that now may interferes with the silicone. I will go ahead and make a scrap something with my sculpey and mold it, to see if the same does happen again. What mold material did you use?
👍: 0 ⏩: 1
I actually used a plain caulking silicone from the hardware store, funny enough.
The weirdest part was I made a mold for paw pads at the same time as the mold for the head, and the results were completely different.
Now, there could be a million reasons for the different results, but since the paw pads worked, I don't think that the caulking silicone itself was the problem; I think I either didn't prep the head well enough, I miscalculated when mixing the catalyst for the head, or the clay had something to do with it. It's worth noting that the head was made out of super sculpey, but the paw pad was made out of fimo.
For the head, I used the plain caulk, mixed with a bit of paint thinner to get it to pour a little easier, and some cornstarch as a catalyst. Looking back, I think I would add a bit more cornstarch, as I ended up being quicker with making the mold than I thought I would be.
The head mold was the one that reacted like sulfur clay; it cured completely fine on the outside, but the inside was sticky and gummy; parts of the mold ripped away and stuck to the sculpt, making both the mold and sculpt more or less unusable.
The paw mold was a different story; I approached this in a different way, since I just wanted paw pads, and not a full foot mold. I actually learned how to make the paw molds from the jewelry and charm-making communities.
I poured the silicone into warm water, and added a bit of soap to act as the catalyst. Then I kneaded it a bit with my hands.
Once it got just slightly stiff, I removed it from the water, stuck the paw sculpt in and let it cure for a day or two.
That mold turned out perfect, and I still use it for my small animal paws.
I've heard that you can use sulfur clays in platinum molds if you prep it extensively with a sealant, so I'm going to try that in the next test run. I do. If that ends up working, people could save a lot of money on mold making. I'm actually using Amazing silicone for my next test cast, so if it does have to do with the silicone itself, I'll figure that out soon.
👍: 0 ⏩: 1
I see! I don't have any experience with the kind of mold making you are practicing. Maybe your silicone was too thick and thats why it didn't cure all the way? You know, like when you paint multiple layers but apply too thick of a coat and the paint won't dry fully underneath.
I use the professional silicons, so now I am still not sure what happened. I am still going for a test mold to rule the sculpey issue out. Keep me posted on your results!
 (Smile)")
👍: 0 ⏩: 1
That's absolutely something that could have happened; the mold box was made with a red solo cup so there was a lot of silicone on the outside. In the future I think I would go thinner.
I'll definitely let you know if I make some discovery! I'm going to be sealing up my sculpey just in case, but it'd save a lot of people a lot of money if sculpey turns out to be useful for mold making.
👍: 0 ⏩: 0

Wow, thank you SO much for doing this!
I'd love to try that stuff myself in the future.
Thank you a lot for sharing! X)
👍: 0 ⏩: 1
Welcome! Good luck with your future molding projects!
👍: 0 ⏩: 0

that last bit was helpful, the part about adding the base to the sculpt because it'll make creating the mold best for a slush cast (so freak'n resin no spill out)
👍: 0 ⏩: 1
Yeah, I learned pretty quick to perfect-ionize my molds - I am a bit lazy when it comes to scratching resin off of any surfaces.. 
👍: 0 ⏩: 0

Excellent tutorial, cannot wait for the next part. I've seen other ways of making a mold casts. Is this the better way? I'm intrigued as am trying to get into myself.
👍: 0 ⏩: 1
Thanks!
It really depends on the project you want to mold. There are techniques that are better on this, but less practical on that project.
👍: 0 ⏩: 1
Ah I see, well I'm into doll making and would like to replicate my dolls heads and feet. Here is one of my dolls for example stephanie1600.deviantart.com/a… . Would it work for this? Sorry to bother you with these questions, I was advised by another DA member to ask you as you are great and helpful to ask about this kind of thing.
👍: 0 ⏩: 1
No worries 
You can use the molding techniques I show in those tutorials for this type of project. For the head choose the one part mold, for the paws the two part mold (if you are not feeling comfortable about using the 1p-mold here too). 2p-molds take a day longer to make and are messier though

👍: 0 ⏩: 1
I'm sorry to say I cannot for the life of me remember who the DA member was. I deleted the reply stack a few weeks back. Sorry about that. How very innovative with the tin foil! Why is it that you recommend to do the head with a one part mold and the paws with a two part mold? x
👍: 0 ⏩: 1
Don't worry  (Wink)")
Depending on how comfortable you feel with molding more or less complicated paws, you can choose to do a one part mold as well. An object with deep undercuts should be done in a two part mold to prevent air bubbles from getting trapped in those undercuts.
👍: 0 ⏩: 0

Did you have any problems with air holes collecting in the ears?
👍: 0 ⏩: 1
Nope, the ears came out perfect.
👍: 0 ⏩: 1


Thank you very much for sharing your experience in such a well detailed way!
👍: 0 ⏩: 1
