HOME | DD
 Lizkay — AdvancedCellShading - Tutorial

Published: 2005-09-14 18:38:24 +0000 UTC; Views: 59331; Favourites: 372; Downloads: 6368
Redirect to original
Description
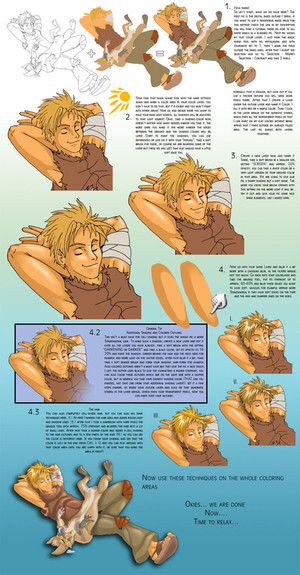
My Advanced Cell Shading Tutorial based on one of my last pics, I still don't finished this pic (Wink)") So well no complete result so far.
So well no complete result so far. This is how I color my gradient cell shaded pieces, hopefull helpful and understandable, if you find any mistake etc. just tell me, a HTML verion of this on can be also found on lizkay.com under Tutorials.
EDIT: There is this sentence at the begining which tells you to go "HERE" at first if you want to work that one out with traditional drawn and scanned pics, this tutorial can be found here: [link] !!!!!

Related content


Comments: 54

this one should work: fc07.deviantart.net/fs7/f/2005…
👍: 0 ⏩: 1


This tut gave me some great ideas, thank you
 (Smile)")
👍: 0 ⏩: 0

to see this tutorial click on the download button on the right side, to see the tutorial described (and placed for the word HERE in the text) go here: [link] that should work
👍: 0 ⏩: 0


")
try this: [link]
it's the advanced version of this old tutorial that link refered to
👍: 0 ⏩: 0

This tutorial was very helpful and filled with a lot of useful information. I have just started working with a new style of art and this has definitely helped me along the way. If you would like to see the first piece I have tried using this tutorial, it can be found here [link] . Thank you for making such a lovely tutorial available to aid artists like me.
👍: 0 ⏩: 0


Wouldn't this be considered gradient shading? Ah well, very nice tutorial.
👍: 0 ⏩: 0

so cool & helpful! how do you get your lasso tool to have really smooth edges? mine always looks pixely...
👍: 0 ⏩: 1
If your lasso tool is selected be sure the 'anti-alias' option is checked, it's visible on the top-menue bar
you can even add a number highter than 0 in that feather: area up there to make it more smooth
👍: 0 ⏩: 0

Thank you so much for making this! I'm hopeless with computers, and this is going to help a ton!

👍: 0 ⏩: 0
A very useful tutorial, Hat off to you for creating it, many thanks!
👍: 0 ⏩: 0

I've added this tutorial in an article called Weekly top quality Photoshop tutorials #26
👍: 0 ⏩: 0


By far the most useful and time saving tutorial ever. I have seen it on your site but i was never able to comment/ show my appreciation on it. I would have never thought of coloring like that. Thank you Very much for this wonderful Tutorial.
and to answer the old Gimp question above Yes it is able to lock transparent pixels (similar spot as CS2) but it could be a newer feature since 2005.
👍: 0 ⏩: 1
Thanks a lot! 
There is a way to make the process a lot faster, instead of working with the locked layers you can use masks, that's what I do for all my newer images and it works faster and is also easier
👍: 0 ⏩: 1
Thank you I will give that a try. Learning techniques are so fun!
")
👍: 0 ⏩: 0

omg thankyou for making this ^___^ its helped me sooo much
EPIC WIN!!
<3
👍: 0 ⏩: 1

After your last few pictures I knew I remembered seeing a tutorial for your magnificent cel shading. Lo and behold, I was right! Definitely favorited, this will come in handy for me when I get Photoshop CS2 back!!
👍: 0 ⏩: 0
kay... forgot to update the second link... sorry, so here is the right link:
[link]

👍: 0 ⏩: 0
Link is in the description
(the text is off my html site and DA doesn't let you copy hotspot links on pictures...)
👍: 0 ⏩: 1

thanks you.... can you visit the new page: [link]
👍: 0 ⏩: 0


When did you change the colors of your lineart?..... When did you ink your line art in different colors? Did you use the pencil tool? AND...Can you explain what the other outine layers where used for?
👍: 0 ⏩: 1
The coloring of the lineart is described in the last text part, the way I described it there is just possible if you have your outlines on a seperate layer, if scan an inked picture you can clean it up that way I described it in this tutorial:
[link]
the outline coloring is also described in the detail there
the un-used layers there are simply used to mark the areas better and to have a better overview of all the layers, (normally I give each color a seperated layer)
👍: 0 ⏩: 0

Possibly, I am not sure if elements offers layerstyles that way, but you can try
I made it with version 7.0, CS and CS2 of Photoshop works fine that way in all versions
👍: 0 ⏩: 0


Oh wow~ That was a very useful Tutorial~~<3 Thanks for posting it
👍: 0 ⏩: 0

The cleanness--- and dare I say simplicity of this technique yields such strong results. I want!!
👍: 0 ⏩: 1
Thankies!!
If you merge the layers with the shadings and light and put a gaussian blur over it, you get a almost painted result, which is also very nice, the practical thing with that technique is that you have your shadings on seperated layers and so you can really change them easily.
👍: 0 ⏩: 0

this is gona be very usefull for me
thank you

👍: 0 ⏩: 0

woa, really nice and thorough tut. I've always wnted to try cell shading, but I'd probably need a tablet.
👍: 0 ⏩: 1
Thankies!!
A tablet is THE thing! I am addicted to my one
👍: 0 ⏩: 0

hm...ja das ist sehr interessant, wie andere zeichner colorieren =3 ich mach die schattierung nie auf ner separaten ebene, ich mal immer auf der grundfarbe rum 
aber ist ein tolles tutorial ^o^b
👍: 0 ⏩: 1
Danke!
Generell mach ich's auch so, dass ich gleich alles auf einer Ebene mach, zumindest dann wenn's weich und "gepainted" aussehen soll, dann geht das fast leichter wenn's auf einer Ebene ist, aber wenn die Schattierung extra ist kann man recht schöne Effekte mit den Ebenen-Einstellungen machen, z.B alles dunkler machen, oder so eine Stimmung reinbringen z.B Sonnenuntergangs-artig wo alles ein bißchen ins rote geht ...etc.
👍: 0 ⏩: 1
jo, stimmt, kommt drauf an wie es aussehen soll =3
ich versuch beim nächsten bild mal deine methode wie im tut ^^
👍: 0 ⏩: 0


yep love your tuts! its the gradient part i have most probs with and i have no patience with pen tools but i will practise and that
👍: 0 ⏩: 0

Whoa, that's dead confusing. You've lost me on that one.
Still, I'll find my own method of doing it. I use GIMP 2, which has a different layout.

👍: 0 ⏩: 1
Does Gimp allow "lock transparent pixels" ? I had it once, but never really did much with it. This is the most practical function of the photoshop layers!!! I don't make any pic without using it.
👍: 0 ⏩: 1
You have a layer, completely transparent, draw a circle in there and than set the layer to "lock all transparent pixels" if you color than on your layer you just color that circle, all the stuff which is transparent is locked, so it allows you to make a gradient over the whole layer but it will only be made on that circle.. = you just can color where ther is no transparent pixel = just where there is already a color.
👍: 0 ⏩: 1
| Next =>