HOME | DD
 manic-goose — Tutorial Drawing Clothes

Published: 2007-02-28 21:06:45 +0000 UTC; Views: 102511; Favourites: 743; Downloads: 10554
Redirect to original
Description
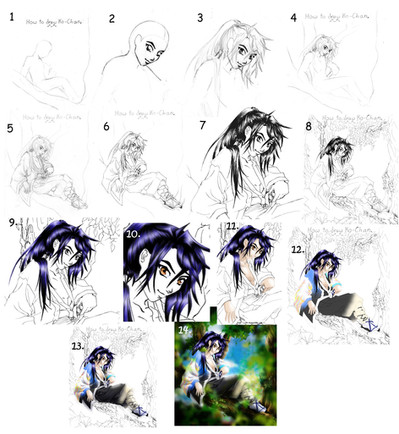
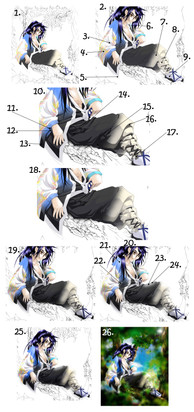
How to draw clothes (mostly)This tutorial is meant to be a tool in helping people to draw clothing in general, but you can use it to try to recreate the image shown here exactly if you wish. Please remember to give me credit for the original character (Ko-Chan) as well as the original drawing if you do. Thanx. =^__^=
The main purpose of the numbers is to help you see how one picture is different from the one before, basically, what changed. The descriptions below are mostly to help with clarification, so you know WHAT you are looking at as well as where to look. They also help to explain how this can translate into different drawings. My advice is to only read what you are confused about, hopefully not everything. This is just one model of clothing, showing some common patterns in the way fabric acts. The best way to get good at drawing clothes is to just keep drawing and trying out some of these in different ways. I hope this tutorial helps a little. Good luck.
1. Before you draw the clothes, you want to draw the figure that will be wearing them. Draw the face and the hair first as well. That helps, even if you will be covering the face. If you want help with that, here are a few tutorials for you. How to draw a three quarter angle face, click here . How to draw a front view face, click here . Ko-Chan’s hair tutorial, click here . How to draw eyes, click here . Yes, I understand that your character will be temporarily naked, but don’t get carried away with details, only draw completely the parts that will possibly show through the clothes. The reason for this step is that when you draw the figure first, you can draw the clothes so they fit onto the character, so it looks as though he or she is actually wearing the clothes rather than the clothes just floating there with some random folds in them. Remember, you want to sketch lightly, so you can easily erase things, and so the finished picture looks clean.
2. No pick a spot you wish to work on first. If you have something being worn over something else, draw the top layer first, it saves time. When you start drawing the clothes, remember to make some bulges where you want the clothes to hang loose; very important for baggy clothes, not so important for tight clothes. These bulges do not have to be precise, just general marks. You can define them later as the folds around them take shape.
3. Most of the clothing will cling a little to the figure, so draw the edges along the shape of the figure. In this picture, the edge of the fabric curves around the hip, hits the tree, and makes an angle to follow the tree, then hangs over the edge. This is why you want the figure drawn first.
4. Any seams or patterns need to follow the shape of the folds you draw, going up and down with the fold lines is the easiest way to show this.
5. On loose fitting sleeves mostly, but also a little on tighter sleeves, there are folds that hang down from the shoulder. They tend to look something like that. Starting thin at the top, but fanning out at the bottom.
6. Where the arm bends, you have fabric folding over on top of it self. When drawing that, you want to draw part of an upper fold going over the lower fold, but with the upper fold disappearing behind the lower fold. Sometimes you have a space between them where you see the fabric that still clings to the arm itself. When shaded, it is darker.
7. It helps to define the shape of the fabric when you draw a line that shows the general area where the arm underneath ends. This indicates a bend it the fabric.
8. Foreshortened arms with fabric can be tough to drawn, but the trick is layering folds in front of fold, the closest being drawn the biggest, and folds behind it disappearing behind the front fold. This is to give an illusion of depth.
9. To add detail, it is fun if the hair hangs over the shoulder, to draw one fold that reaches up over the hair a little. It adds depth as well.
10. Once you have drawn everything in an area completely, you can erase the lines of the figure and the surroundings that overlap it. This helps to cut down on confusion.
11. When you have one piece of clothing over another, sometimes you might want to draw part some overlapping, and don’t forget, you still want to follow the shape of the figure at least a little. But you can draw a bulge in the fabric so that the shirt under the other comes in front of it a little.
12. So you draw the clothes around a hand, you can start working on defining the hand a little at a time. I find it easier to do this way because I don’t get stuck with the hand at the end this way. It also helps when you are inking, because that way the hand is drawn completely before you have to draw the edge of the fabric where it touches the hand.
13. If something is tied into the waist, it helps to draw extra bulges (folds) toward the bottom, where gravity pulls down on the fabric. Two of these folds is a general good number; one can be good too, depending on how loose you want the fit, more than two looks silly though… I think.
14. When starting a new article of clothing, it helps to lightly sketch out a general map of how you want it to look. This is when you show where you want it to cling and where you want it to hang loose.
15. Pants have a funny way of bunching a little around the . . . err . . . midsection, so draw lots of little folds overlapping one another in that area.
16. When you have baggy pants, there is a space at the bottom that bulges out more than anywhere else. Using sharp edges rather than round and sooth edges to show these folds will give the impression of a slightly thicker material that is a little ridges, rather than smooth and think like nylon.
17. If your character is sitting on something, drawing a little fabric that rests on the surface of what the character is sitting on plants the character better, so it feels less like they are just floating in space.
18. Where a leg bends, you want to draw more little folds on the inner part of the bend, just lie what you do with an arm’s bend.
19. If you have one leg in front of another, you need to focus on the front leg, but once you have a good amount of detail, you can start thinking about drawing the clothes on the back leg.
20. When you are drawing clothes that are tied to the body by a belt of a rope or something else, the first thing you do is plot out the general shape of the fold that are created by this. Just draw the outline first.
21. When drawing large fold, there are often gaps between the folds, drawing them can add dimension.
22. Under a larger fold, there is sometimes a smaller fold, especially if the fabric is being tied down.
23. Don’t forget to draw seams and patterns, and make sure they follow the shape of the folds in the clothes.
24. For the tied down part, lightly sketch the path of the rope or string or belt (in this case … string … ribbon) completely. You will draw folds over it next.
25. Draw the folds over and behind the rope string belt.
26. Finish drawing the rope string belt, but only where it shows through the folds.
27. When drawing the edge of something that fans out a little, draw the edge line as a squiggly line, going up and down and back an forth.
28. Only draw the foot when the pants are nearly done or all the way done.
29. When drawing feet, the heel is usually behind the rest of the foot. Show this by drawing a line that reaches into the heel a little.
30. Samurai have these funny socks that split the big toe from the rest of the toes, so drawing the big toe separately is a must. It also helps to do so even when you are drawing all the toes or when you are covering the whole foot, because the big toe is placed a little differently from the rest of the toes, it does stand out.
31. After you have drawn the bottom of something, drawing lines that come up from the sharp corners will make the squiggles look lie folds.
32. When drawing something that wraps around something else, drawing it rounded a little gives depth, as well as the illusion of it bending back on itself.
33. This is just drawing attention to the straps of the sandal shoe thing he wears.
34. Draw the base of a shoe by drawing its thickness. Also, shoes bend with the shape of the foot, curving in where the foot curves in.
35. Feet usually get covered up a little by thing son the floor or ground that are in front of them, so by drawing something that comes in front of the foot a little, you help give the feeling that the character isn’t floating in empty space.
36. Just drawing attention to the hand. Draw the main part of the hand first, going to the knuckle and draw the knuckle, even if you will erase it later. Do this before drawing fingers, it usually helps.
37. These lines represent folds that are only partially visible to the eye.
38. This is a finished hand. Often, a grasping hand has one finger that shows more clearly than the others, which bend back more.
39. When the picture is nearly done, you need to remember to add the details. In this case, it is the ray skin on a katana.
40. Look! Fingers!
41. Don’t forget to draw the details in an ear. (I did. XD)
42. Define that parts of the ground that are in front of a foot clearly, and erase all the guiding lines then you are done.
Related tutorials using the same picture:
General anime drawing guide, click here
drawing a three quarter angle face, click here
drawing Ko-Chan’s hair, click here
coloring dark hair, click here
shading clothes, click here
coloring skin, click here
coloring Ko-Chan’s clothes, click here
Related content
Comments: 38

Wow this looks really helpful I got to try it one day. Thanks for the post
👍: 0 ⏩: 0

It's nice .. but too much , I wish if it was more clear!
Thanks , It's helpful ..
👍: 0 ⏩: 1

Yeah, this is old, did you have any particular questions relating to coloring clothes?
👍: 0 ⏩: 0

I think this tutorial could be really helpful, but it would be lots better if you put the text in the picure (like a very long thin picture), and put a nice bg colour on it. That way it would look 10 times more attractive and .. well readable (just some tips). Because I think it would be a waste to make such a nice tutorial, and then have no one read it
... you could also start with just putting an open alinea between each line <3
Again, I really like it. It works just way batter with less text and more drawing 
👍: 0 ⏩: 1

Yes, I agree, that probably would have helped, but at the time, I was still unfamiliar with how best to present a tutorial, as this is very old.
👍: 0 ⏩: 1

Oho late reply xD
Anyway, I didn't check all of your profile 
👍: 0 ⏩: 1

Aha ok 
👍: 0 ⏩: 0

I'm working on my people-drawing skills, and I think this tutorial will really help.
👍: 0 ⏩: 1

Happy to hear that. Good luck
👍: 0 ⏩: 0

Thank you for putting up such helpful tutorials. This will be of great help when I draw clothes in the future ^^
👍: 0 ⏩: 1

I am glad you appreciate them.
👍: 0 ⏩: 1

Good to know. Good luck with your artistic endeavors.
👍: 0 ⏩: 1

Glad to hear that. Thank you.
👍: 0 ⏩: 1


👍: 0 ⏩: 2

I know this comment is really old, but I just cracked up at your siggy!!
👍: 0 ⏩: 0

That is what most people do at first. XD That is what I did. ^^
👍: 0 ⏩: 0

wow!! Sensei!! This is really helpful!! I was trying to draw an outfit but couldn't get the fold for the sleeve!! ^^ Thanks sensei!!
👍: 0 ⏩: 1

I'm glad. I wasn't sure how much help it would be seeing how there are so many steps to it.
👍: 0 ⏩: 0

Thank you. But I hope it is helpful too. ^^
👍: 0 ⏩: 0
