HOME | DD
 meanlilkitty — Midna Helmet Colage

Published: 2010-10-10 04:12:50 +0000 UTC; Views: 5068; Favourites: 115; Downloads: 176
Redirect to original
Description
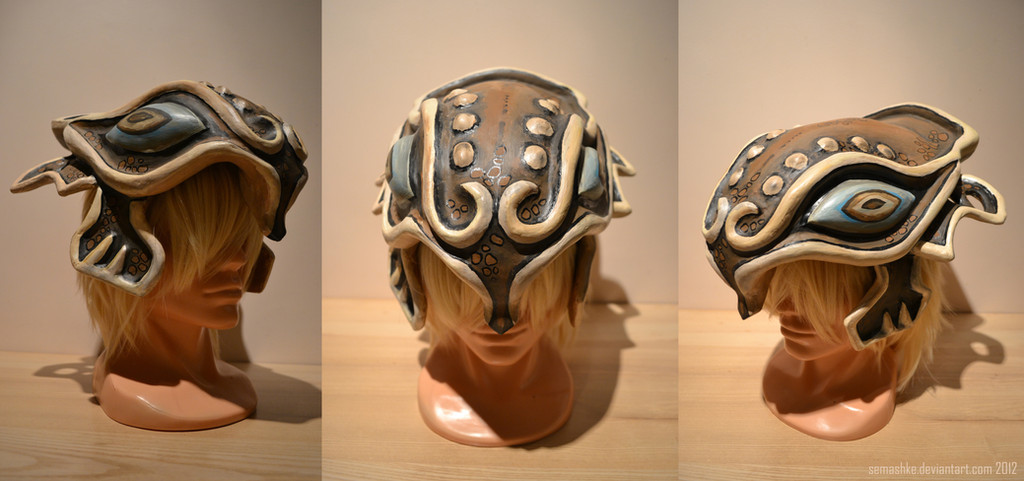
Yay, it's finished! I moved in the middle of painting this, so it's been a struggle getting the finishing touches done, but hey, it's done and if I don't say so myself, it's freaking AWESOME!! X3 This was a lot of fun to make and I'm really pleased with the end product. Later I may do Midna's ponytail clasp just for funsies.Made from pink insulation foam, some paper clay, and a few bamboo skewers. Painted with acrylics.
Related content


Comments: 36

I'm gonna use this as a guide on how to make myself a helm!
Could I use Model Magic for the parts that stick out, and then glue them on with super glue?
And also, to get the dents of the squared circles, I can use an ironing pen ( For guitars ), right?
Another thing- was this EASY, SO-SO, MEDIUM, HARD, EXPERT?
👍: 0 ⏩: 1

For me it's not terribly hard, just time consuming, but I've made like six of these now and have been making props for six years roughly. I actually build the raised parts directly on the helm, I just gesso it first so the clay has more to hold onto--straight pink foam is a little too slick. I'm not terribly familiar with Model Magic, but I used Paper Clay for the raised parts, it dries within a day, is ready to use out of the bag and doesn't crack. Let me know if you need any more advice!
👍: 0 ⏩: 1
Hm... Lesse... a soldering iron for guitars... could THAT be used for making the details in the helm? My dad owns a LOT of them, and I assume since they can melt things that you need ( Like drawing with a pen, it only marks specific areas you guide it into ).
👍: 0 ⏩: 1
I don't know what that kind of tool would be, but a wood burning tool or a dremmel would be your best bet. If a guitar soldering iron acts the same way, then go for it. I would probably start with a practice piece of foam to make sure you can cut it cleanly. If you do go with the soldering iron or wood burner, be sure to do it somewhere with good ventilation, because the fumes are pretty bad
👍: 0 ⏩: 1
I know, my dad used to use them on his guitars, WHEW! it smells like the rear end of a car. DX
👍: 0 ⏩: 0

Hey... ummm... XD I just wanna say, this looks fantastic. I'm a huge cosplay freak. And my girlfriend is going to be cosplaying Midna next May for Anime Central. (hopefully!!!) And I wanted to know how you made the helm here. It's a very detailed piece, as i can already tell. but other than that, it looks almost simple enough to make.
Could you tell me where a tutorial for this piece would be? Or any tips you have for someone new to this?
👍: 0 ⏩: 1
Thanks! It's honestly not as hard as it looks (according to me at least haha), it's just time consuming and has a absurd amount of details. Basically it's just layers of pink insulation foam rings that I glued together then sanded to make it curve. The front is made from a separate foam block that I shaped and detailed first, then attached it to the main helm with a bunch of hot glue and screws (from the inside). The snake details are made from paper clay and the details are all made with a wood burner with the first helm, all the new ones I make are carved with a dremmel. Less toxic fumes. Gesso the whole thing, sand, and paint in a bunch of different layers of grays, blues, greens and silver luster. The finished helms I do with the craft foam wig has a felt cap on the inside that I screw and glue into place on the inside of the helm. That way, there's somewhere to glue the wig, and even if the helm ends up a little loose, you can wear the entire thing like a hat.
I know it's a lot of work, but if you come across any issues, let me know and I'll be happy to advise!
👍: 0 ⏩: 1
Alright, thanks for the quick response!!  (Smile)")
👍: 0 ⏩: 0

Hey, sorry, me again (having commented on another part of your Midna helmet, me going to cosplay as midna) How did you get the round shape of the for front piece? Did you manage to some how bend the insulation? or did you just layer and carve?
👍: 0 ⏩: 1
layer and carve. It's a bit wasteful, but I don't wanna fuss over math when I could be carving, haha, and melting foam can be quite toxic
")
👍: 0 ⏩: 0

You did such an amazing job! And I want to thank you for sharing your progress pics. I also want to cosplay Midna, and so I have to make that helmet (which scares me a lot xD). You gave me a lot of impressions, how to do it, and hopefully it will end well xD
👍: 0 ⏩: 0

Oh, so pink insulation foam is safe to touch? I thought we were talking about actual insulation. *embarrassed* I'm assuming it's similar to the green craft foam that =CanineHybrid uses? How all did you shape it?
(Sorry, I have to know these things. I want to make props so very bad. >w<; )
👍: 0 ⏩: 1
The ridged foam is, not the soft stuff you see in rolls. It's actually different from the green foam. The green foam has a lot of air pockets in it, so it's not as strong as the pink foam, and it also crushes easier. The green stuff you can find at any Michaels or Joannes, the pink or blue foam you'll have to find from a home depot, lowes, or order online. Shaping it is quite easy. I tend to build up layers of the pink foam by gluing them together with wood glue, then leaving them weighted while they dry for several days. After that I use a dremmel to rapidly cut and shape it all down, then use a electric sander to smooth it out. If you don't have those tools, then you can use a steak knife and some sandpaper, it'll just take longer
👍: 0 ⏩: 1
Oh, I didn't know that. About how much were the dremmel and electric sander tools?
👍: 0 ⏩: 1
The dremmel you can buy off brands for $40-60, but I'd stick with the Dremmel brand, which will be more like $60-70, then there's a extender so you don't have to hold the dremmel that's usually around $40. (It's like what the dentist would use to drill your teeth, much easier than holding the 2 lb dremmel for a hour at a time). Then there's bits for the dremmel that usually run $5-10 each, but the dremmel will most likely come with a starter kit. I usually use a orbiting circular sander, and depending on the brand, $20-140. My band sander is a fairly small one, and it was about $60
👍: 0 ⏩: 1
Oh geez, I had no idea you had to get so much stuff for it. Very well, I'll be sure to keep these in mind. Thank you so much!!
👍: 0 ⏩: 0

This absolutely amazing! I love the helmet. I've made a Midna Helmet myself but I think yours turned out far better than my own. If you don't mind me pointing out one small edit that would make yours an exact replica to the games. It's so small I almost missed it when I made my Helmet, but under the eye there are two lines. I don't mean to be nit picky just thought you may like to know. Here's the picture if you want to see what I'm talking about [link] . Over all fantastic job, I will most definitely buying all your Zelda masks in the future!
👍: 0 ⏩: 0

Where did you find the referance images for the back? ")
👍: 0 ⏩: 1
Haha, finding 360 views of this thing was dammed impossible. I basically used a mix of papercraft, game references, and other cosplayers. I figured that somewhere in there was the truth and used the designs that were most consistent XD
👍: 0 ⏩: 1
Heh, that makes sense! This is really well done :3 I hope mine looks half so nice
👍: 0 ⏩: 0

Where did you buy the insulation foam ? O.o is it the fluffy kind?
👍: 0 ⏩: 1
Home Depot, but no, it's a sheet. The pink version of the helmet is what is looks like (after it's shaped, of course). I've really only found one Home Depot that carries this, but you can also order it online and over the phone with 1800-get-foam
👍: 0 ⏩: 0

O_____O give me that helmet O______O i want that helmet 8>W<8
👍: 0 ⏩: 0

This is the most beautiful Fused Shadow i've ever seen 
👍: 0 ⏩: 0


Just acrylic silver paint? Cause I'm doing something where I need to make my helmet look rusticy metal. D: AND IM CONFUZZLED
👍: 0 ⏩: 1
Hell, no, haha. This silver is only a top coat. You should have seen the base color, it was like Midna got caught at Marte Gra. Lots of red, green, gold and blue since when you look at Midna's helmet, it's really blotchy and has lots of different colors happening. To help age it, after I got the base silver/gray layer on, I sponged on more dark gray, metallic silver, dark green and dark red onto it to continue to bring out depth of color. After all that, I got a metallic black and painted and rubbed it into all of the grooves and details to help age it and really pop out the details. Basically, if you want a flat, dull color, paint right out of the tube. You want something realistic with a lot of depth, mix colors and bring in lots of layers.
If I wanted to make it rusty looking, I would have mixed some red into the black, then probably followed up with a red/orange mixture and possibly some green to bring out a patina look. I would also sponge the reds/orange and gold mixture over the helmet, and maybe even cluster some of the colors together in areas that would get the most exposure to the elements. A good idea would be if you looked up images of rusty metal and basically use them as your inspiration. Let me know if you need any more help!
👍: 0 ⏩: 1
Wow, thanks! I was thinking about that, i got this 'metallic silver acrylic paint' which is more like a silver glaze, which bums me out. I'm tryin' to figure out what to do with it, cause it's confusing as hell, it doesn't even mix very well. Daaahhhh. Anyway thanks a lot (:
👍: 0 ⏩: 0

Awesome job! It must have been hard job to do this!
👍: 0 ⏩: 1
It actually wasn't as hard as it looks... O_o Just time consuming. Basically I cut out like eight layers of pink insulation foam and stacked them like a cake with every layer bigger than the one below it. Basically it looked like a aztek pyramid then I sanded it all down so I got a nice curve. Then I hammered a bunch of BBQ skewers into it to help keep it stable. The horned part was made from five layers of the shape that I spent a helluva lot of time sanding to get the curve right. When I was happy with the carving and details, I used a combination of hot glue and more BBQ skewers to attach it to the crown of the helmet. The details I marked with a Sharpee and actually used a scalpel attachment on a wood burning tool so carve it all. The snakes, wiggly line, and eye details is all paper clay.
I'm used to so much going wrong when I work on something so different, but this actually all when very smooth. I just stared at Midna for like a hour while I decided how I was going to tackle this bear. XD Thankfully all that planning helped enormously and I was able to put out a really cool prop.
👍: 0 ⏩: 0

You are so awesome! It looks really really great! The top right photo has that nice aged look!
👍: 0 ⏩: 0


It looks really, really amazing! You have every right to be proud of yourself.
👍: 0 ⏩: 0

this is really fantastic! one of the best Midna helms I've seen
👍: 0 ⏩: 0