HOME | DD
 michaelgabrielr — Custom Samus sprites and tutorial

Published: 2012-02-13 10:33:52 +0000 UTC; Views: 4831; Favourites: 21; Downloads: 44
Redirect to original
Description
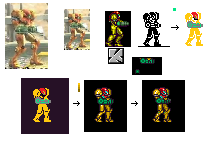
As a stress relief, I've drawn these custom-made sprites of Samus Aran from the Metroid series, which I'm thinking about using in the Metroid fan game I've mentioned earlier here [link] (based on Rootay's map, found here: [link] ). Here you can see the steps I took to make it:Step 1. Used Supe Smash Bros Brawl model (Nintendo) and improved AM2R sprite (custom made by me, combined Super Metroid and Zero Mission style) as reference pictures for the new drawing.
Step 2. Drawn the basic outline in black and white. If it looks recognizable now, then you're doing it right. (a big thank you to Daniel Cook, boss of Spry Fox and moderator of "Lost Garden" game design blog [link] for that one!)
Step 3. Adding basic colors. I've used the standard colors of Windows 7 Paint and went from there. Since "Green is Blue" [link] in Japan, the color of the arm cannon varied between the installments, so I decided to go teal with that one.
Step 4. The outline. I've noticed in some Castlevania sprites, especially in Harmony of Dissonance, but not exclusive to it, that the main character had an outline around its sprite. This was a great way of making the sprite pop out of the background (e.g. character clothed in black standing in front of a black background will now be visible). Create a rectangle of a dark hue that is different from black and put your sprite in there. Now you can remove the excess until you get this nice outline around your character.
Step 5. Shading. It may look hard, but it's not (though it takes time to learn it). Look at how video game characters are drawn, try to replicate this pixel by pixel. Find out why certain parts are shaded that way, try to "get" the style used for the game and break it down into its basic components. Practice drawing things with as few pixels as possible and then you will notice things like one pixel drastically changing the overall shape or making things more shiny. You can also add small corrections and details if you feel like it at this point.
Step 6. The hardest part - corrections. Few things are done well the first time and everyone, regardless of skill level, will likely have to make few modifications to their work before it is finished. As an example, I've noticed that the arm cannon was too big, when I rotated it and saw that it hung way to low and was disproportional to the rest of the body, so I made it smaller. Then I had to correct its shape and shading. I also felt like adding few extra details and shading at this point. The last part has probably the lowest effect/work ratio, but it's definitively worth it!
If you're an aspiring pixel artist, I wish you success!


Related content
Comments: 3

This is very helpful like i'm gonna edit those sprites that i need to edit and i'll give you credit for that those tutorial is awesome.
👍: 0 ⏩: 1

Nice to hear that.
Have fun spriting!
👍: 0 ⏩: 1

I will in the months eventually.
👍: 0 ⏩: 0


