HOME | DD
 Mr-Wang — Color Editing for Walfas in Gimp

Published: 2012-12-01 06:28:29 +0000 UTC; Views: 2382; Favourites: 23; Downloads: 24
Redirect to original
Description
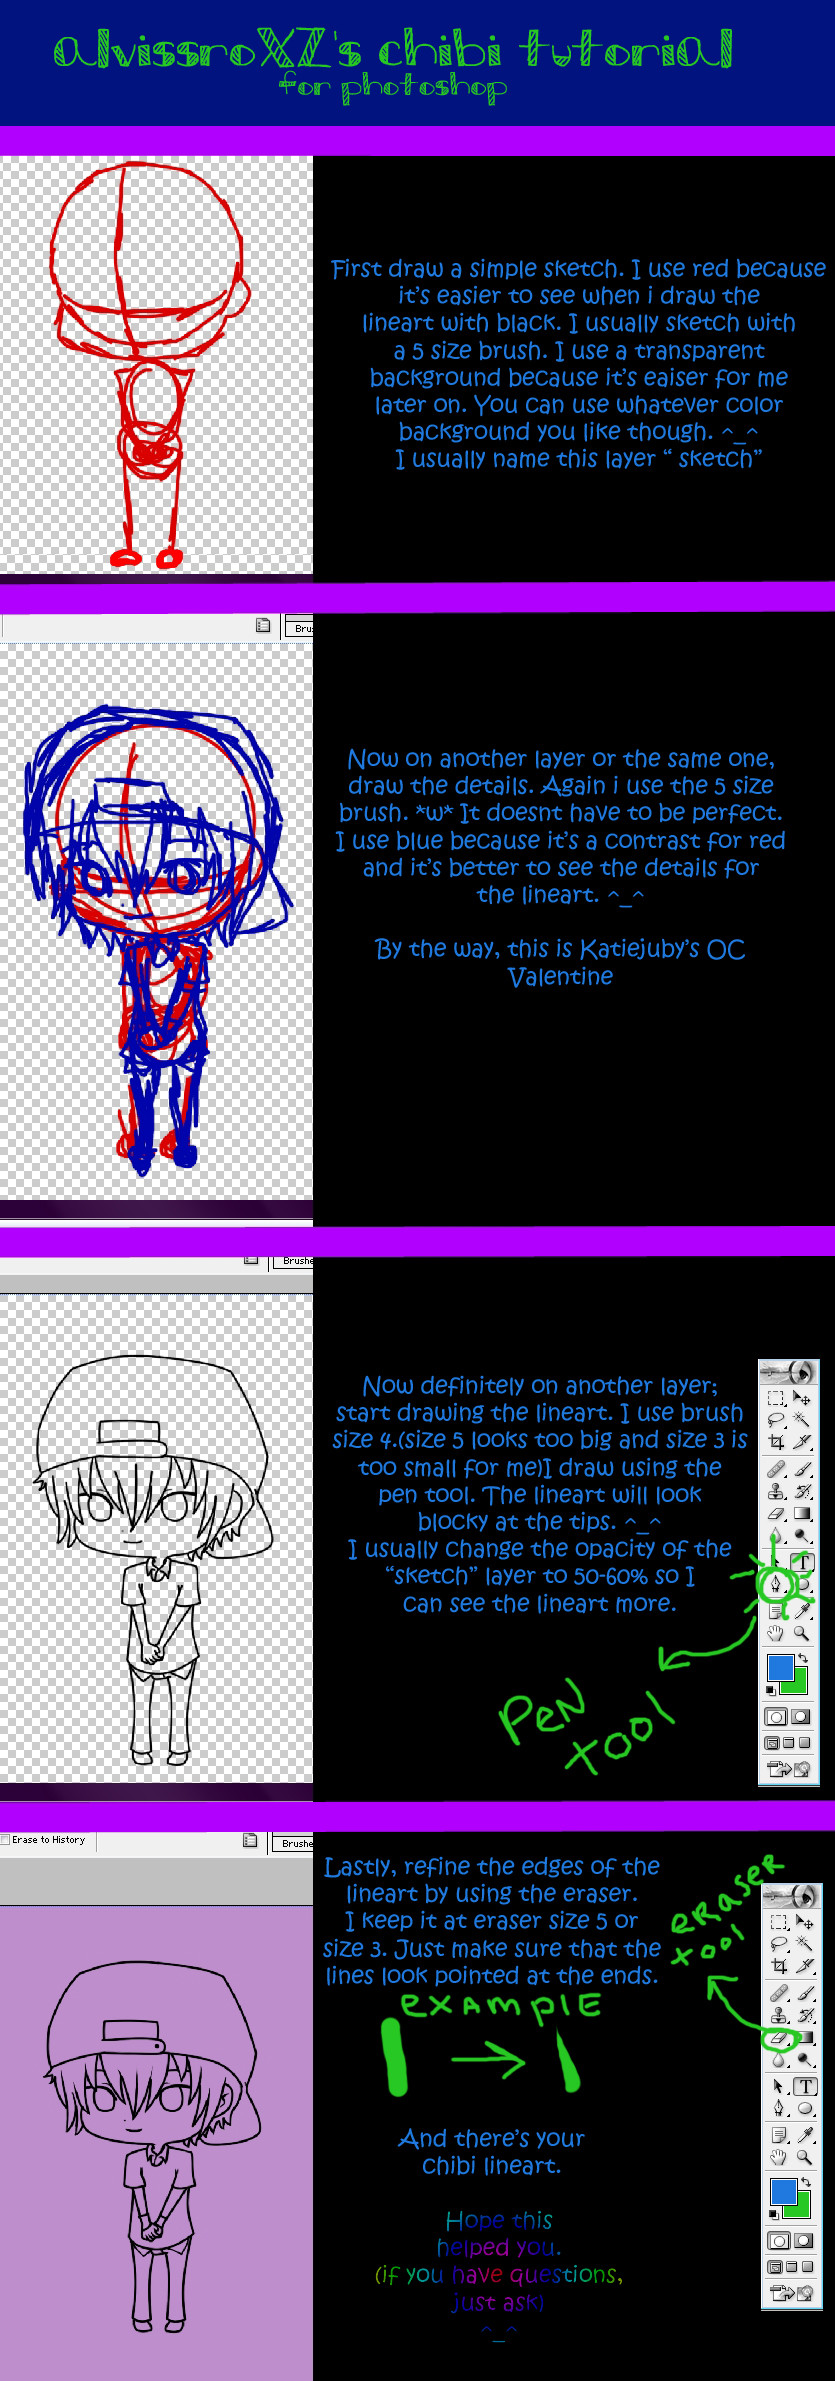
I hope you know a thing or two about Gimp already, but if not I hope this tutorial can help nonetheless.I use the steps described here in this tutorial all the time whenever I am creating a Walfas comic. This is made moreso important since I more or less created a unique appearance for myself, and had to color my beard all the time. The method works out for me, though how I discovered it, I can't recall exactly.
If there are any questions, feel free to ask, and please note that this is my first tutorial, and I'm not quite sure how well I did.
As soon as I'm able, I'm gonna submit this over to the newly made Tutorial section of the Walfas Station Wagon.
Related content


Comments: 26

I have a problem with my edited character, is there any way to fix the edges of the character when I mean a transparent background? it still has remains of the white background
👍: 0 ⏩: 1

I'm not sure I follow the problem, but I'm going to respond the best way I can interpret it is... Basically, just follow my tutorial, but for the layer that the character is on, use the "color to alpha" tool and choose white. Then when the white background bits are gone and character itself is semi-transparent, just put a blank layer underneath the character. Use the paint tool to color in what's directly beneath the character layer so that the character itself is not transparent, but the background is transparent. So then you can place your character on whatever background you please.
I'm not sure if this helped, so feel free to ask and clarify if it didn't.
👍: 0 ⏩: 0

Bro, I just used part of this tutorial and it worked magnificently! Great jaaj (job in YTP lang.)
👍: 0 ⏩: 0

After seeing this, I've come to a conclusion.
Color ALL the walfas!
👍: 0 ⏩: 0

Having just started drawing on GIMP, I can tell you that this tutorial is useful for more than just Walfas-ing. Thanks!
👍: 0 ⏩: 0

many thanks, mr. wang. this tutorial's definitely a keeper.
👍: 0 ⏩: 0

I'd love a tutorial for recoloring in Paint. NET by the way, I don't get how its recolor tool works.
👍: 0 ⏩: 0

Thank you very much for this tutorial. I'm always thankful for help, since I'm a little bit confused by the huge amount of possibilities, I have in GIMP (I mostly work with MS PAINT).
Anyway, I would like to ask you something, which would be also very interesting for a tutorial. How can I properly "cut out" parts of pictures, so that they have no background?
Especially for OCs or items, that I created myself, it would be a great help, since I don't have this option in MS Paint.
👍: 0 ⏩: 0

um, I gave never used Gimp, but I notice 2 important things I use regularly in Photoshop, Illustrator and After Effects, A layers pallet and Mode. I don't know if Gimp has "Multiply" for a mode but it is does, then to color the beard in can be even simpler.
I would basically follow the steps up to using the paint bucket. The jaggy edge (what I often refer to as "crunchy") can be painted less carefully with the mode set to Multiply. If it's a pick up layer, you can choose to merge layers or just leave it. If you modify the paintbrush to multiply, be sure to reset it to "Normal" when your done. This is because Multiply only darkens colors to your current foreground. If it's already darker, it ignores it.
👍: 0 ⏩: 0

This is the one thing we could never figure out on my own!
Very helpful!
~Phlog and Intel
👍: 0 ⏩: 0

*raises hand* I have a bit of problems with this.
See, I don't use GIMP. I use Photoshop CS4, and while it doesn't have a Color-to-Alpha function, it has the Select Color Range, which is basically the same thing except I have to manually delete the pixels.
But about the pixels...sometimes when I choose the color I want to remove (or really, ANY color at all) and select them using whatever, I always notice SOME pixels are left behind. These left-behind pixels are of a slightly different color, but if I remove them, the overall item looks really really odd. How do I deal with those?
👍: 0 ⏩: 1
Man, I'm not a Photoshop user, but lemme see what I can help with.
Alright, really odd in what way? I've had similar problems once in a while, but I might need to know more on your end. Is the problem when if you delete the extra pixels, you get jagged edges similar to what the blue seal looks like in the third panel? If that's the case, just remove those different-colored pixels left behind, then you can apply a bit of a gaussian blur to remove those jagged edges. I don't know what setting would be good on the blurring, so I'd try experimenting at around 0.4 or so and try from there. Try selecting the area that looks weird.
I hope I got it, but then again, if I'm way off I'll try to help if you can clarify.
👍: 0 ⏩: 1
Well...yeah, actually it's like that.
👍: 0 ⏩: 0
Amazing, huh? Didn't think it was that much, but you've got my thanks anyway. At least people seem to agree with you here.
👍: 0 ⏩: 1

Well, I love how to shown it with some eye noticing and how the seal looks way different then the orignal, Blue is definately your color for being a Jiang Shi :3
👍: 0 ⏩: 0


Thank you! This makes it much easier to make higher quality Walfas comics!
👍: 0 ⏩: 0
My apologies, this is my first tutorial so I kinda didn't know how to make it. Is there anything you need clarification on?
👍: 0 ⏩: 1

Well for things like programs I just work better with videos is all, I get what I'm supposed to do but I don't know where to click.
👍: 0 ⏩: 1
I had hoped the red circles in the tutorial would've helped with that, but I completely understand what you're saying.
👍: 0 ⏩: 1
Okay then, I did my jorb here then
👍: 0 ⏩: 0

Nice method, though I've always used either the pencil in Hue mode, or that coloring option in the Colors menu.
👍: 0 ⏩: 1
Hmm, I might have to look more into that. My thanks.
👍: 0 ⏩: 0

this actualy could be very helpfull, theres stuff I didnt know here.
👍: 0 ⏩: 0