HOME | DD
 obtusity — Outline and glow in FireAlpaca
by-nd
obtusity — Outline and glow in FireAlpaca
by-nd

#tutorial #firealpaca #tutorialhowto #firealpacatutorial
Published: 2015-01-25 03:48:34 +0000 UTC; Views: 36781; Favourites: 406; Downloads: 136
Redirect to original
Description
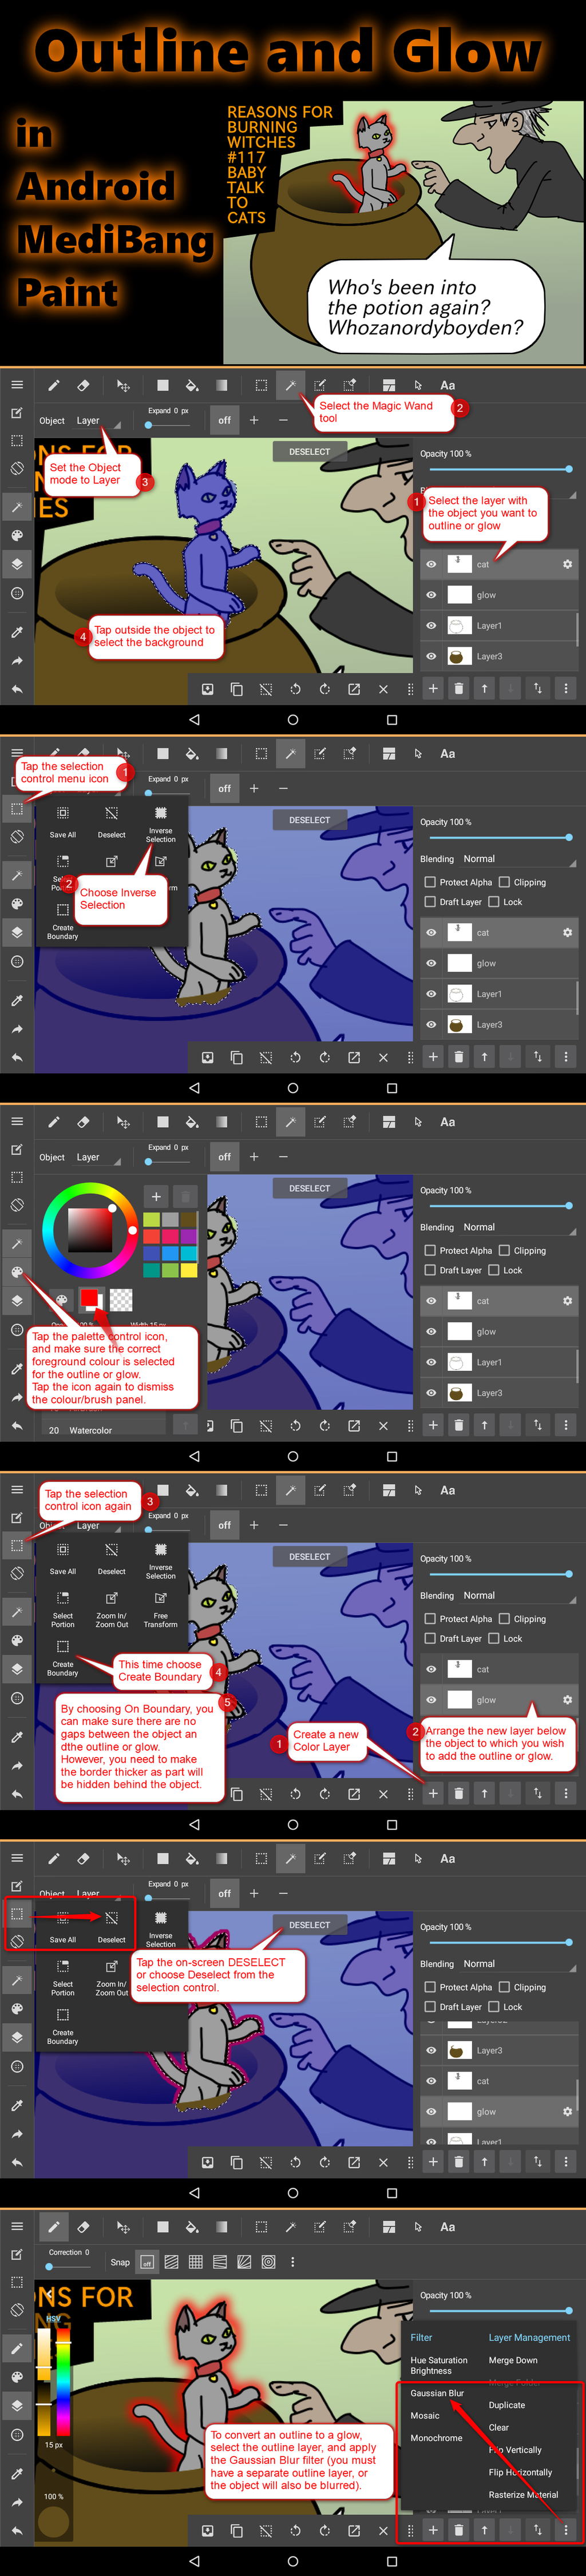
Update: Also see Dizzee-Toaster 's outline method here Personally, I prefer to add the outline on another layer, as per , which makes it easier to make changes as altering the colour, or turning the outline into a glow.Related content


Comments: 52


This helped a lot. I drew a neon sign for my comic-cover with it
👍: 0 ⏩: 0


Thanks! I was just figuring out how to outline my drawing!
")
👍: 0 ⏩: 0

Been trying to work out how to do this for ages! Thank you so much for sharing  (Smile)")
👍: 0 ⏩: 0


this no longer works...I followed it up to the bucket fill...and it will NOT let me bucket fill. I think perhaps they changed the program. I cleared everything and did this a second time to the same result. it will no longer allow bucket filling. I tried the pen tool as well to no avail.
👍: 0 ⏩: 1

No, it still works.
Check that you are on the correct (blank new) layer and that the Bucket tool Reference setting is set to Layer, not Canvas. (The default is Canvas, you will have to change it)
👍: 0 ⏩: 0
Just saw another question where somebody used the term chromatic aberration (one or more colour fringes due to lens flaws, highly blurred, nothing to do with 3D viewing) when they meant 3D anaglyph (two red-green or red-cyan layers, details offset varying amounts according to object depth, designed for use with "3D glasses" with two different "lens" colours).
If you meant using different coloured layers for 3D effects, see a better answer here .
👍: 0 ⏩: 0
If you're talking about simulating chromatic aberration caused by the weaknesses of camera lens glass, making an outline as shown in this and similar tutorials is as close as you can get to simulating that appearance, plus maybe some blur and perhaps moving the outline layer (or a simple duplicate of the art layers with colour modifications) to one side, and possibly playing with blending modes.
FireAlpaca does not correct chromatic aberration in existing images, it is a digital paint program, not an image manipulation program.
👍: 0 ⏩: 1

ok thank you!
also just adding- fire alpaca update 1.7.4 (latest) said it did chromatic aberration.
thank you anyway (btw love your posts)
👍: 0 ⏩: 1
Thanks!
Maybe a translation error? 1.7.4 included a bug-fix for the Hue and Color blending modes (they were not working correctly in earlier 1.7.x releases). These are layer blending modes, different from chromatic aberration, but I can see how a translation flaw might have mistaken the two.
These are the update notes for recent versions (translated from original Japanese list at firealpaca.com/ja/download/ with a few extra words of my own):
FireAlpaca version 1.7.4 (2017/05/09)
Fixed bug at layer composition [The Color and Hue blend modes are fixed, and now give identical results to some Photoshop examples ]
Other, small fixes
FireAlpaca version 1.7.3 released (2017-04-26)
Brush Correction (Stabilizer) has been improved.
The maximum value of the Correction has become 40
Fixed a bug in brush script processing [now writes alpha correctly (was formerly incorrect), not sure if any other fixes]
FireAlpaca version 1.7.2 released (2017-04-19)
Fixed a bug that the navigator’s image quality deteriorated
FireAlpaca version 1.7.1 released (2017-04-05)
Added layer blending mode (Soft Light, Hard Light, Hue, Saturation, Color, Brightness)
Fixed a bug that sometimes did not change to an hourglass cursor (Windows)
FireAlpaca version 1.7.0 released (2017-02-13)
Auto save function added. (You can disable it from environment setting)
Added function to export file (save with PNG or JPEG without changing the file name).
Improved error display when saving with PNG or JPEG failed.
Fixed a problem when moving a layer partially.
FireAlpaca version 1.6.4 released (2017-01-10)
Improved mesh deformation accuracy.
Improved display quality during transformation and mesh deformation operation.
It is possible to deal with cases where trouble occurs when using HUION tablet (from environment setting).
The preset brushes have been updated.
FireAlpaca version 1.6.3 released (2016-12-21)
Mesh distortion function added.
Fixed a bug in the hue filter.
We changed the tab display of the canvas (Full path display can be enabled from environment setting).
FireAlpaca version 1.6.2 released (2016-12-05)
I made it easy to understand the layer replacement.
Gaussian blur has been improved.
The operability of the hue filter has been improved.
FireAlpaca version 1.6.1 released (2016-11-18)
Improve 3D perspective layer editing dialog
Other, small fixes
FireAlpaca version 1.6.0 released (2016-11-16)
Added alpaca button (Clear layer, AlpacaGET post)
3D perspective layers function (snap method) added
Improved brush followability when using pen tablet
Material brush parameters changed
Preset brushes can now be reset (from the Help menu)
You can now delete new creation (recent files) history
👍: 0 ⏩: 1

The reason why Cranberry saw the chrome aberration ad is because it was an ad for OpenCanvas (why it was in Firealpaca, i wouldn't know)
👍: 0 ⏩: 2
I see some people are using the term chromatic aberration (one or more colour fringes due to lens flaws, highly blurred, nothing to do with 3D viewing) when they mean 3D anaglyph (two red-green or red-cyan layers, details offset varying amounts according to object depth, designed for use with "3D glasses" with two different "lens" colours).
For different coloured layers for 3D effects (3D anaglyph, not chromatic aberration), see a better answer here .
👍: 0 ⏩: 0
Thank you for that clarification.
portalgraphics.net, the company that makes OpenCanvas, is also the developer and major sponsor for FireAlpaca - in some ways, FireAlpaca is their test program for OpenCanvas development.
👍: 0 ⏩: 0


this was so helpful!!! usually I do the outline manually (which takes forever to do) but this saved me soo much time! thank you so much for making this tutorial!
👍: 0 ⏩: 0


Exactly what I needed and it worked perfectly. Thsnkyou so much
👍: 0 ⏩: 0
That usually indicates: you haven't expanded your inverted selection, or you haven't used a large enough expansion for your image size, or you failed to create a new layer to fill, or your layer is not above the other layers, or you didn't set the Bucket fill to Layer instead of Canvas.
And, of course, a pale glow against a pale background might not show up well.
Try again - however this time, try a larger expansion, and most importantly (not in the text, although it shows in the screenshot), make sure your new layer is above all the other layers before you fill it.
👍: 0 ⏩: 1

ok, ill try all of those. Thanks <3
👍: 0 ⏩: 0

Agh I just wanna thank you so much! Im new to firealpaca and this was very helpful.
👍: 0 ⏩: 0

Thank you so much for this! It helped a lot, no more manual glow making for meee!
👍: 0 ⏩: 0


This is sooooo helpful!!! OMG. I just started digital and it is awesome!
👍: 0 ⏩: 0


Awesome! I knew about the wand and inverse features but not the expanding part! Thanks so much!
👍: 0 ⏩: 0

I use Medibang Paint and not FireAlpaca, but they had the same options, so this was crazy helpful! Thanks!
👍: 0 ⏩: 0

Where is the gaussian blur? I cant find it X3
Edit: nevermind, i found it
Thanks so much
👍: 0 ⏩: 1

Where? I can't find it ;-;
👍: 0 ⏩: 0

A much belated thank you for your comment, and I hope the technique was useful for you!
👍: 0 ⏩: 1

It really was! I've been wondering how to make glow on FireAlpaca, and now I finally know, thanks to your awesome tutorial! It's really helpful.
👍: 0 ⏩: 0

Glad you found it helpful!
👍: 0 ⏩: 0

this is great ! ive been making outlines manually all this time xD
thank you!
👍: 0 ⏩: 1

Glad you liked it 
👍: 0 ⏩: 0

| Next =>