HOME | DD
 Onyx-Tigeress — Simplified GIMP Eye Tutorial
by-nc-nd
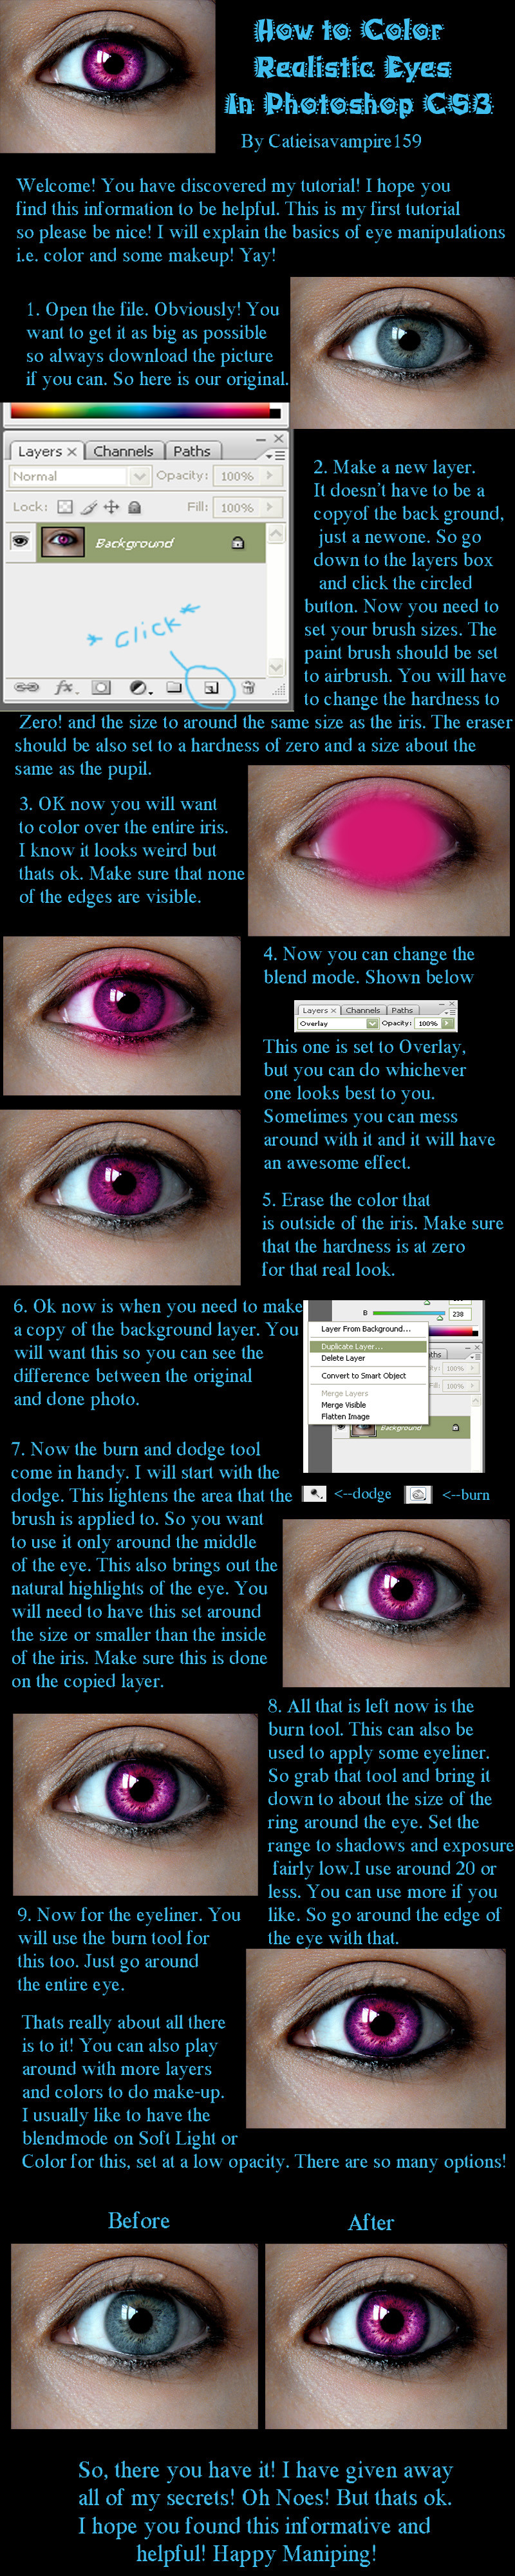
Onyx-Tigeress — Simplified GIMP Eye Tutorial
by-nc-nd

Published: 2011-01-26 06:55:59 +0000 UTC; Views: 22230; Favourites: 514; Downloads: 508
Redirect to original
Description


 EDIT!
EDIT! After almost three months I decided the colors were too drastic and hard to see. Therefore I re-uploaded the tutorial, the background is now GIMP Grey instead of black and has a less noticeable print in the background as well.
I'm also uploading it as a PNG image this time around to see if that helps with dA's glitching. I don't know about you but all my JPEG images are coming out VERY blurry if they're loading at all.
Hopefully these changes will help more than hurt. And remember to let me guys know what you think.
End Edit.  (Wink)")
Alright, let's see if this is easy for us to wrap our heads around!
")
I based this tutorial off my very popular first manipulation tutorial.
It's much simpler (I.E. SIMPLIFIED) so this should work well for both beginners and experienced eye manipulators alike.
It took only half the time I thought it would and I was even able to create and upload my XP Wallpaper Pack and Vista Wallpaper Pack !
Hopefully you guys like those as well!

And sorry if the background is a little overzealous as well.

I wanted a way to copyright it without having to use my watermark
 so I decided to use my signature.
I felt like I was looking at a freakin' wanna-be Louis Vuitton bag for hours on end.
Again, sorry about that.
 (Smile)")
Well hopefully you guys find this much more useful than my most recent tutorials.
And links are as follows bellow!

 The featured manipulation Lagoon. Stock Photo by the lovely ~cyanide-rain-stock 'Captivating Eyes Tutorial' by the amazing *Cutspring My Complex Manipulation Method
 ~~~~~~~~~************~~~~~~~~~~~~
...Clickity ...Clickity... GIMP 2.6.8 Copyright Rules
Related content


Comments: 264

No problem. I really had fun with your tutorial. If it wasn't for your help I wouldn't have made it.
👍: 0 ⏩: 0

I don't like your "secret" overlay. Other than that, it's very nice.
👍: 0 ⏩: 0

Thank you very much for this. It is absolutely amazing. My first attempt with this: [link]
I liked the outcome, but I want to further my skills in this sort of manipulation. The things that I've seen come from this are just awesome. So, thanks again, and I'll no doubt be looking at your other tutorials and works.
👍: 0 ⏩: 1

Aww thank you, it's my pleasure.
And you did excellent for your first try. I especially love the iris color, you really did a great job.
Keep working at it, you could go far.
Also, sorry for the really delayed response.


👍: 0 ⏩: 0

Thank you ....great tutorial ... used it here [[link]
👍: 0 ⏩: 1
Thank you! Glad you found it useful!
And it came out really good! I especially love what you did with the eyelashes.
Also, sorry for the really delayed response.

👍: 0 ⏩: 0

Thanks for the awesome and clear tutorial. While I don't think my first attempt [link] turned out too good, I plain on using your tutorial time and time again.
👍: 0 ⏩: 1
Aww, it was my pleasure really. I enjoy spreading the knowledge.
And for your first attempt it's amazing. It's often hard to color very light-colored irises without them ending up over exposed in a way, you did great!
Keep at it, you've got real potential.
Also, sorry for the really delayed response.
👍: 0 ⏩: 0

[link] Turned out okay, I guess. It was my first manip anyway.^^
Thanks a lot for this tutorial! (Just one question ... I didn't find the softlight mode, where exactly should it be? 
👍: 0 ⏩: 1
It turned out great! Not bad at all for your first attempt, it's certainly better than mine.
And I'm glad you found the tutorial useful.
Hmm... That's odd.
In my version - US English - my SoftLight mode is right above the HardLight mode, both of which are over the Grain Extract/Merge features towards the top of the listing.
Trust me when I say Overlay and Softlight are very similar to each other. If you can't find a Softlight mode in your GIMP it's really no big deal, Overlay will work just fine.
Also, have you tried Google-ing it. You'd be amazed what you can find on the user forums.
Also, so sorry for the really delayed response.

👍: 0 ⏩: 1
Thanks
Yep, that's what I thought, too, but I think I just found out where it is (thanks to your tip - I Googled the layer modes xD). Obviously it's been translated as "Soft Edges", that's why I didn't find it. But Overlay worked just fine, and I also found "Grain Merge" good for some things.
No problem at all.
👍: 0 ⏩: 0

Looks awesome, you did a really good job with the texture overlay.
Also, sorry for the really delayed response.
👍: 0 ⏩: 1
Looks great! I really like the colors and the overlays in the iris.
👍: 0 ⏩: 1


I think I know what you did at that Overlay Layer
Anyway, thank for postin this tutorial, it really helped~♥ [link]
👍: 0 ⏩: 1
Ooh, do you now?
And I'm glad you found it useful. I agree with ~cyanide-rain-stock the colors really get my attention. It looks fabulous!
Also, sorry for the really delayed response.

👍: 0 ⏩: 1
You filled the layer with black and put the layer mode to Overlay? xD;
Thank you!
👍: 0 ⏩: 1
Ah, you got it! Cookie for you!

👍: 0 ⏩: 1
Glad you found it useful!
The manipulation looks great by the way, your piece came out looking awesome!
Also, sorry for the really delayed response.
And happy belated birthday.

👍: 0 ⏩: 1

Yes
Thank you ^_^
That's ok and thank you
👍: 0 ⏩: 0

[link]
Thanks! This helped a lot!
👍: 0 ⏩: 1
Looks great! Lovin' the contrast! And thanks so much.
Also, sorry for the really delayed response.
👍: 0 ⏩: 0

I figured out where everything goes wrong, when you start talking about overlay/softlight mode. it doesnt do anything for me. at all. im confused. im on the right layer nd everything. when the iris was blacked out and then saturated, everything went fine. then i tried to color nd i can color but it wont go back to the iris underneath. :[
👍: 0 ⏩: 0
i keep getting really pissed cuz it works nd i color it but it wont put it over top of the other layer like you said then i undo nd try to do the process again and now all of a sudden it wont let me color anything. WTF? :[
for the love of god make me a tutorial thats BEYOND simple with millions of pictures.
or skype with me so i can show you what im doing.
:[[[
👍: 0 ⏩: 1
M'kay, calm down.
I don't have Skype but we'll figure it out!
Did you Copy Visible > Paste As - New Layer after you desaturated the iris?

👍: 0 ⏩: 1
yeah.
i got it to work, but i had to do it a completely different way then you did :/ idk how i did it, but i did it
👍: 0 ⏩: 1
Well I guess the important thing is you did it.
👍: 0 ⏩: 0

In the Dodge/Burn section of the tutorial , my Gimp 2.6, doesn't show the same panels you have to alter. Like Burn, Shadow Exposure or Dodge, Highlight, Exposure. BTW, Love the tutorial.
But i can't find these Panels.
")
👍: 0 ⏩: 1

The 'Dodge/Burn' Dialog box should pop-up, showing those options at the bottom of the scroll box?
What OS do you use? Windows, Linux, Mac?
👍: 0 ⏩: 1
sorry so long to respond, Windows 7
👍: 0 ⏩: 1
That's fine.
Hmm, so when you select the Dodge/Burn option and double click you don't have a pop up box, or you don't see any of those options?
👍: 0 ⏩: 1
ppffftttt!!! 


👍: 0 ⏩: 0

It's more than okay!
Love it, keep up the good work!
👍: 0 ⏩: 1


heres mine but im working on more soon great tutorial even though i used photoshop i dont gimp yet but its all the same following this [link]
👍: 0 ⏩: 1
Aww, thank you!
And yeah, they're pretty much the same.
The manip looks great by the way. I really love the contrast!
👍: 0 ⏩: 0
heres mine but im working on more soon great tutorial even though i used photoshop i dont gimp yet but its all the same following this
👍: 0 ⏩: 0

I tried it! Heres the link to mine: [link]
It's not very good because this is my very very first time doing anything like this

👍: 0 ⏩: 1
Ooh, I like it! Not bad for your first attempt!
👍: 0 ⏩: 1

| Next =>