HOME | DD
 panick — Robot Workflow

Published: 2012-04-24 20:47:36 +0000 UTC; Views: 48382; Favourites: 924; Downloads: 1046
Redirect to original
Description
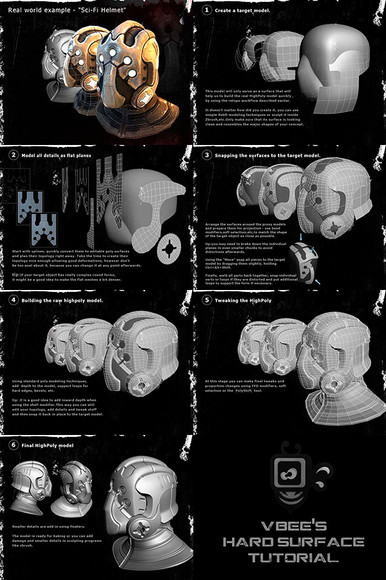
People have been asking here and on other sites on how I went about doing this robot. Thought it would be easier to show.Now this is more like a little sneak peak at my work flow, then a full step by step tutorial(That would be impossible to get down into one picture). This is more for people who already have some basic knowledge in Zbrush and standard 3D graphic software.
If you have more specific questions please feel free to ask and I'll try to help.


Related content
Comments: 93

Ok im wait this tutorial Much thanks.
👍: 0 ⏩: 0

cool process! I thought you made a rough model and then remade each piece for hard edge modelling, but I guess u decided to keep the model and just subdivided like crazy lol Great job!
👍: 0 ⏩: 1

Haha yeah that was never they intention. It started as something I just quickly doodled while eating on my lunch at work. Then I just wanted to add a little thing the next day....and then one...more thing......and...yeah. So this model was an accident
👍: 0 ⏩: 0

great!! thanx a lot mate.. This stuff is addictive.. btw, added it to 3d-helpers ressources
👍: 0 ⏩: 1

I think this just changed my life. Awesome workflow, thanks for putting this up!
I've seen the Hard Surface DVD's by Eat3D, but I still don't quite "get" it. Any tips are greatly appreciated!
👍: 0 ⏩: 1

Hah thanks. I'm gonna do more tuts/walkthroughs as soon as I got the time.
👍: 0 ⏩: 0

ahh i love this kind of stuff. Watching the work in progress fuels my desire to create stuff too!
👍: 0 ⏩: 1

thanks,its really elaborate...now my other stupid question ( I am full of them
👍: 0 ⏩: 1

Well there is the easy and smart way (just create a new cylinder subtool and place it where you want it) or stupid and not so easy way I did and just sculpted it, which takes time and never will be perfectly cylindrical 
👍: 0 ⏩: 1

yeah,,,I dont know why I was thinking always about sculpting it,when you can just add a new subtool,and if you want,merge some subtools....Its so obvious...make an new subtool....lol...thx for clearing my mind.
👍: 0 ⏩: 0

Amazing work, Thanks for the breakdown, Will be using that Stamp technique next time im in ZBrush
I'd love to see that HUGE document with in detail stuff
👍: 0 ⏩: 1

Man that would be the largest document in the history of DA! But I have a plan on breaking it down in to a couple of different tutorials, not all in one
👍: 0 ⏩: 1

Haha, well, anything at all is amazing. Looking forward to seeing and learning from your tutorials
Thanks
👍: 0 ⏩: 0

How did you get the chromatic aberration (red/blue lens effect) in your final image? Is it painted on or an effect you can add automatically (and how please!)
👍: 0 ⏩: 0

I would love to give this a try when I get a chance, there's just been this fascination I've had for a while about 3D Art/CGI, and while I don't really know the big picture of what's going on here, I certainly understand more of what I'll be getting myself into. xD
👍: 0 ⏩: 1

Cool glad I could help
👍: 0 ⏩: 1

hehe well that too but I meant more that the picture would need a height of about 50 000 pixels to fit all the text and pictures
👍: 0 ⏩: 0

I actually got one. I'm apparently too daft to comprehend that awesome effect you did, second part where you mixed the materials like this. Or well, that cleanly and specifically using masks.
Much appriciated if you'd bother explaining
👍: 0 ⏩: 1

Hmm. See if I can give an example: Place the two different material renders in separate layers in Photoshop. Put the metal material one on top and set the blending to Overlay and lower Opacity to 50%. Still on the same metal render layer add a Layer Mask. It should be filled with white but if not fill it. Now pick the standard Brush tool and start painting black in the Layer Mask in the areas where you don't want the metal texture to show. You are effectively just erasing the top metal render layer so the one below shows. Then I just desaturated the metal layer a little to give it a more grey metal look.
👍: 0 ⏩: 0

this is pretty nifty. Always cool seeing a new workflow.
👍: 0 ⏩: 1
<= Prev |


