HOME | DD
 photo-class — Adding Borders to your Photos

Published: 2005-01-24 20:03:39 +0000 UTC; Views: 38734; Favourites: 282; Downloads: 10508
Redirect to original
Description
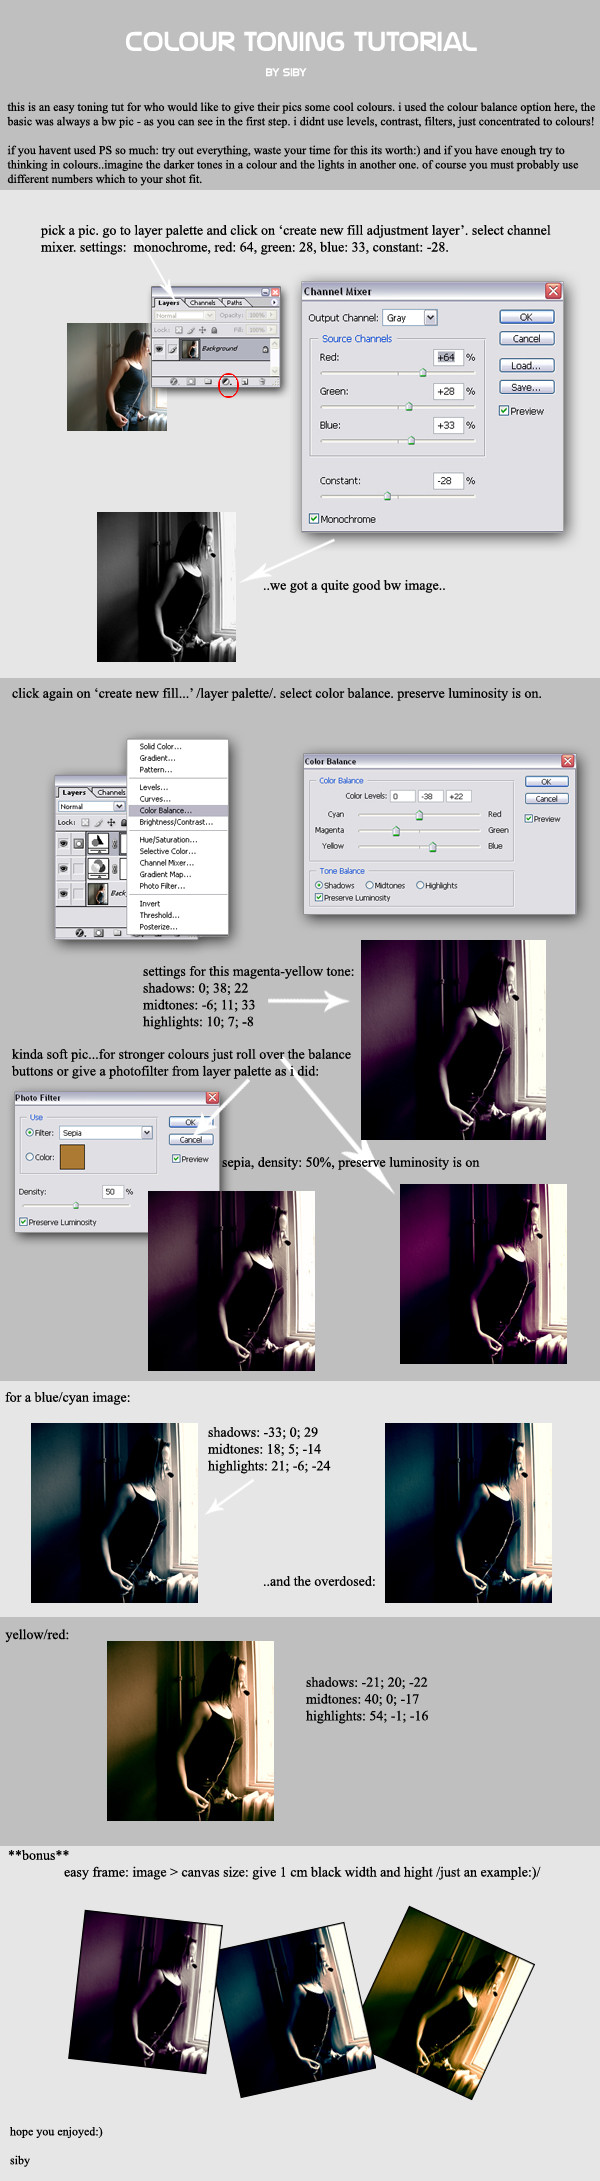
This is a simple tutorial on how to add borders to your photos and a few guidelines to consider. The software applications covered are: Adobe® Photoshop® Adbobe Photoshop Elements® Paint Shop Pro®
 The Gimp
 Let us know what you think about it.
The article is from ~roy204 again and fits in a new category called "Digital Darkroom" to replace the Photoshop section since we now cover more software.

Related content


Comments: 97

Waazzaaaaaa!!
Very cool tutorial, thank you very very much!!
Sweeet Dreams!!
👍: 0 ⏩: 0


this is a very helpfull tutorial to me! i was actually trying to find out how to add borders to my photos ")
👍: 0 ⏩: 0

I knew DA wouldnt let me down, just what i was looking for
👍: 0 ⏩: 0

Tks, guys!
You make things became easier!
Great tutorial!!!
 (Wink)")
👍: 0 ⏩: 0


Nice tutorial. I usually put smaller border than this one but I will try with bigger  (Smile)")
👍: 0 ⏩: 0

")


thanks! This is very helpful and I'm sure that in future I won't be spending so much time for adding border as I do now...
👍: 0 ⏩: 0


This is awesome! I ran thru the tut. in p.s. elements, and it was quite simple. Thank you for taking the
time to write this up!
👍: 0 ⏩: 0

Thank you so much. I have been searching for a tutorial like this.
👍: 0 ⏩: 0

Thank you for the tutorial... It's really good! I already knew how to add borders, but the part about colors and borders' thickness was really helpful for me! Good job!
👍: 0 ⏩: 0

I can't wait to look at this and try it. I think it might be better to split it up by program, because each time we download we don't need the programs we don't have.
👍: 0 ⏩: 0


Very informative. everyone says add borders to your photos and now its time for me
👍: 0 ⏩: 0


That tutorial was brilliant! I now know exactly how to put proper borders on photographs, thank you!

👍: 0 ⏩: 0

This was incredibly helpful! Thanks so much. I just put up a deviation using this technique and the soft focus technique (don't worry, I made sure to thank you in the description :wink: )
👍: 0 ⏩: 0


Thanks a lot for the lesson! Even a dummy like me learned how to make boarders in just a matter of minutes. Cheers!
👍: 0 ⏩: 0

i just learned how to put on borders from you! thanks very much! i hope it'll make my pictures look more professional...
👍: 0 ⏩: 0
the-sashimi-frog [2005-04-18 23:17:00 +0000 UTC]
I probably did it the long way, but I made a separate black BG layer, added a hairline border around the photo then layered it on top of the BG and then merged. Depending on how you loook at it, it is either a shortcut or the long way.
👍: 0 ⏩: 0

Ok here's my question:
I use the Gimp and it works really well, but when I was exiting it one day I accidently exited first the window that held the different layers and chanels of the image. I was just wondering if you know who to re-open it, because when I opened the Gimp it didn't come up as it usually does?
Thanks- hope that made sense

👍: 0 ⏩: 1

File -> Dialogs -> Create new Dock -> Layers, Channels & Paths
👍: 0 ⏩: 1
Wicked, thankyou so much
👍: 0 ⏩: 0


this rocks. but i have a question. what if the picture is taken in black and white? would we use the gray for it? or do as you said for like warm colors on black so like a picture w/ the subject being light, using a dark border and what not? hmm?
thx,
-HO!
👍: 0 ⏩: 1
For black nad white I find that a black frame compliments better adarker photo and white frame a brighter photo but the best is always to try both
👍: 0 ⏩: 1

Thanks! I was always wondering how they added borders for their pics!!!!
👍: 0 ⏩: 0

Thank you so much! Great tutorial! I wish I had looked here last night, as I just spent a ton of time trying to figure this out on my own. 
Very clearly written and easy to understand... and thanks especially for explaining that you have to make a copy of the background layer in order to put other layers underneath it -- it took me forever to get that!
A small detail: in my version of Photoshop (6.0 for Windows), there's no option under Canvas size for "relative" or "canvas extension color", so method #1 doesn't exactly apply, but its simple enough to figure out. Plus, I prefer the layering method anyway...
You guys are the best -- I've learned so much from Photo Class! 
👍: 0 ⏩: 0

It's something that should be so simple, but until now, I hadn't figured out how to add a border using my version of photoshop. I'd always edit the image then finally transfer it into paint to add a simple 5-pixel black border around the edge. Thank you so much for this! My images will be finished a lot more smoothly now!
👍: 0 ⏩: 0


Again, great and yet concise tutorial on adding borders. I like the way you presented an easy way to do it for all major photo editing software choices available.
Is it too much to ask for a more detailed border tutorial from the artistic point of view? Like, which border would go nicely with that kind of photo, etc. I'm especially interested in the color choice for said border (besides the obvious black and white).
Also, I've been meaning to ask; is there a difference between border and frame? The way I see it, the 4 pixel black contour would be the border while the 40 pixel white fill would be the frame. I realize everyone uses one or the other, but I'd like to get your personal advice on this
👍: 0 ⏩: 1
We could definitely consider a more advanced tutorial on border color but in this domain it's harder to define what's general guideline versus what's personal preference.
I like your terminology about borers and frames, I guess "frame" comes more from the world of paintings and traditional art where the frame would be the actual wood frame and therefore should refer to the outermost and largest part of it.
Cheers.
👍: 0 ⏩: 1
Aaah, so that's why "framing a photo" is the physical action of putting it in a wooden frame... Yeah, I guess anything under the frame might be considered a border, no matter how large. Thanks for enlighting me
Keep those lessons coming!

👍: 0 ⏩: 0

two things:
(1) I see you are missing Macromedia's Fireworks ... I use it for all my frames, very fast and easy
(2) You may consider cutting the tutorial up into a PDF file for download
thanks!
👍: 0 ⏩: 0

Thanks for the information. Are you able to add to this article what the other ways to add borders are in Paint Shop Pro, apart from using the automatic function. You mention something about layering? I am really keen to learn more.
Thanks again.
Have a great day.
Katie
👍: 0 ⏩: 0


👍: 0 ⏩: 0

what do you do if a picture is black andwhite
what colour border?

👍: 0 ⏩: 2
Yes, as *Wieland said, the best thing to do iw to try both border colors and go with the one you feel best. Cheers
👍: 0 ⏩: 0

Like he wrote in the last section of the borders tutorial - dark pictures go well with black borders, light ones with white. I prefer black, but just test it yourself on each picture and go with what ever you like better.
👍: 0 ⏩: 1


| Next =>