HOME | DD
 pythos-cheetah — Furry Photomorph Tutorial - pt. 2

Published: 2012-09-06 07:27:11 +0000 UTC; Views: 20120; Favourites: 83; Downloads: 334
Redirect to original
Description
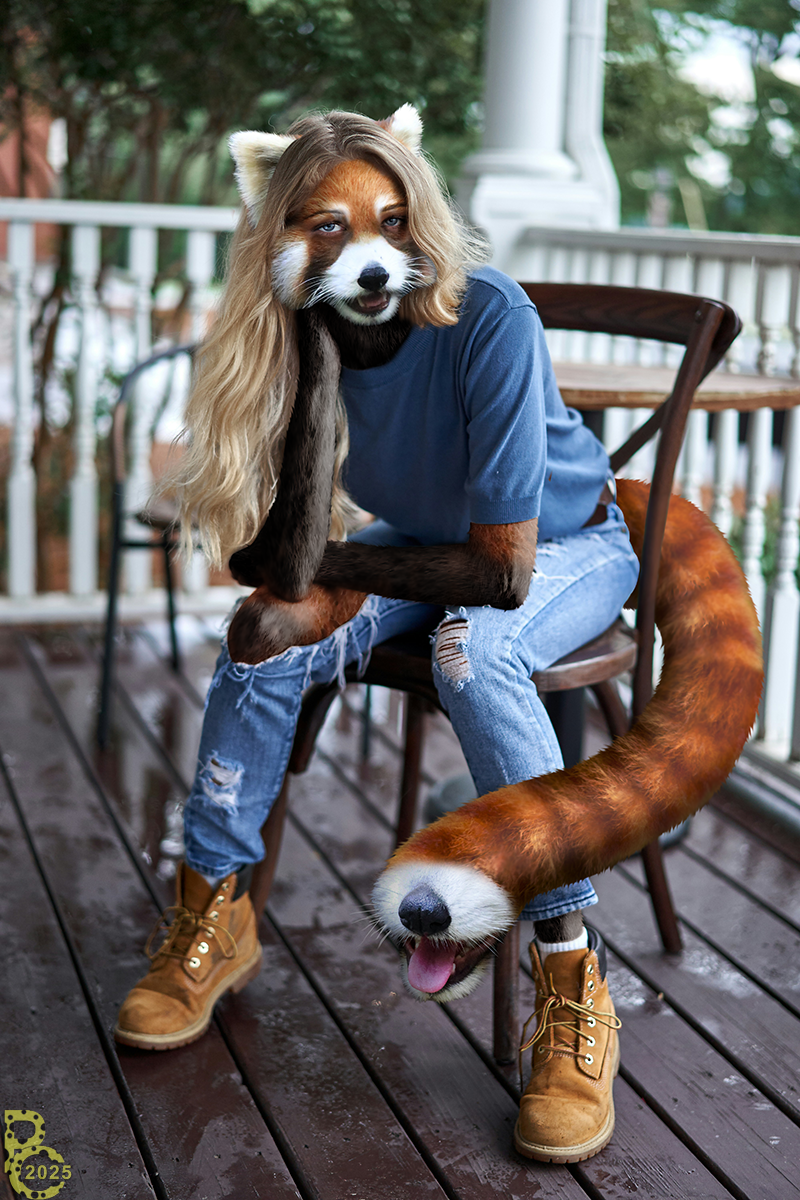
What’s this? A tutorial?Some people have been asking me how I make my morphs, so I thought I’d make a tutorial alongside my “fursona” morph. It wasn’t too complicated of a job, so I thought it wouldn’t be too hard to explain. I’ve never made a tutorial before, so hopefully people can understand what’s going on.
Human stock by ~niniel-stocks - [link]
Animal stock by ~NikiljuiceStock , ~foowahu-stock , *HOTNStock , and Arag on FurAffinity (used with permission)
[link]
[link]
[link]
[link]
[link]
Related content


Comments: 58

Rubber's certainly a hard one. My best suggestion would be to do something similar to the orca I did last year: pythos-cheetah.deviantart.com/…
I did a matte black for the skin using the basic technique for this tutorial, only without the fur part. After I'd finished the basic manip, I merged the layers and went back over it with a Highlight Dodge brush at a very high exposure (like 90%) to blow out the centers of the reflections at various parts on his body. I then used a soft Midtones brush, at much lower exposure, to add in the more diffuse reflections surrounding them.
👍: 0 ⏩: 1

I use Adobe Photoshop Eliments 2.0, I feel I might not have the right tools, I dont know.
What program are you using?
👍: 0 ⏩: 1
Photoshop CS5. Elements should have the Dodge/Burn tool, which is what I used
👍: 0 ⏩: 0

Hey, it's me again. And I have now followed all the steps, but still do not get it out that the body is clearly visible.
👍: 0 ⏩: 1
Alright, are you using Photoshop or GIMP? There's an extra step or two in GIMP that you have to add that aren't covered in the tutorial (which was written using PS CS5)
👍: 0 ⏩: 1
I work with an old version of PS(PS CS2), but I tried with GIMP and it doesn't work too.
👍: 0 ⏩: 1
Is there any way you could send me the PSD file (maybe by uploading it to Sta.sh and sending me the link) so I could troubleshoot it a bit?
👍: 0 ⏩: 1
I'm trying to upload it but the upload always stops at 30%...
Is there perhaps another way to send it to you? The file is about 180MB in size.
👍: 0 ⏩: 1
I don't need high resolution to be able to figure out what's going on. If you go in and reduce the Image Size (say to no more than 1000 pixels on the largest size), that should reduce the size of the file tremendously
👍: 0 ⏩: 1
I have now uploaded it on another page.
www.file-upload.net/download-8…
👍: 0 ⏩: 1
That website wants to install software on my computer to download stuff from it, which is a big red flag to me.
👍: 0 ⏩: 1
okay, how can I reduce the size of the PSD file then? I mean 184MB are a little bit to much...
👍: 0 ⏩: 1
the quickest way to do so is to reduce the pixel size of the image. If you go to Image->Image Size, and reduce the Pixel Dimensions to be no more than 1000 pixels on each side, that should cut down the file size by a lot when you save it (save it as a different name if you want to retain the larger version)
👍: 0 ⏩: 1
I have finally made it! Here's the page. I thank you again for your help and patience. : D
sta.sh/01mob6xh2smx
👍: 0 ⏩: 1
Well, you'd actually done everything right. I think the main problem is that the model was so pale, and the photo so flatly lit, that there wasn't much definition there to show through onto the fur. I upped the contrast on the Hard Light layer (Image->Adjustment->Brightness/Constrast, move the slider right), and switched to a uniform color fox fur for the example, but otherwise left everything right as you had it.
sta.sh/0c0d9uerpd4
👍: 0 ⏩: 1
Thank you very much.
So I just have to rotate only at the contrast in some paler models.
This has helped me in any case  (Smile)")
And the picture you made looks good too.
I'll probably still need a bit more exercise and perhaps a little more patience: D
👍: 0 ⏩: 1
Practice and time are definitely the best way to get better at it. Here's what mine looked like when I first started: sta.sh/01c9r9yzr607
👍: 0 ⏩: 1
Every beginning is difficult. I'll just keep practicing: D
If I get stuck again, I know whom I can contact
👍: 0 ⏩: 0

Hey man. Thanks for being patient but my computer won't let me upload the file. My computers messed up so ya. Sorry to bother ya :/. But thanks for the help anyway.
👍: 0 ⏩: 0
Ok I'll try getting it to ya ASAP as I have some things to do today. Thanks for your help again.
👍: 0 ⏩: 0
actually never mind on the first one. how do i get you my stash privately?
👍: 0 ⏩: 1
You can note me the link
👍: 0 ⏩: 0
Thanks man your a life saver! So i have it in stash now how do i send it to you?
👍: 0 ⏩: 0
scratch what i said about not needing to send you a stash. i tought i had the hue/saturation thing down but i have no clue what to do anymore .-. Could i actually send you a stash of what im trying to do? btw my erasing isn't that good so ya
👍: 0 ⏩: 1
Sure, I can take a look at it
👍: 0 ⏩: 0
i thought i may aswell ask you pythos; what software do ya use for this?
👍: 0 ⏩: 1
Adobe Photoshop CS 5. The tutorial should work for anything in the CS line, but I'm not sure about Elements or non-Adobe software
👍: 0 ⏩: 0
i tried what you said on the layers thing and mine still comes out black. What do i do from there?
👍: 0 ⏩: 1
If possible, why don't you upload the PSD file (the actual photoshop file) to your Sta.sh, and send me the link. I'll see if I can figure out what's going on
👍: 0 ⏩: 1
I actually ended up figuring this out. Thanks though and thank you SO SO SO VERY MUCH for helping me with all my random questions! I'm sorry if they were annoying im just not good at photoshop XD anyway Thanks again and i look forward to your future posts!!!!
👍: 0 ⏩: 0
My bad on commenting twice i thought i only did once. Lol im so dumb sometimes
👍: 0 ⏩: 0
When i get to the part where you adjust Hue ect. mine just turns black. Could i have some help?
👍: 0 ⏩: 0
How do you get the body to come through? When i adjust mine it always comes out black. Help?
👍: 0 ⏩: 1
I have four layers to start with, three of them copies of the background, with A on top like this
A
B
C
D (blank layer)
D is the fill layer, the one I colored green. A is the layer that I erased where I want the fur to go. B and C are the lighting layers. C is set to Soft Light, and in the Hue/Saturation panel I reduced the saturation to -40. B is Hard Light, and I set saturation all the way down (-100) and Light/Dark to -25. I put the fur layers between C and D.
👍: 0 ⏩: 1
Ok. That makes sense now. Thanks a bunch!
👍: 0 ⏩: 0
")

Yeah hey me again, I'm just having a bit of a problem doing a snow leopard any helpful tips ?
👍: 0 ⏩: 1
Does Elements 7 have Clone Stamp? Another trick you can use to get around the lack of masks is to take a piece of fur from something that has a uniform color (like say a lion), and use the level/color adjustments to get it to a similar color as a snow leopard. Then, use the clone stamp to copy one of the snow leopard rosetta spots, and (with the Aligned box turned off) copy it a bunch of times over the fur. You can also use the clone stamp at a low opacity to help blend those hard edges where the two layers meet.
👍: 0 ⏩: 1
Yes is dose ! 
👍: 0 ⏩: 1
Sure - or you can use the sta.sh system, that way no one can see it until you're ready to post the final version.
👍: 0 ⏩: 1
Thanks!...How do I use sta.sh ?
👍: 0 ⏩: 2
For example, this is one version of a recent request without the background I later added
[link]
👍: 0 ⏩: 1
Okey , now I get it !

👍: 0 ⏩: 0
Underneath the Submit Art in the Submit tab is a link to your sta.sh. You can upload stuff there just by drag & dropping, and no one sees it unless you send them a link to it. You can then submit from there your regular gallery whenever you want. I use it for showing requesters the working versions so they can request revisions.
👍: 0 ⏩: 1
Okey I'll send it in a bit , don't go anywere ! :3
👍: 0 ⏩: 1
I don't have to be at work until 4, so I'm here for probably at least an hour or so
👍: 0 ⏩: 1
Okey here it is ! 
👍: 0 ⏩: 0
I dont really understand how to get this effect , I still see shapes of the overlaping fur and stuff , and I don't think I have a layer mask option , ot is that the eye icon on the left side of my layer ?
👍: 0 ⏩: 1
At the bottom of the layers panel, there should be a row of icons. What icons do you have?
👍: 0 ⏩: 1
| Next =>