HOME | DD
 Reyndrys — My Little Pony Sculpture Tutorial Part 1

Published: 2014-05-29 21:05:00 +0000 UTC; Views: 9099; Favourites: 193; Downloads: 91
Redirect to original
Description
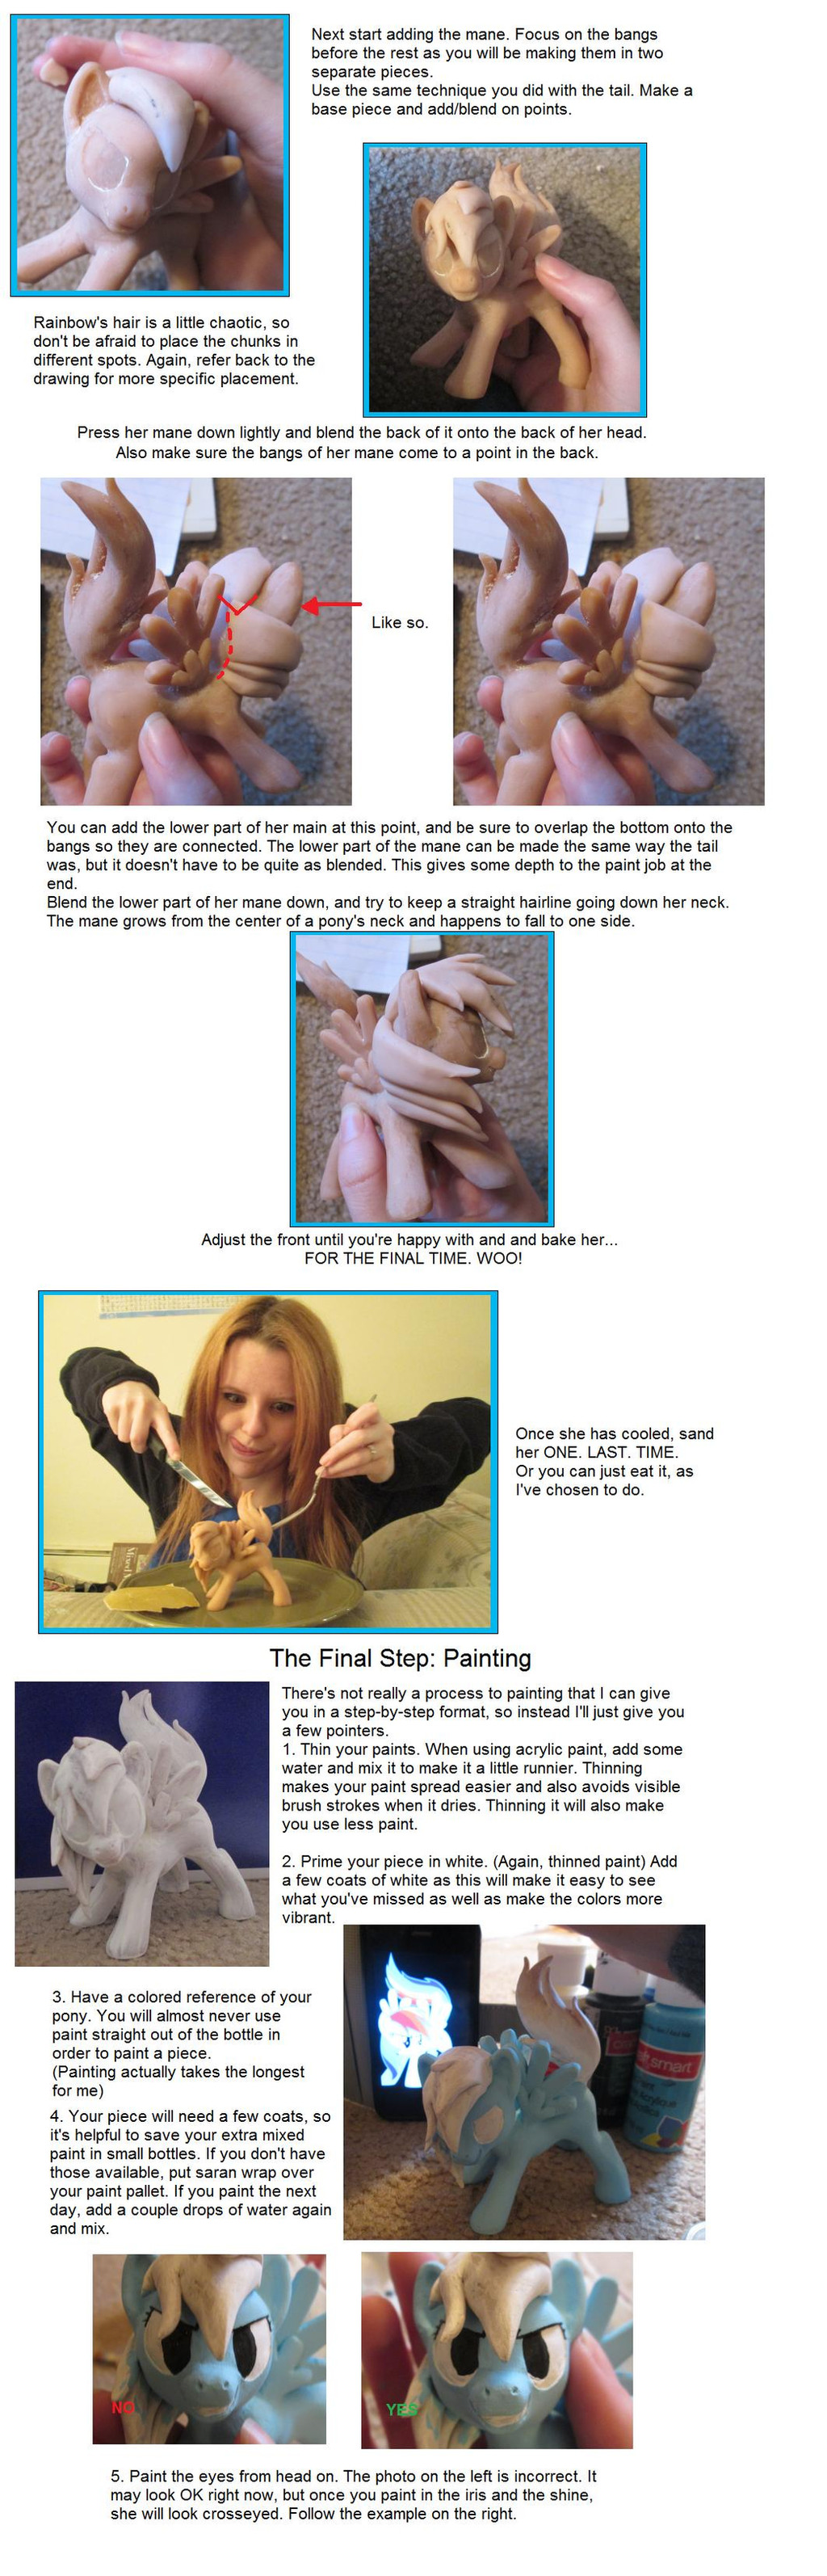
Okay okay, this tutorial was made in MS Paint. Give me a break, I'm awful with computer programs... The information is all you need anyways, right? RIGHT??I took a bunch of photos with my Rainbow Dash sculpture..
This was originally made for someone awesome and I wasn't going to share it *hoarder* But the DA community has helped me so much by posting their tutorials, so it's high time I gave back.
If you have any questions along the way I'd be happy to help.
If you use my tutorial, please link me with the resulting piece because A. Credit is always appreciated and B. Let me see what you made!
Thanks Everypony!
Part 2 reyndrys.deviantart.com/art/My…
Related content


Comments: 24

I love this tutorial. I feel these techniques would be helpful not only for sculpting ponies but any kind of figurine-type pieces.
Can I ask where you get the steel wire/what brand that is? For some reason I can't find it at my local craft stores. I see a lot of copper and aluminum wire in the jewelry sections but there's nothing in the clay areas.
👍: 0 ⏩: 1

Thank you!
Instead of getting my craft wire at a craft store, I get it at the hardware store. It comes in greater quantities, and it's WAY cheaper. Craft stores always overcharge. Also, avoid aluminum wire at all costs. I had some once because it was even cheaper than the others, but aluminum tends to break, which was a surprise.
I use galvanized Steel Wire. It usually comes in a 75ft pack. On this Rainbow Dash, I used 20 gauge (.88mm) I think it's made by AnchorWire (18, 20, 22, and 24 are all pretty decent gauges. But 20 and 22 are the easiest to work with in my opinion)
Hope that helps! If you have any other questions feel free to message me anytime
 (Smile)")
👍: 0 ⏩: 1
Thanks so much for the detailed response! I will definitely be putting this information to good use
👍: 0 ⏩: 0

How do I wrap the tape around he joints? They keep slipping away as I tape them.
👍: 0 ⏩: 1
Sometimes mine do that too. I just add a dab of glue over the tape (get some glue on the wire too) then cover the glue with another piece of tape. Let it dry and then it shouldn't slide around.
Hope that helps!
👍: 0 ⏩: 1
Seems legit, but how in which way do you wrap it without having the joints being pushed around in the process.
👍: 0 ⏩: 1
I suppose I usually wrap it around in a sort of "x" pattern. It always moves a little bit (Which is annoying) I've started adding milliput over the taped spots, when it hardens, I can sculpt around it no problem. (Sorry for my delayed response!!)
👍: 0 ⏩: 1
That milliput sounds reliable, and I can agree with the wrapping motion around the tape. Thanks for your help, M'am.
👍: 0 ⏩: 0

If you are making an alicorn, would you have to put wire for the horn because it's longer?
👍: 0 ⏩: 1
I build the head first and while the clay is still wet, wedge a piece of wire in where you would like the horn to be. Then bake it with the wire sticking out and then sculpt the horn over the wire. I usually make the horn separate then gently slide it on and bake again. Hope that helps!
👍: 0 ⏩: 1
Ok, I'll do that! And thanks!
👍: 0 ⏩: 0

Thanks a lot for this tutorial! It's very useful for beginners like me. And here's what I made: starkdust.deviantart.com/art/M…
👍: 0 ⏩: 1
Nice work! I'm super excited that my tutorial could help you! I hope you continue making pony sculptures as you already seem to have a knack for it. Plus I love Maud Pie ")
👍: 0 ⏩: 0

thank you, this was super helpful. and this is my sculpture 95n.deviantart.com/art/MLP-Tri…
👍: 0 ⏩: 1
Oh! I'm so glad you posted this
👍: 0 ⏩: 0

thanks, Here's my first! what do you think? directorstark.deviantart.com/a…
👍: 0 ⏩: 1
Wow! Looks great! How long did it take you? You should be proud of yourself
👍: 0 ⏩: 0

How many times can you bake the figure? I started with super sculpey and super sculpey firm mix, and I'm super excited haha your tutorials are amazing! (sorry bad english)
👍: 0 ⏩: 1
Thank you!
You can bake a piece as many times as you want! Just let it cool off completely between baking :3
Your English is fine, no worries.
I'd love to see what you sculpt!
👍: 0 ⏩: 1
thank you for the answer!! I will!
👍: 0 ⏩: 0

Used! Probably the best MLP sculpting tutorial I've come across. I'm going to use it again today, if you don't mind!
The sculpt: celestial-rainstorm.deviantart…
👍: 0 ⏩: 0

My question was asked in the form of thought....you a psychic?
👍: 0 ⏩: 0

Where did you get that blending tool? I have quite a few tools for sculpting but that looks particularly useful for smoothing out cut in areas like eyes.
👍: 0 ⏩: 1
I got it at Michaels Craft Store, it's made by Sculpey and is called a 5 in 1 tool. The heads are magnetic and interchangeable. Honestly I never use the other heads. The blender is rubber, and I recommend giving the tip a good workout before its maiden voyage because it is a little stiff at first. I simply cannot do without this tool.
👍: 0 ⏩: 0