HOME | DD
 rockgem — Fractal Manipulation Tutorial for Photoshop -Bunny
Published: 2014-04-20 09:00:06 +0000 UTC; Views: 1582; Favourites: 17; Downloads: 19
Redirect to original
Description
and its just in time for Easter


Happy Easter to all my friends and watchers here on dA


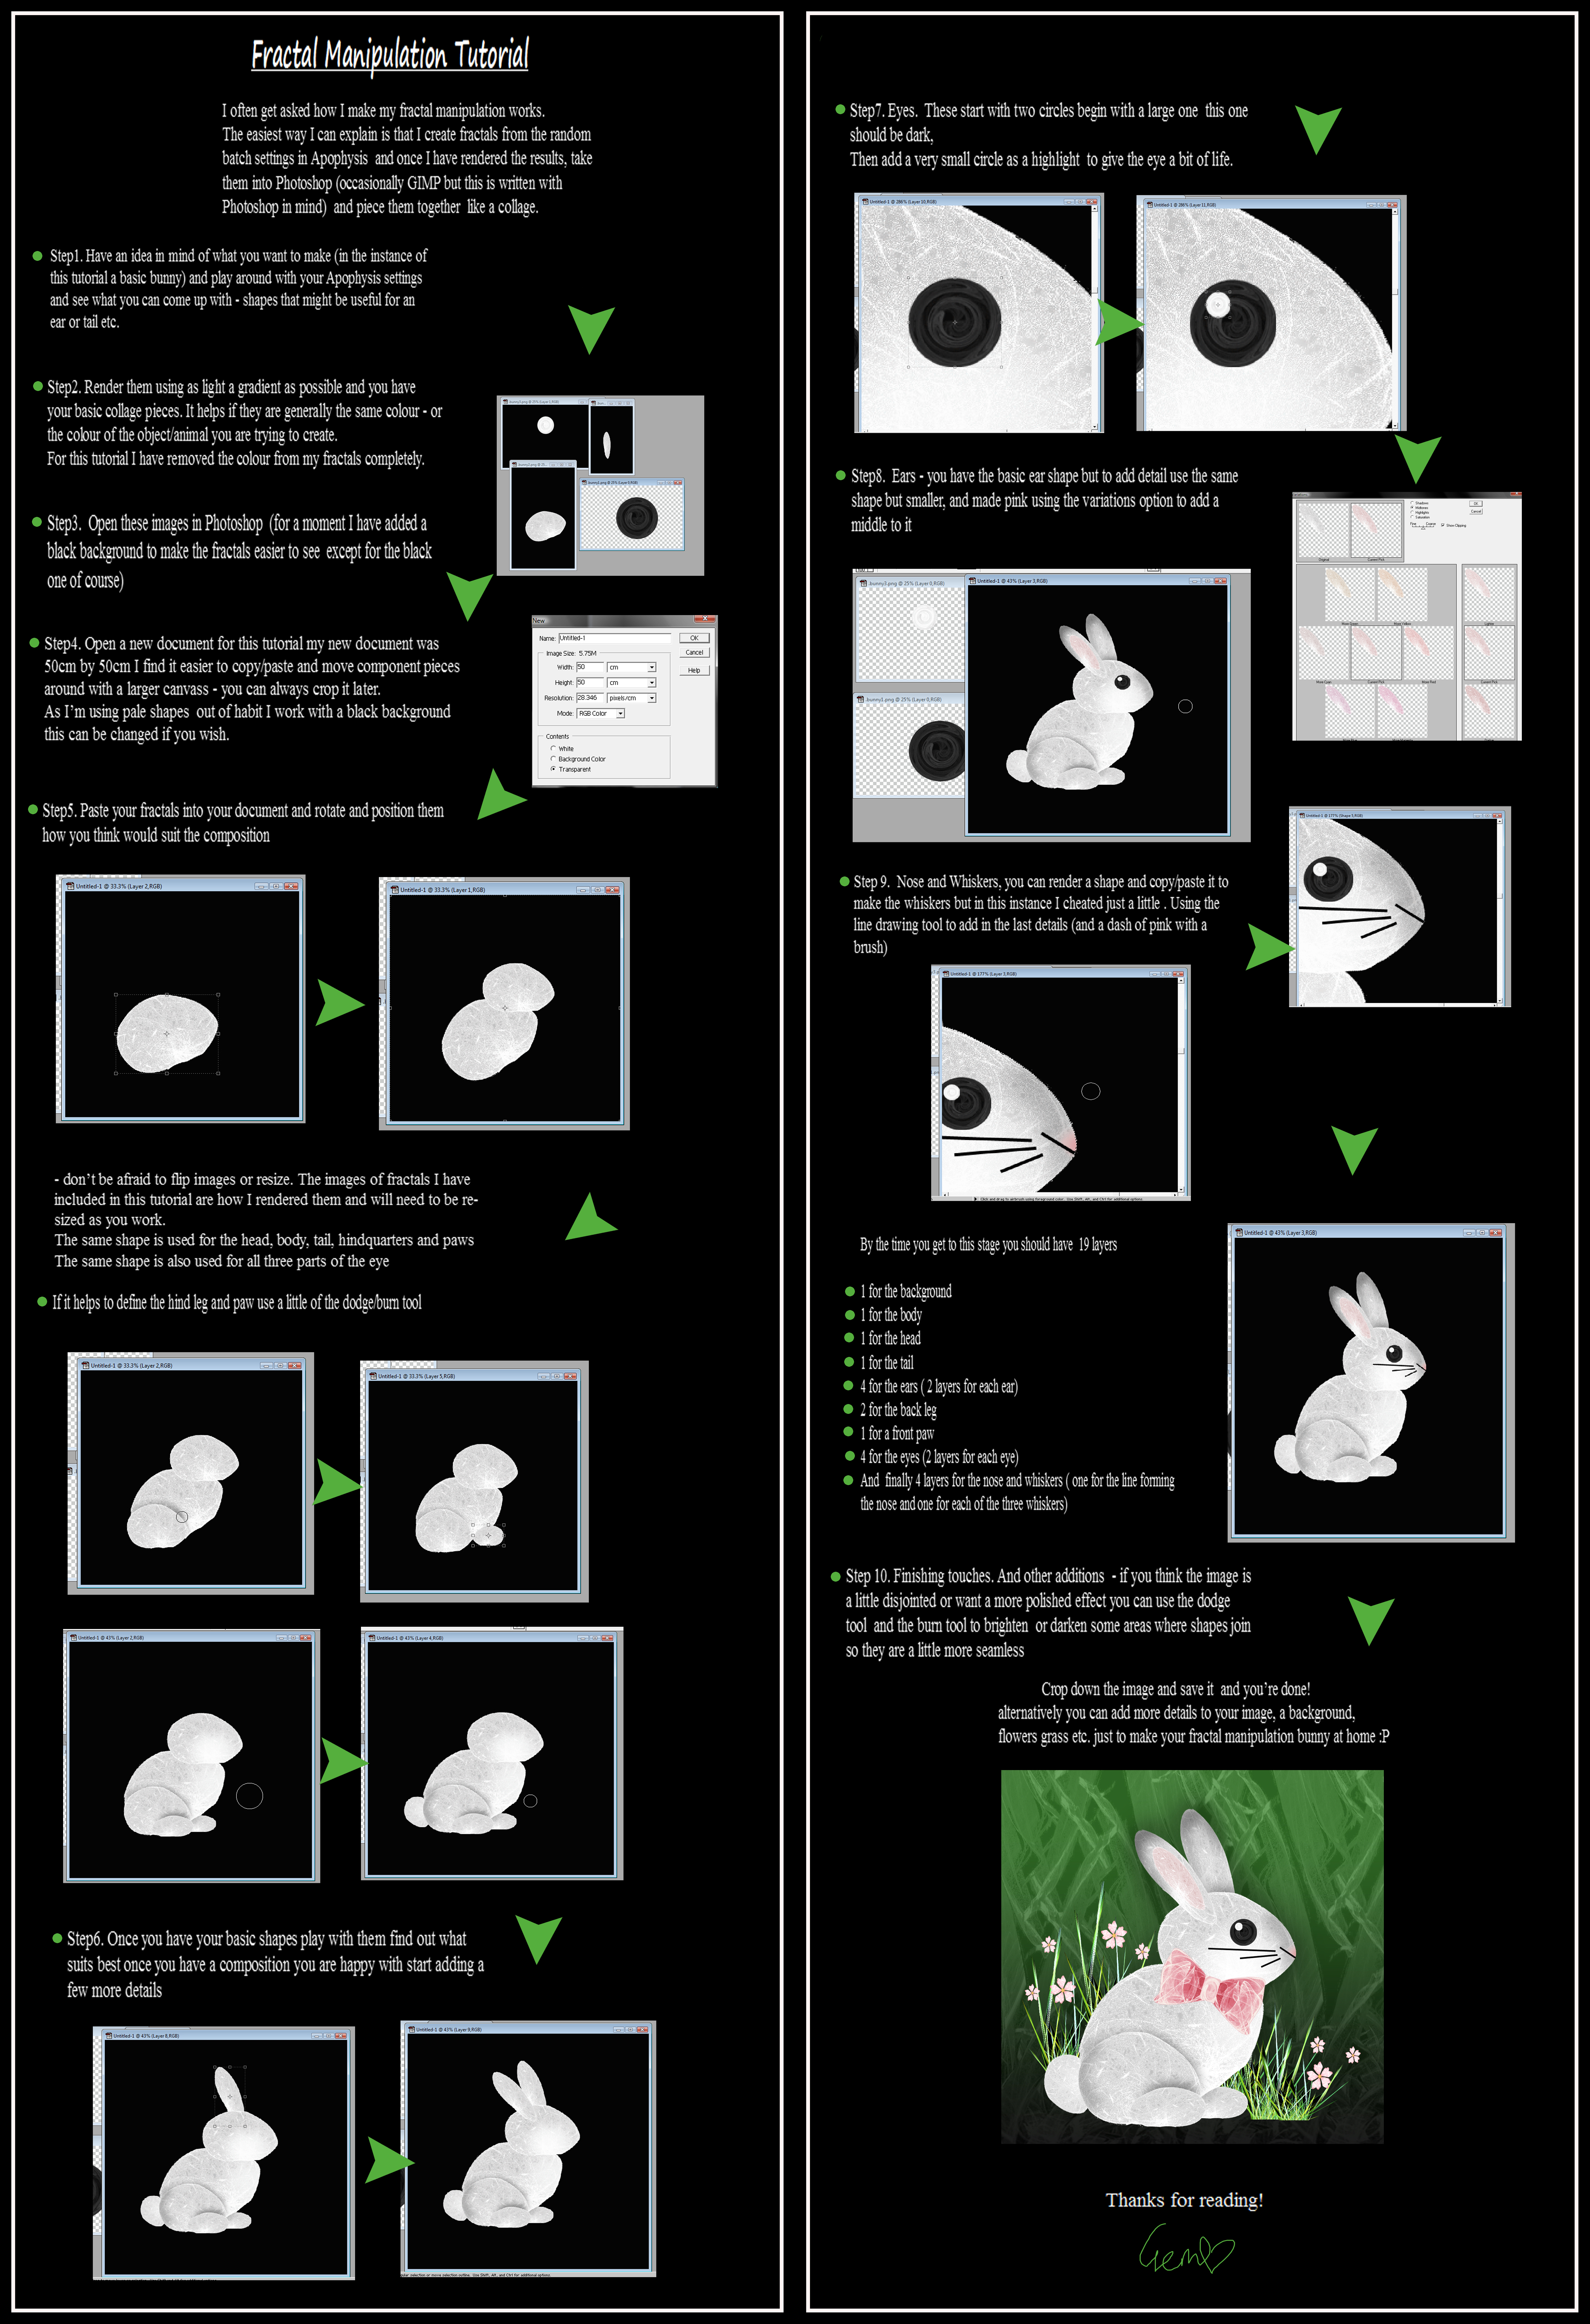
I often get asked how I make my fractal manipulation works.
The easiest way I can explain is that I create fractals from the random batch settings in Apophysis and once I have rendered the results, take them into Photoshop (occasionally GIMP but this is written with Photoshop in mind) and piece them together like a collage.
Step1. Have an idea in mind of what you want to make (in the instance of this tutorial a basic bunny) and play around with your Apophysis settings and see what you can come up with - shapes that might be useful for an ear or tail etc.
Step2. Render them using as light a gradient as possible and you have your basic collage pieces. It helps if they are generally the same colour - or the colour of the object/animal you are trying to create.
For this tutorial I have removed the colour from my fractals completely.
Step3. Open these images in Photoshop (for a moment I have added a black background to make the fractals easier to see except for the black one of course)
Step4. Open a new document for this tutorial my new document was 50cm by 50cm I find it easier to copy/paste and move component pieces around with a larger canvass - you can always crop it later.
As I’m using pale shapes out of habit I work with a black background this can be changed if you wish.
Step5. Paste your fractals into your document and rotate and position them how you think would suit the composition
- don’t be afraid to flip images or resize. The images of fractals I have included in this tutorial are how I rendered them and will need to be re-sized as you work.
The same shape is used for the head, body, tail, hindquarters and paws
The same shape is also used for all three parts of the eye
If it helps to define the hind leg and paw use a little of the dodge/burn tool
Step6. Once you have your basic shapes play with them find out what suits best once you have a composition you are happy with start adding a few more details
Step7. Eyes. These start with two circles begin with a large one this one should be dark,
Then add a very small circle as a highlight to give the eye a bit of life.
Step8. Ears - you have the basic ear shape but to add detail use the same shape but smaller, and made pink using the variations option to add a middle to it
Step 9. Nose and Whiskers, you can render a shape and copy/paste it to make the whiskers but in this instance I cheated just a little . Using the line drawing tool to add in the last details (and a dash of pink with a brush)
By the time you get to this stage you should have 19 layers
1 for the background
1 for the body
1 for the head
1 for the tail
4 for the ears ( 2 layers for each ear)
2 for the back leg
1 for a front paw
4 for the eyes (2 layers for each eye)
And finally 4 layers for the nose and whiskers ( one for the line forming the nose and one for each of the three whiskers)
Step 10. Finishing touches. And other additions - if you think the image is a little disjointed or want a more polished effect you can use the dodge tool and the burn tool to brighten or darken some areas where shapes join so they are a little more seamless
Crop down the image and save it and you’re done!


 alternatively you can add more details to your image, a background, flowers grass etc. just to make your fractal manipulation bunny at home


The some of the items used in creating the background can all be found either in my older works or in my stock folders - I did use a Photoshop gradient as well
I often get asked how I make my fractal manipulation works.
The easiest way I can explain is that I create fractals from the random batch settings in Apophysis and once I have rendered the results, take them into Photoshop (occasionally GIMP but this is written with Photoshop in mind) and piece them together like a collage.
Step1. Have an idea in mind of what you want to make (in the instance of this tutorial a basic bunny) and play around with your Apophysis settings and see what you can come up with - shapes that might be useful for an ear or tail etc.
Step2. Render them using as light a gradient as possible and you have your basic collage pieces. It helps if they are generally the same colour - or the colour of the object/animal you are trying to create.
For this tutorial I have removed the colour from my fractals completely.
Step3. Open these images in Photoshop (for a moment I have added a black background to make the fractals easier to see except for the black one of course)
Step4. Open a new document for this tutorial my new document was 50cm by 50cm I find it easier to copy/paste and move component pieces around with a larger canvass - you can always crop it later.
As I’m using pale shapes out of habit I work with a black background this can be changed if you wish.
Step5. Paste your fractals into your document and rotate and position them how you think would suit the composition
- don’t be afraid to flip images or resize. The images of fractals I have included in this tutorial are how I rendered them and will need to be re-sized as you work.
The same shape is used for the head, body, tail, hindquarters and paws
The same shape is also used for all three parts of the eye
If it helps to define the hind leg and paw use a little of the dodge/burn tool
Step6. Once you have your basic shapes play with them find out what suits best once you have a composition you are happy with start adding a few more details
Step7. Eyes. These start with two circles begin with a large one this one should be dark,
Then add a very small circle as a highlight to give the eye a bit of life.
Step8. Ears - you have the basic ear shape but to add detail use the same shape but smaller, and made pink using the variations option to add a middle to it
Step 9. Nose and Whiskers, you can render a shape and copy/paste it to make the whiskers but in this instance I cheated just a little . Using the line drawing tool to add in the last details (and a dash of pink with a brush)
By the time you get to this stage you should have 19 layers
1 for the background
1 for the body
1 for the head
1 for the tail
4 for the ears ( 2 layers for each ear)
2 for the back leg
1 for a front paw
4 for the eyes (2 layers for each eye)
And finally 4 layers for the nose and whiskers ( one for the line forming the nose and one for each of the three whiskers)
Step 10. Finishing touches. And other additions - if you think the image is a little disjointed or want a more polished effect you can use the dodge tool and the burn tool to brighten or darken some areas where shapes join so they are a little more seamless
Crop down the image and save it and you’re done!


 alternatively you can add more details to your image, a background, flowers grass etc. just to make your fractal manipulation bunny at home


The some of the items used in creating the background can all be found either in my older works or in my stock folders - I did use a Photoshop gradient as well
The final image can be found here
All images and literature/written work in =rockgem's gallery are © Gemma Hart. All rights reserved. Reproduction and/or retransmission of all or any part of this gallery are prohibited under copyright law. Users desiring to reproduce or retransmit all or any part of this gallery must first secure in writing the appropriate copyright and other authorization from the copyright owner. My work is not public domain.
Thankyou.
Related content
Comments: 9

it would be nice if people did try this style of fractal manipulation out 
👍: 0 ⏩: 1
Yes, I understand, I only work with paint shop
And was just working on a fractal, and then wanted to edit it in a paint shop as you describe, but have been so busy with forms that there is nothing left to manupilate
Maybe I did not understand the assignment quite well
I'll read him again later
Thank you for the tutorial!
👍: 0 ⏩: 1

I mean this fractal, maybe you have some tips for me ?
👍: 0 ⏩: 0

I don't know how I missed these tutorials Gem. It must have been the year I had to take leave from DA. Thanks for the tutorial, I always wondered how you did your wonderful manipulations.
👍: 0 ⏩: 1

we all need time out once in a while , but i did break some of the ideas i use in my fractal manipulations down into something simple like this, granted it is not how all my manipulations work but it does give an idea. my secret is somewhat out of the box now i guess haha! I render my shapes using apophysis then use each fractal shape like you might create a collage, certainly with the blocky basic shapes it does give a wonderful sense of whimsy and a certain degree of cuteness. Something like this bunny can be done relatively quick, but i know some of the more complex works i sometimes cook up can take hours - i think the longest i ever spent on a fractal manipulation was about 8 hours
👍: 0 ⏩: 0

Another excellent tutorial Gem, very easy to follow
👍: 0 ⏩: 1

thankyou kindly for the compliment 
👍: 0 ⏩: 1


