HOME | DD
 sculptor101 — Figurine WIP/ tutorial part 1 armatures and legs

Published: 2014-06-11 06:08:14 +0000 UTC; Views: 46103; Favourites: 236; Downloads: 0
Redirect to original
Description
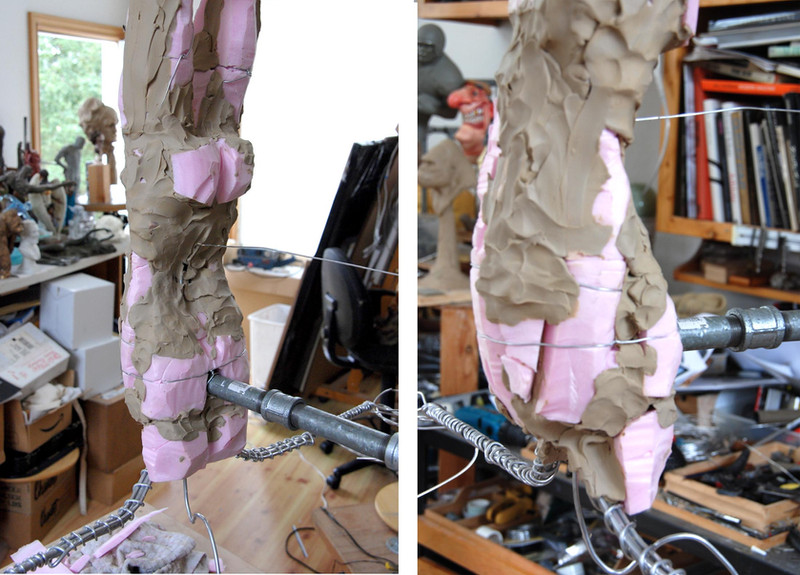
Many friends had asked me "How do you make figurines, can you show me the process?" I had therefore made a tutorial that divided in several areas of the figurine while I was working on a self project, a project that wasn't base on commission, actually they were sort of work in progress. You may see a lot of photos taking during sculpting. It's long hours of work that I did beside my work. Please look for yourself and compare the differences of how it was made. I tried taking shoots as many as I can at the "turning points" in angles.
I know you might have a lot of questions, the materials, tools, methods... I would suggest you may look for my other tutorials for commonly asked questions. I don't really know how long this project may take. But I'll keep updated as it goes on. The pictures shown an angel figurine in progress. Enjoy!
Title: It has a title but I'm not going to say it now, please wait until you see the whole scene when nearly finish.
Material were used: Super Sculpey, jumbo paperclips, crazy glue, baby powder.
Alex Liao
Please also refer to the following related tutorials:
Figurine WIP/ tutorial part 1 armatures and legs
Figurine WIP/ tutorial part 2 dress and folds
Figurine WIP/ tutorial part 3 wings
Figurine WIP/ tutorial part 4 wings
Figurine WIP\ tutorial part 5 the soldier + angel
Figurine WIP\ tutorial part 6 heads + base final
Final sculpture scene:
Bring the boy back home by sculptor101
--------------------------------------------------------------------------------------
《歡迎搜尋加入》Welcome to add me:
網站(Website): www.sculpture.com.tw/
Blog: art.sculpture.com.tw/
Instagram: instagram.sculpture.com.tw/
Pinterest: pinterest.sculpture.com.tw/
Youtube: Youtube.sculpture.com.tw/
#Instagram #pinterest #Blog #deviantart #sculpture #garagekit #sculptor #videoturorial #sculpturetutorials #arts #design #molding #modeling #YouTube #FaceBook #雕塑 #公仔 #精工 #影片教學 #藝術 #設計 #陶藝 #模型 #模型師 #原模師 #雕塑教學 #公仔模型 #動漫 #翻模 #原型師
Related content


Comments: 42

These are all very lovely! I have a question though: I see you using a paint brush in several of these tutorials and, I'm wondering exactly what the purpose is? Is there some sort of liquid you are using?
👍: 0 ⏩: 1

Thanks so much!!
That's for smoothing the surface of Super Sculpey, you may refer to my tools tutorial No. 18, 19,21 for detail at:
sculptor101.deviantart.com/art…
You can use nail polish remover for it, but each brand of formula may vary, do test it on the clay before you use it.
👍: 0 ⏩: 1
Thanks so much! I've always had trouble smoothing out my work
👍: 0 ⏩: 1

Alex, how would you shape the leg wire for a woman wearing high heels buddy? I have no probs in wax as there is no wire but with clay, I get probs.
also what size/thickness wire would you use in this tutorial if the figure had to be 17 inches or so?
atb --tim
 (Smile)")
👍: 0 ⏩: 1
I would worry about its steady for 17" tall figurine. It's easy to fix the armature if it goes to molding after sculpting. So I would use much thicker size of wire as possible. The best way is to use the metal pipes that holds its waist. And the main armature secured to it. I don't really know the size of wire but would pick the wire you should bend it with big pincer.
Do you usually make a casting from clay out of silicone mold? Or just make it for practice?
👍: 0 ⏩: 1
usually just practice Alex. but I am having problems shaping the wire to accommodate a foot wearing heels; I've tried many different shapes and bends but the wire gets in the way.
When I use wax, it is no problem as I don't use a wire. But with clay, it is driving me nuts.
atb --tim
👍: 0 ⏩: 1
I would mainly make the wires go with the shape of the character's body from her feet to stand still and just put some minor wires go through the heels that enough to apply the clay. Perhaps some strings pull tightly from the legs to the base board in triangles. Take your time to find out the best way, so you would have good experience next time.
👍: 0 ⏩: 1
well if you ever sculpt a female wearing killer heels, be sure to document that! For now I'm going to use wax as I am hating on wire at the present!!! lol.
atb --tim
👍: 0 ⏩: 1
Hey Tim, whatever is good for your work would be better! Good luck to your killer high heels lady!
👍: 0 ⏩: 1
cheers Alex! but it is still annoying that I cant do it in clay on a wire!
atb --tim
👍: 0 ⏩: 0

Can youexplain how you smooth the clay? And why do you cut the legs of
")
👍: 0 ⏩: 1
Please take a look my tool tutorial at:
sculptor101.deviantart.com/art…
No 18, 19, 21 for the explanation
I cut the legs for molding reason, also the figurine can be seen under the skirt that I don't want to fill it all up with clay.
👍: 0 ⏩: 0

what can I say???????....I'm shocked ... graciasssssss
👍: 0 ⏩: 1

Very nice work and REALLY good to see the stages broken down.
👍: 0 ⏩: 1
Thanks a lot! I thought it would be good to just post the process of photos, perhaps friends here be easier to understand. ^^
👍: 0 ⏩: 1
No worries, hope it helped.
👍: 0 ⏩: 0

Thanks for taking time to record every step, really awesome to see each small increment in the process
👍: 0 ⏩: 1
You are welcome! I didn't think much and arrange the scene, it's a bit messy of the working turn table. But at least I try to show how they were formed. So glad you like it! ^^
👍: 0 ⏩: 0

Thanks for this. Everyone starts off differently. I guess it's what works best for you.
")
👍: 0 ⏩: 1
You are welcome! Yes, anyone may have their own way, whatever suitable to them is a good method.
👍: 0 ⏩: 0

Finally I get the chance making it and share. thanks dear!!
👍: 0 ⏩: 0

This is amazing! I always get excited seeing new tutorials from you. =]
👍: 0 ⏩: 1
The process will go on and I'll post them on later. Hope they help!
👍: 0 ⏩: 0

This is a really great tutorial, thank you so much for sharing!
It is great to see this figurine in the making. Also the second part is really good.
It's incredible, how you work those folds and shapes out of the naked sclupey. The feet are amazing, too!
I just don't really get, why you cut of her legs at the end. Is it to correct the angle or something?
👍: 0 ⏩: 1
You are welcome my dear!! I thought this photos may explain by themselves. But I probably would need to make more notes for it later.
I intent to make it like a 1/10 scale garage kit, so the molding will be a problem in legs. Also it's fun for self assembling. There will be many pieces with pin attachments in these figurines. I cut off the legs on purpose, you will see the next updates many parts might cut off, wings, hands, heads, base etc.
👍: 0 ⏩: 1
Okay I have seen this before, but never with a propper explanation,
im very exited to see the further process.
And Thank you for sharing it, once more!
👍: 0 ⏩: 1
You are welcome my dear Judy!! There is a story in this scene, I'll keep taking the progress and tell it in a proper time. I really appreciate your support!
👍: 0 ⏩: 0

You are welcome! It's my pleasure helping others!
👍: 0 ⏩: 0

I wish I could look over your shoulder when you sculpt. Really nice. I know I said that before but I always wonder how someone can work so smooth and rich in detail with the normal sculpey *_*
One litte question. For what do you use the glue? So that the new clay hold on to the baked clay? Or only to glue the parts back together? ^^
👍: 0 ⏩: 1
Me too, I wish you would be my angel to look over my shoulder!!
I guess that I had played with it for many years, so I know well how it could be formed.
The glue is very useful when apply soft clay on baked clay. But be very careful not putting to much, it "runs" fast! Or sometimes, when you apply the clay, it stays on but it moves after your tools are working on it, it creates air inside (between soft and hard clay) that bothers you, you may cut the soft clay open and put a very little drop into it with a paperclip or a needle.
Yes, It may glue the parts back on also.
👍: 0 ⏩: 1
Oh, I'm no angel
So you really use the glue to connect the baked with the unbaked sculpey. Really interesting. For this purpose I use Translucent Liquid Sculpey but I think your method is cheaper ^^ I will give it a try : )
👍: 0 ⏩: 1
I usually use Sculpey Diluent (softener), apply very thin on baked sculpey. It works fine for attaching new clay. But I use crazy glue because it is much faster to stick on and won't even move. You may try it and be careful, it drop and run fast. Make sure that you have some tissue paper beside you!
👍: 0 ⏩: 0


