HOME | DD
 SgtMilenko —
Sculpting Tutorial
SgtMilenko —
Sculpting Tutorial

Published: 2010-09-03 16:58:58 +0000 UTC; Views: 74028; Favourites: 2552; Downloads: 1689
Redirect to original
Description
In this tutorial Ill be going over some basics of sculpting.Its huge, so its best if you download it.
Comments appreciated, painting tutorial on its way.
Pour vouz who asked for the head tutorial, please go here:
[link]
Click here [link] for the finished product!
Id LOVE to see what you created using this tutorial, so if youd like please take the time to post your creation in the comments below.
EDIT: I woke up this morning and noticed I had 300 new messages since 8 hours ago ("wtf did I not take my pills last night...?"), and first thing I see on my reply sack is "Congratz on the DD..."
I swear guys, Christmas isnt for another 4 months!
Im not quite sure how to begin to thank you all...
Related content


Comments: 397

Haha, I love seeing DD responses...yours is the best!
("wtf did I not take my pills last night...?")
Christmas isnt for another 4 months!
xD Congrats again!
👍: 0 ⏩: 1

This is the best trip Ive ever had, mate.
👍: 0 ⏩: 0

it has a vagina in its mouth D:
but amazing sculpture work haha <3 i'd love to comission you <3
👍: 0 ⏩: 1
Yes.. It makes her even more fearsome...
She shoots acidy spit that burns your flesh. I mean, really. Valve is sending us SUCH subtle hints. And if you look close enough, you can see shes wearing a thong.
👍: 0 ⏩: 1
XD haha nice.
they have the mind to think of these things
but still dont know what the number 3 is.
👍: 0 ⏩: 0

Holy. Nut. :0 Awesome. Where did you buy the supplies, Micheals?
👍: 0 ⏩: 1
Hobby Point actually, but inside US, Dick Blick ^^ They have some pretty good deals!
👍: 0 ⏩: 1
: D I've never heard of those places, thanks. I'll look them up!
👍: 0 ⏩: 0

Fantastic tutorial and wow, suck an amazing sculpture! Really makes me want to try sculpting more.
👍: 0 ⏩: 1
Yes I knew I missed one item on my shopping list... Turkish Pepper Lollipops...!
Cheers mate!
👍: 0 ⏩: 1
...DERP. I had to re-read my comment to figure out what that meant. Heh... I meant "Such". >.>
👍: 0 ⏩: 0

This tutorial is great! I want to do some sculpting, but I've been concerned about using my oven for it. I've read that you're not supposed to use the same oven for baking food and baking clay because of health whatnot. That's why I've only used some airdry clay, which is kind of lame if you want to make detail. :/
Your sculpture looks super awesome though! The textures are astonishing!
👍: 0 ⏩: 1
I spread the disease!
Super Sculpey gives thumbs up for using your regular oven. But just to be on the safe side, air it out after baking in it, and be sure to clean it often.
👍: 0 ⏩: 1
Hehe great! Thanks for the info! Now I'm definately going to have to try out sculpting!
👍: 0 ⏩: 0

Amazing you took the time to make this awesome tutorial
Your work is amazing!
")
👍: 0 ⏩: 1
Its these kinda comments that make writing tutorials all worth it
👍: 0 ⏩: 1


You can thank us by making more awesome tutorials! xD joking aside, nice job on the tutorial, it's easy to read and the pictures are helpful.
 (Wink)")
👍: 0 ⏩: 1
Alright, another tutorial, coming up!
👍: 0 ⏩: 1


Awesome....I've spent much time with Super Sculpty but I haven't tried the turpentine technique.
👍: 0 ⏩: 1
...And once you do, I promise you wont go back.
👍: 0 ⏩: 0

Awesome work, thanks, gotta admire your skills, I hope to reach that level some day
Thanks for the tutorial. It never occurred to me to use turpentine to smooth the clay down. I do clothing the hard way (as in, making a really thin layer and putting it over like a real cloth) but your tutorial is making me reconsider.
Personally I always thought Super Sculpey was way too soft and prone to accidental smudging and bruising along with being really hard to sustain by itself due to it's low firmness. I might be doing something wrong, but even with a surgical cutter blade I often 'drag' the clay instead of cutting or carving it, which is really frustrating. How do you make detailed hands with it for example? Or the thin clothes in the skirt of your elf figure? Perhaps you bake them first and attach latter?
Before that I had a tried using Sculpey III, doing a mixture of beige&translucent colors, and it worked pretty well.
Recently I've been trying Sculpey firm and it seems to be the better one so far, it's firmness allows me to sculpt without fear of ruining other parts and it's firmness allows for some resistance in places where I'm not able to put a wire underneath.
About the baking, what advantages do you see in baking a handful of times for 3 hours? the 15-30 minutes the package states seem to work fine. One thing I've tried that worked pretty well is boiling. Putting plenty of water to boil and let the piece there for 30-40 minutes works well and seems to be more delicate and less prone to ruining sculptures like the oven; it causes whitening on the color though.
Anyway thanks again for this awesome tutorial, keep up the good work! Looking forward to the painting one too as I'm terrible at that!
👍: 0 ⏩: 1
Hi and thanks for commenting!
I used to do clothing that way too, but then I realized I wasnt skilled enough to measure the thickness of the cloth accurately. Go have a look at my Textures - tutorial, I explained that method there.
I too, cheated on Super Sculpey with Sculpey Firm. If you want to play safe, Sculpey Firm is your buddy. But I find sculpting it a bit too slow, as you need to apply much more pressure when sculpting with Firm. Thats why I often use a mixture of firm and Super Sculpey. The unwanted side-effect is discoloration which might screw up your perception of details.
As for sculpting detailed hands... Extremely hard. That is why, with Super Sculpey, you need planning. You need to plan ahead which areas youre going to work on first, and which areas youre going to complete last (to give yourself space to move around, or support the sculpture with your hands).
And youre absolutely right. You have to be very, very careful when using Super Sculpey, and thats why its not uncommon for me to boil some parts of the sculpture to make them hard.
I used the boiling technique on my other sculpture (not featured here), and I noticed that it is prone to cracking, since it doesnt bake the core of the sculpture evenly. But then again, that sculpture was particularly thick.
Ive stuck to oven baking ever since, only boiling parts of the sculpture, but eventually fully baking it.
As for baking, I once experiemented heating pieces of clay in different durations, and the longer I baked, the harder the pieces got. Baking three hours straight causes some cracking in sculptures once they come out of the oven, so I had to limit that time into cycles.
This allows me to safely remove any wires from the sculpture, and fill the holes with new clay during the next cycle.
👍: 0 ⏩: 1
I see. I never tried baking and adding new clay before a new bake, as I've been told that the newer clay expands slightly, actually causing new cracks or widening the holes it was supposed to cover.
I'd love to put to test what you explained on this tutorial, with more planning and time as I usually do this as a hobby in the late hours of night when I return from uni and at most invest a week in a figure; but looks like I'll have to wait until next year as I'm moving to Japan for study reasons. I'll keep an eye on your work. Any tutorials you make until I return are 110% welcome
👍: 0 ⏩: 0

this is really really super duper helpful. And I love the photos that went with it!!
👍: 0 ⏩: 1

woa!
1st. The details of the sculpture are amazing!!! awsome!! Increíbles! Fantasticos, asombrosos xD This is professional ... but... wtf! what is that xD xD
2nd. Good guide, i want to start in the world of sulptures and this will help me so much
Thanks!
👍: 0 ⏩: 1
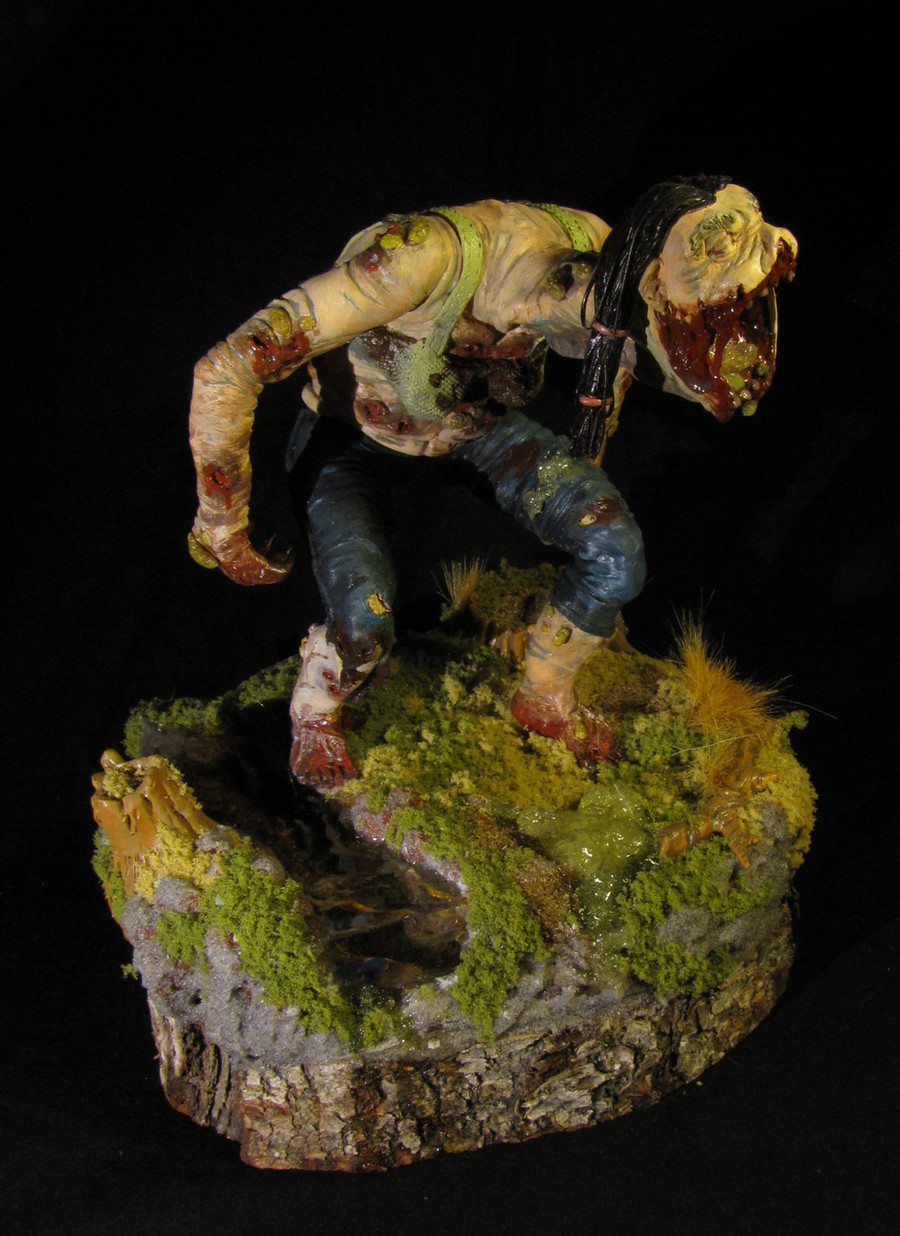
Its the fruit of my imagination.
Well, not really. Could be, looks disfigured enough.
Its the Spitter, from the Left 4 Dead -video game.
👍: 0 ⏩: 1
is a video game character... great  (Smile)")
Nah! don't look disfigured... is a beautiful woman xD
👍: 0 ⏩: 0

This is really helpful and so well done.!
Congrats on the DD.
👍: 0 ⏩: 1


wow thats very good... WAIT THATS A SHE!?!?!?!?!
👍: 0 ⏩: 1
Id marry her in a heartbeat. A beaty, aint she?
👍: 0 ⏩: 1

This stuff i am familiar with, Having used it for a character i had to to make in one of my classes for my Computer Animation Degree at Full Sail University. Super Sculpty is really good to work with.
Though i have one question, Part of my sculpture broke off. How would i go about repairing it, Its already been baked long before it broke.
👍: 0 ⏩: 1
No problem, Ive head quite many of my sculptures broken, or assembled after baking. The best thing to do is get some epoxy putty (liquid and solid kind), and use that as if you were gluing the pieces together. Finish off with some Liquid sculpey to hide the seams, and youre done!
You can always send me the pictures of the broken part, so I can assist you better.
👍: 0 ⏩: 0

When you said ''wires'' can we use any types of wires? or it needs to be in a special and unique metal, if not it will blow up or something?
Also, concerning the wood base, won't the wood burn into the oven? or you need some special type of wood too?
----enough questions----
Awesome tutorial! I definitely learned a lot and I'm enough confident now to put my Super Sculpey to use!
👍: 0 ⏩: 1
Keep spamming those questions, Ill always be glad to answer!
Normal alumium wire will do, its quite hard to blow anything up since the temperature well be burning these babies in is always under 150!
ANY type of wood will do, but if you want to be extra careful, try to get a piece that doesnt have any branch holes in it, they actually will start to bubble up in the oven, and Ive cracked quite a few bases because of them. They smell super good once heated up, tho.
..."Branch holes"...??
👍: 0 ⏩: 1
Ah schweet! than that means I can pretty much start sculpting NOawh! <3
an other question = you talked about temperature and time, shouldn't it change for different sizes? Like a big sculpture compare to a small one, the time would variate no?
also, how can you make some details like hair that holds in place (in mid air), are you using a tiny wire that you recover or something?
Thanks for your kind answers by the way! and I'll make sure to write you if I have an other question
👍: 0 ⏩: 1
Yes, spot on dear sir.
If youre baking a smaller sculpture, be sure to bake it for a shorter duration and in a lower temperature. For miniature size 110 celsius is enough, wait till it get golden brown.
Check out my hair tutorial here:
[link]
I think that covers the hair pretty well
👍: 0 ⏩: 1


I tried that same wire-frame method back at college..........it was a total disaster xD Guess I'm not cut out for sculpting xD
👍: 0 ⏩: 1
Dont worry, I used to screw up a lot with the wiring in the beginning... So not getting it perfect on the first time is no big deal
👍: 0 ⏩: 1

")
👍: 0 ⏩: 1
Tough luck mate.
Have to say its always easier to instruct people when I can see the sculpture that theyre working on.
Then again... She aint exactly miss Universe herself, is she now? ^^
(Pro tip: sculpt monsters that are hideously ugly to hide your mistakes)
👍: 0 ⏩: 1
<= Prev | | Next =>