HOME | DD
 sirris — Screen Printing 101 Part 1
Published: 2005-10-27 20:01:50 +0000 UTC; Views: 26134; Favourites: 108; Downloads: 400
Redirect to original
Description
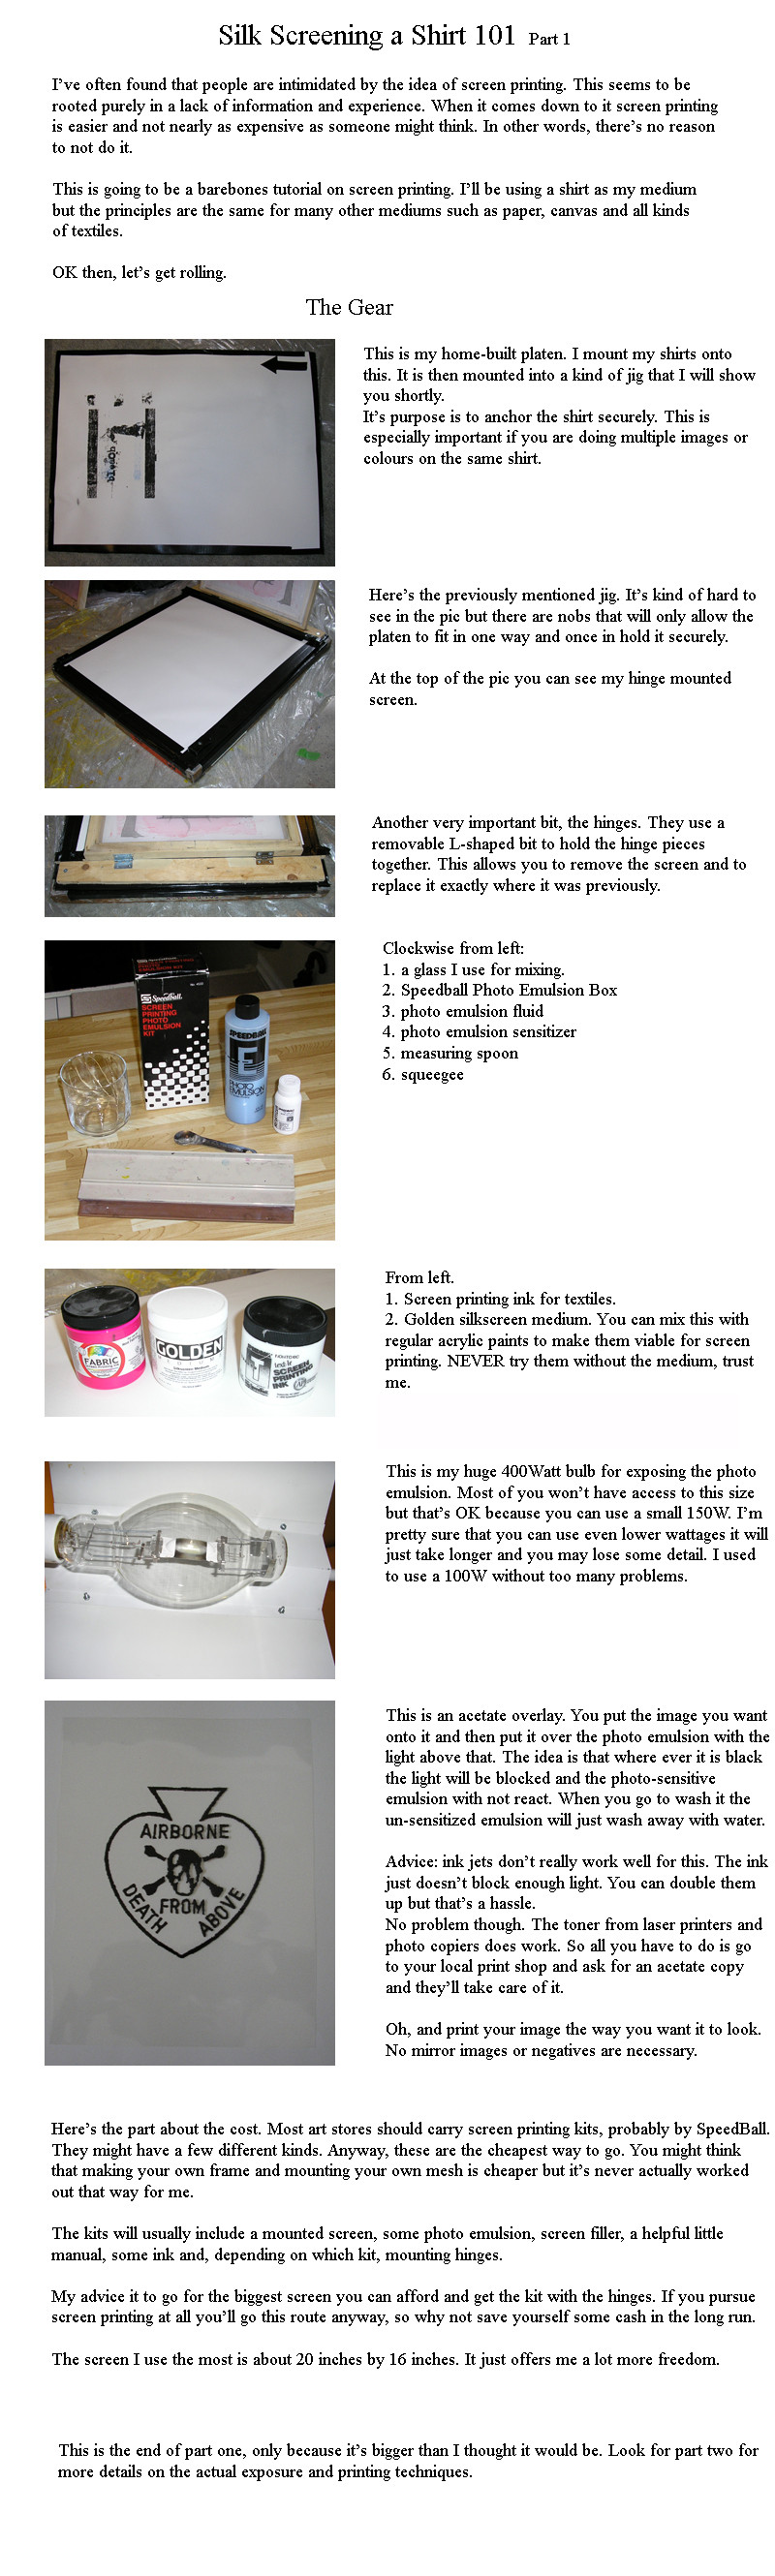
This is part 1 of 3 of a tutorial on the basics of screen printing a shirt.I really want to show people how easy and inexpensive it is. I think that screen printing is one of those things that intimidates people when it really shouldn't. I think I left out that a basic kit shouldn't cost much more that $30 or $40. That's pretty cheap considering what you can do with it.
Anyway, this part covers the gear you'll need to get started. I should mention that you don't need everything I've listed here. You can print without the jig and platen (those will make sense if you read the tutorial, heh), they're just something I use.
Screen Printing Tutorial Part 2
EDIT: I've changed a pretty important bit of info. I had previously stated that regular printing inks are OK for shirts. That is not the case, I repeat NOT the case. It has been removed from the tutorial proper.
Addendum: A lot of people of checked the tutorial out but I haven't gotten any feedback. I'm just wondering if it's been helpful at all or if it needs to be tweaked further.
Screen Printing Tutorial Part 3
Related content


Comments: 22

Very Informative!
So buying Mediums to mix is a must right?
👍: 0 ⏩: 1

I generally use pre-mixed screen printing inks. While you don't have as much control over the colour (although, you can mix them) it's a lot easier to deal with. The water-based inks are basically acrylic mixed with the medium already. Solvent-based inks I have no experiece with at all.
Using screen printing medium with acrylic does work, of course. You just have to be sure to mix the right amount of medium in or you'll have the acrylic setting in your screen and then that screen is cooked.
I hope that helped you out a bit. If not, hit me up again and I'll see what I can do.
👍: 0 ⏩: 0

Just got a beginners' kit yesterday - this is going to be very helpful! Thanks

👍: 0 ⏩: 1

i am saving this and my boyfriend is buying me a screenprinter for my bday. stoked on all the advice.
👍: 0 ⏩: 1
Sounds like you're gonna have some fun. Glad to be of help.
👍: 0 ⏩: 1
still need the parts. we found a speedball kit that comes with everyone but the bulb? do you recommended that? I am still a little unsure as I have never done stencils this way before.
👍: 0 ⏩: 1
Ah, the Speedball kit. That's exactly where I started out. It's a great thing to learn on. And, really, it could be the only setup you ever really need. I went crazy teaching myself and constantly moving up to more and more expensive gear. You may not need to go as far as I did and then the Speedball kit is perfect.
BTW, I just bought my 11 year old niece the same starter kit.
Any questions just fire 'em at me, hehe.
👍: 0 ⏩: 0

bro..
i need your help!
i just bought a 150 watts flood light lamp.
im just curious about the exposure time. Could you please help me find the average time for exposure.
Thanks.
👍: 0 ⏩: 1
I'm not really sure that I can help you other than to use the Exposure Tutorial I put together. If you follow it, you will find your correct exposure times. You may need to change the length of time in the test (or not) but it should work for you. It's the same thing I had to do to figure out what the right times for my 400 Watt bulb.
👍: 0 ⏩: 0

Would those hinges you mentioned have a special name? I finally found somewhere selling screens over here and I'm hoping to get started soon enough... I could probably construct some sort of jig myself.
And are the inks you usually use water-soluable?
👍: 0 ⏩: 1
OKies, I'm going to give you some links to what I have. The site is Canadian so don't pay attention to that part, just the example.
Here's one for the hinges. In this case I use the top ones. I did start with the bottom ones, "Screen Printing Frame Hinge" but they're just not as good as the "Screen Printing Frame Hinge & Clamps", as you can prolly tell from the price difference. For building a proper rig you definitely need the better ones but for just goofing around and learning you can start with the cheaper ones. You're call.
Hinge link: [link]
Now here's what I use for fabrics. It is water based, which I like. There are better ones that aren't and the clean up is really bad and you need a special curing light or oven for finishing. Also, I've used all of these inks on paper with no problem either, so I find them to be quite versatile.
Ink link: [link]
If you need any other pointers, you know where I am.
👍: 0 ⏩: 1
THANK YOU
I bought water-soluble inks, the guy at the shop did mention that about needing to practically bake the other inks (I was hoping I could use a hairdryer :embarrassed (Smile)")
They sell them by the litre here (that's roughly 2 pints, I think), but I could only afford a black and an opaque white for now. As for the clamps and hinges, there's probably something similar lying around my garage.
I'll let you know what happens, when I get results they'll go up here anyway
")
👍: 0 ⏩: 1
They are for textiles right? If not specifically it may not be the end, of course, because any acrylic tends to work to some degree. All my earlier shirts were done with plain old acylic paint and stencils.
If you're doing it on a shirt you will need to heat-set it. The general rule is that you use and iron (not sure how hot, mine's lost it's sticker for that), anyway hot, for 3 minutes. I use plain printer paper as an interface between the iron and the shirt. If the printed area is extra large, like the Danny Jacket, for example, I had to break that up into more like 5 3 minute sessions with the iron.
Definitely let me know how it goes. Good luck.
👍: 0 ⏩: 1
Yeah they're textile paints.
And thanks for that tip about the iron, the guy in the shop had me under the impression that I'd have to buy some kind of curing solution.
👍: 0 ⏩: 1
Naw, it's just like any other acrylic paint really. Be careful not to let it sit in your screen too long, as it can cure pretty fast sometimes, and that's the end of the screen.
If you're doing multiple colours using multiple screens or, even if you need to do multiple passes to get the strength of colour that you want, you can use a hair dryer on the fabric for a minute or two to help cure it faster before the next run.
Also, be wary of too many passes. This can lead to cracking later on. Same thing can happen with stenciling of course. You'll get the feel for it.
Ah, so much advice, so little time.
👍: 0 ⏩: 1
Ok things are progressing... I've been looking at various tutorials on how to make the actual jig and comparing them. I found some detatchable hinges in my shed that will almost definitely do the job, saving me about 50 euro - hinges are good because I have serious problems lining things up straight, even with a ruler, and I've been asking my dad (he's a carpenter so he knows what he's talking about when it comes to fiddly little screws and wooden contraptions and the like) about clamps, he had the idea of using wooden toggles instead of spending more money on special clamps.
I just need to ask; what's your platen made of? Some of the online tutorials mentioned formica surfaces, I'm wondering is that really essential or is primed/proofed wood just as effective?
And how do you expose the shirt to the light, do you just hold the lamp over it or is there a special piece of equipment for this?
👍: 0 ⏩: 1
There are definitely different ways to mount your screens. It's really a matter of personal preference and that will come from experience. You may find, later one, that hinges are necessary to up your game. You'll know when the time comes. Believe me, my rig been totally MacGuyver'd together and is, even still, being modified when ever something comes up that requires something that it just can't do. It's always evolving.
My platens are kind of like that formica covered stuff that counters are made of. They're really just 3/4" board with a hard plastic coating on the surface. I worked with a guy that just used a plywood wrapped in a a layer or two of cloth. So you don't necessarily need to have that dead on hard surface. I would say that it needs to be rather uniform though. What I mean by that is; if the surface isn't relatively uniform you can end up with the pattern of that surface showing up in your printed piece. So if you use wood that's not smooth enough you might end up with the grain of that wood showing up.
The shirts themselves aren't exposed to the light, just the screen. Here's how I do it:
1. Get the shirt on the platen and put it into the rig/jig.
2. Take your acetate positive and put some double sided tape on it in some out of the way places (like up in the corners or where ever).
3. Get the acetate positive with your image on it and line it up on the shirt and tape it down (I mean like almost no tape, just like a 2 corners, enough to keep it from blowing away but not enough to hinder the next step.
4. Put your screen into the rig, like full on into hinges or what ever you'll be using. Press down with your fingers where the double sided tape is. Slowly lift the screen up, looking underneath to make sure that the double sided tape is holding the acetate to the screen firmly and the other tape is letting go easily.
5. Take the screen over to where you expose it to the light and, well, expose it.
That's basically how I do it. I'm going to be doing some shirts really soon (my hand is healing up from a tattoo). I'll make another more detailed photo tutorial so that you can see what I'm talking about. Hopefully that should be sometime next week.
Cool?
👍: 0 ⏩: 1
Very cool
I found some semi-transparent stuff called acrolyte for the platen. I won't be able to print until the frame is varnished anyway, so no rush.
👍: 0 ⏩: 0

so these tutorials?
they're great. i started screen printing not too long ago, and i had designs i liked alot, but i had no idea how to make the stencils for them. the instructions in the speedball manual totally lost me. i'm so glad i found this.

👍: 0 ⏩: 1
Hey there,
Thanks for the favs. And sorry it took so long for me to reply to this comment. Feel free to message me if you need any pointers. Good luck and have fun.
👍: 0 ⏩: 0

wow this is a great tutorial, really informative! nice work man
👍: 0 ⏩: 0