HOME | DD
 Tiberius47 — Using Histogram and Levels

Published: 2007-08-18 13:10:27 +0000 UTC; Views: 6790; Favourites: 56; Downloads: 0
Redirect to original
Description
How to read a Histogram and use Levels to Adjust BrightnessIn this tutorial, I'll be explaining how to use the histogram function on your Digital Camera and also how to use Levels (which is found in Photoshop and just about any other decent image editing program. I'll be covering the basics when it comes to using levels, so if you are already familiar with using this function, you might not learn anything new. The way to read both levels and the histogram is essentially the same, so I decided to kill two birds with one stone.
Most digital cameras allow you to see a histogram when you are reviewing your photos. It's a good idea to make sure you got the correct exposure using the histogram rather than looking at the image on the LCD screen, because it's very hard to see from that little screen whether the exposure is correct. The histogram will give you a much more accurate way of making sure the exposure is correct.
How to read a Histogram
The Histogram is nothing more than a graph that displays the number of pixels of different brightnesses in an image.
The brightness of each pixel is represented along the base of the graph. The darkest pixels are represented on the left hand side of the historgram, and range to the brightest pixels on the right.
The number of each pixels of each particular brightness is represented by the height of the histogram above the baseline. So, the higher the histogram is above the baseline, the more pixels there are of that particular brightness. A high graph on the right indicates a lot of bright pixels, and a high graph on the left indicates a lot of dark pixels. A graph that's high in the middle shows that most of the pixels are midtones.
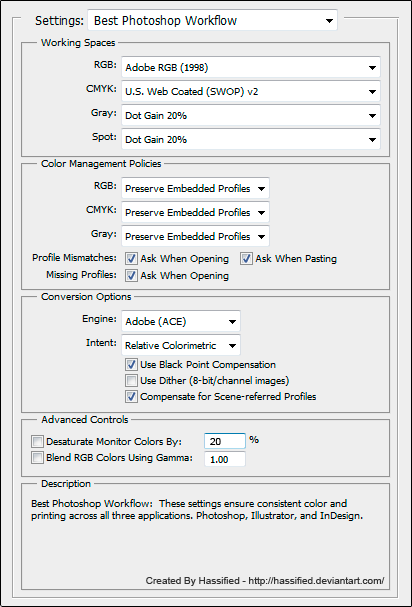
By now, you'll have noticed that I've actually got a picture of three histograms (actually the levels box from Photoshop, but they're basically the same thing) instead of the picture of my digital SLR that I've put in the other tutorials like this. This way I can show you some different histograms.
The first histogram shows a histogram of a picture that is underexposed. You can see that the histogram is very high on the left side of the graph, indicating a large amount of dark pixels. There's also very few pixels in the brighter areas of the histogram. In fact, the bightest part of the picture isn't even halfway across the histogram - indicating that the brightest part of the picture is only a midtone grey. This picture will be dark, and there won't be any highlights, giving it a washed out look. Levels can be used to correct this, as I'll explain a bit later.
The second histogram shows a properly exposed image. Most pixels are centered around the midtones, with smaller numbers of pixels heading towards the bright highlights and the darker shadows. This shape (or something like it) will indicate reliably that you've got a good exposure.
The third histogram indicatesover exposed photo. You can see how the spike on the right of the graph indicates a large number of bright pixels. The histogram is also indicating that there are very few darker pixels on the left of the graph.
When you review your photos, you can easily correct for under or over exposure by using the camera's exposure compensation function (check the manual to see how to use it).
Using Levels to correct exposure
Sometimes when you take a photo and don't get the exposure correct you don't get a chance to take a second photo with better exposure. Any decent photo editing program will offer you a Levels function (or something similar) to adjust the brightness and contrast instead of using those horrible brightness/contrast sliders. In Photoshop, you can open levels by pressing CTRL-L.
When you have opened levels, you'll be faced with a nbox just like the ones you can see above. it looks complex, but it's actually just a way of controlling the brightness of pixels with quite a degree of control.
I'll start with the histogram. It's read exactly the same way as the histogram on your camera. Underneath it, you'll see three sliders; a black one, a grey one and a white one. These can be moved to different parts of the graph, allowing you to adjust the brightness of the white point, the midtones and the dark point of the image. In this way, you can correct for incorrect exposure. For instance, in the case of the first levels box shown above, the white point slider can be slide over to the left until it meets the edge of the "hill" of the histogram. This is basically telling Photoshop to move the white point to the pixels represented by the edge of the "hill", so the brightnesses of all the pixels are recalculated. Now that the brightnesses have been recalculated, the picture goes from dark blacks to bright whites, eliminating the pale washed out look.
Likewise for the third example. As there are no deep shadows in the picture represented by the third levels histogram, we can slide the black arrow over to the right until it meets the edge of the "hill". This moves the black point so that the darkest pixels in that image are black.
These two tricks can be used even if the histogram is centered around the midtones but doesn't have any pure black or white pixels. If the histogram "hill" doesn't go all the way to the edges of the graph, the brightest and darkest pixels are going to be shades of grey, and not true blacks or whites. this is what causes the washed out look. In such cases, sliding the white and black sliders inwards will give the picture the blacks and whites for the shadows and the highlights, giving an increase in contrast.
The central slider represents the brightness of the midtones. This is useful if the histogram "hill" isn't centered between the brightest and lightest parts, as it allows you to adjust the brightness of the midtones without adjusting the highlights and shadows.
Other features of Levels
At the top of the Levels box is a drop down box labelled "Channel". When you open Levels, it is set to RGB, meaning that whatever adjustments you make will affect the red, green and blue channels. However, if you want the adjustments to affect only one channel, you can use this box to pick the channel you want to change, then make the adjustments to levels as normal.
The three boxes just below that are just numerical representations of the positions of the sliders under the histogram.
At the bottom is a gradient from black to white with two sliders. This is related to the highlight and shadow sliders in the histogram above it. You can slider them to alter the brightness values for the white point and black point, in case you want them to be a shade of grey rather than black or white. I haven't used it all that much, however.
The buttons that go down the right side are self-explanatory for the most part. The OK button is very familiar, and there's also the cancel button. A handy little trick is that if you press the ALT key the Cancel button becomes a Reset button in case you want to start again.
Below that are load and save buttons, which are handy for saving commonly used levels settings.
I won't go into the Options button in this tutorial, as this is just meant as a basic tutorial.
Below that are three eyedropper buttons. These are handy for a more hands-on adjustments of the Levels histogram. You can click on the darkest part of the image with the black eye dropper and it will automatically set the black point to the pixel you clicked, and the same with the midtones eyedropper and the highlight eyedropper.
Finally, the preview checkbox just allows you to see the changes you make as you go. If the box isn't ticked, then you'll only see the results after you click okay. Leave it ticked, it makes the job much easier.
Well, that's all I'll say in this tutorial. Hopefully it will help clear up the mystery surrounding the histogram on your camera so you can get better photos, and it will also encourage you to use the levels function to adjust the brightness of your photos, as it gives much better control than the basic brightness/contrast sliders. Feel free to ask if you've got any questions.
Related content


Comments: 14

Nice guide. I know how to read a histogram, but when I went out last night to take some night shots I had a problem with the street lamps and the moon. When a street lamp was too close and it was in the picture, the highlights are blown out where the center of the light is. I didn't have much problem with the lamps as I could correct the settings and the picture was still good. But with the moon it was a little bit tricky... It always came out a bit brighter than I wanted it,but when I used the exposure compensation thing the whole image got darker and it just made it worse...
[link] This for example. The whole photo is near black, but the moon is waaay too bright and when I edit the settings to make the moon less bright, the rest of the picture is just black.
I'm using a Canon PowerShot SX120 IS and maybe thats the problem, but if you give me some advice it would be helpfull =]
👍: 0 ⏩: 1

That's a very tricky situation. The trouble is that the dynamic range (the difference between the brightest parts and the darkest parts) of the photo is just too great. If you expose to get moon exposed correctly, everything else is too dark. And if you expose to get the landscape the way you want it, the moon is over exposed.
In a situation like that, it's almost impossible to get one shot that gives a good exposure across the whole dynamic range. But bear in mind that letting the highlights blow out isn't always a bad thing. Blown highlights in a light source - the sun, streetlights etc - these are places where you can let the highlights blow without detracting from the image.
Another thing you could do is to simply take two photos, or maybe more. You can then combine the best bits of each in Photoshop.
👍: 0 ⏩: 1
Thank you for the explanation.
👍: 0 ⏩: 0

 (Smile)")

Good writeup!
I'm wondering: when the top of the a peak is cropped, does that impact on the image in any way? I've always just ignored it, figuring it means there is just lots of the image at that luminosity.
👍: 0 ⏩: 1
Yeah, pretty much. If the top of the peak is hitting the top of the graph then there are lots of pixels of that particular brightness level. You only have to worry if the peaks are at the far left and far right of the graph; they indicate clipped shadows or jighlights, which means that the darkest parts of the image are just solid black or solid white, with no detail at all.
👍: 0 ⏩: 1
Cheers for clarifying that. I am familiar with the left and right exposures
*puts technologist hat on*
There is a technique called 'expose to the right' where you deliberately over-exposure shots as close to the right of the histogram as possible without blowing out the whites. This is because the way the lumniosity is digitally recorded is not linear. Half of the data available to record the image is used to capture the detail that lies in only the brightest 1/5th portion of the histogram. The next brightest 1/5th chunk gets a quarter of the available data space and so on until only a tiny amount of data is available for the darkest tones. That way, when you go to edit your raw image, you have finer detail because more of it was recorded than if it had been properly exposed
👍: 0 ⏩: 1
Yeah. the idea of over-exposing as much as possible without blowing ot the details is that you can keep as much shadow detail as possible. It's easier to get detail from bright areas than it is to get it from shadow areas, because the shadows often have a whole lot more noise.
👍: 0 ⏩: 1

I was very alarmed when I read this because I haven't read much theory, instead I have progressed (if that's the word) by trial and error. Early on I had a nasty experience with blown highlights. So as a result of that traumatic experience I took to underexposing, if I was in any doubt.
But I was so alarmed (and intrigued) by this "expose to the right" idea that I googled and found it's disputed (eg - [link] ).
But perhaps it's about time I tried exposing evenly!
👍: 0 ⏩: 0

Thanks, I'm glad you like it, and thanks for the fave!
👍: 0 ⏩: 1


nice turorial, man...really helpful for those who don't understand levels and histograms very well, such as myself.
")
👍: 0 ⏩: 0