HOME | DD
 torstan — How To Sink A Map

Published: 2013-01-15 16:30:48 +0000 UTC; Views: 10985; Favourites: 110; Downloads: 176
Redirect to original
Description
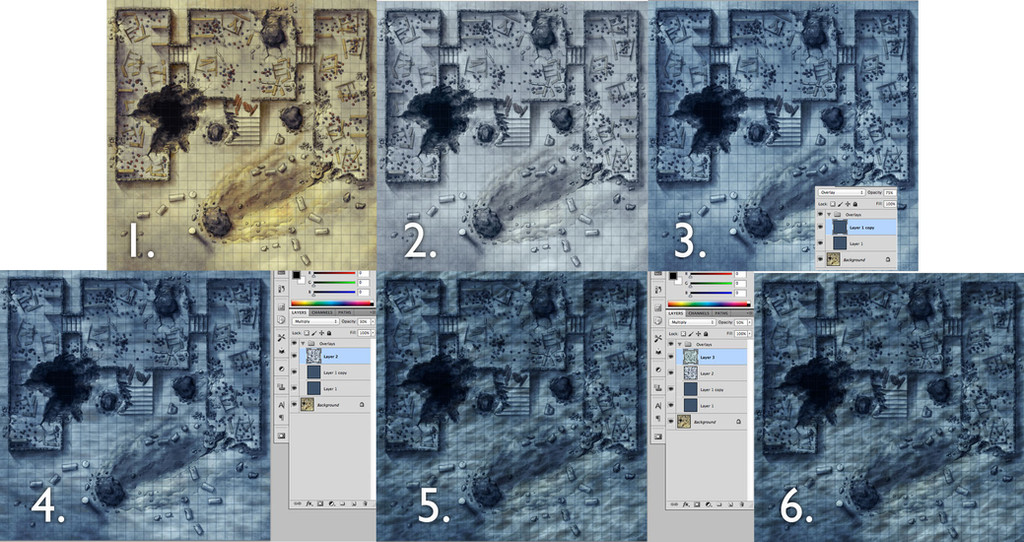
How to turn a map into an underwater landscape1. Starting map
I'm going to take an existing battlemap and turn it into an underwater ruin. Here's the map I'll be using - a simple ruin from this Ruined Library map pack ([link] ). Ruins work well as they can easily be the remains of a unfortunate city subjected to an Atlantean cataclysm.
2. Add a colour layer
The first problem is that the map is definitely not the right colour. We need to desaturate the map, and add an over-all blue cast to the map. I create a new layer above the map and fill it with a grey blue (#3e526a to be precise). It's not too saturated, so it'll do both jobs at once. I set the layer blend mode to Color, and set the opacity to 75%. For more on blend modes, see this post: [link]
3. Add an overlay layer
Note that you can still see colour variation in the map - that's because we set the colour layer to 75% rather than 100%. You don't want to wash out all the prior colours. The map looks a bit like a moonscape rather than an underwater map. To bump up the blues a bit I duplicate the colour layer, set the blend mode to Overlay instead of Color.
4. Adding Ripples
So we could leave it there, but I want to add some ripples to the map. As light hits the waves on the surface it is distorted and that creates a pattern of light and dark across the sea-bed that's quite distinctive. Yesterday I covered how to create a ripple pattern ([link] ). You can follow those steps, or just download one of my ripple files here: [link] (note the file is CC-BY-NC licensed, so if you want to use the ripples in a commercial product you'll have to follow the tutorial and make your own!).
I select a large region of the ripples texture and paste it into my working map - it will show up as a new layer. Once there, use the transform tools (ctrl/command - T or Edit->Free Transform) to spin it round and make sure it covers the whole image. Add a color layer above it, find a nice blue and merge down so that the black parts of the texture are now a good sea-blue color. Finally I set the blend mode to Multiply and drop the opacity right down to 30%.
5. More Ripples!
You can immediately see the difference that the ripple pattern makes to the map. I like this so much, I'll do it again. The second layer is coloured with a greener blue to add some colour variation to the map, and it's been rotated so that the ripples aren't going in quite the same direction.
6 And we're done! The ripples give a convincing under-the-sea feel to a map that started off as an arid blasted desert ruin.
Please share, and comment if you have problems or have suggestions for future posts. You can find previous tips over on the tutorials section of the blog: [link]
Related content
Comments: 7

Great idea! Do you think you could also make a PDF of the whole process and upload it here please? I would greatly appreciate it!
👍: 0 ⏩: 1

I'm afraid that would require a little more time than I have right now.
👍: 0 ⏩: 1

Sure. I will stay tuned anyway, just in case 
👍: 0 ⏩: 0

Oh my! What a cool effect to try.
I love the way you explained each step, and how very understandable this all was.
This is a well done tutorial, and thanks for sharing your knowledge with the rest of the community. 

👍: 0 ⏩: 1

You're welcome. Glad it came in handy!
👍: 0 ⏩: 0

No worries - glad it's useful!
👍: 0 ⏩: 0


