HOME | DD
 torstan — Using Paths to create natural walls

Published: 2012-01-19 18:18:27 +0000 UTC; Views: 15296; Favourites: 225; Downloads: 361
Redirect to original
Description
Using paths to give pretty wall texturesIt's a longer one today - but the effect is a pretty one. It's a method for creating pretty wall edges - especially handy for natural stone locations
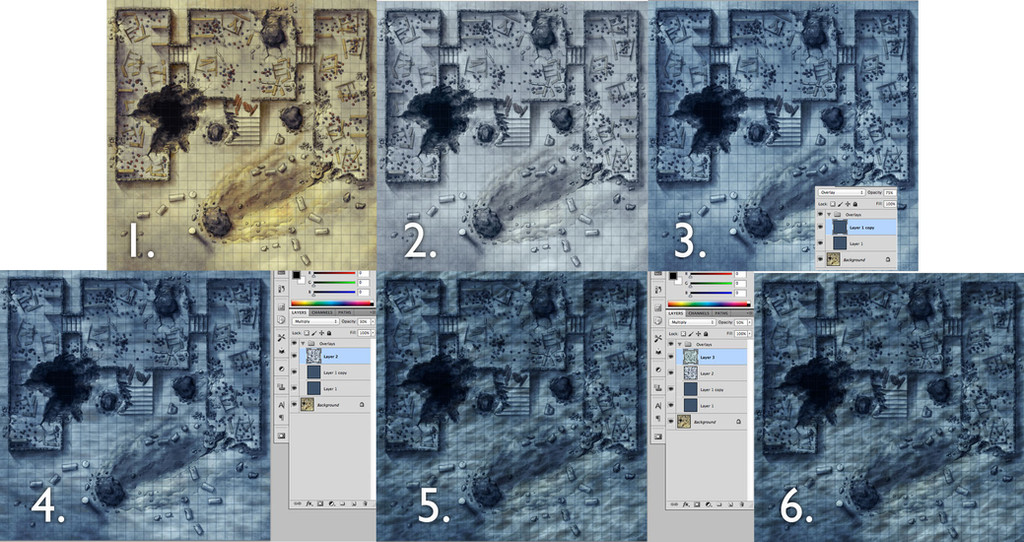
1. Start with a textured base and draw your walls on a separate layer. Make sure your floor area is entirely enclosed by walls or the edge of the canvas.
2. Use the magic wand tool to select the area that will be the walls (and use Select->Modify->Expand to make sure the selection runs down the middle of the ink lines). Then go to the Paths dialog and click the 'Make work path from selection' button to make a path from the selection. (also use Select->Save Selection before going any further - you'll need this selection later)
3. This creates a work path. Drag and drop the work path to the New Path button to create a permanent path. You also want to invert the selection and do the same process to get a path that surrounds the floor space. You'll now have two paths.
4. Now a quick tweak - I desaturate the background layer using an adjustment layer. I also add an overlay layer that's masked to just hit the walls.*5.* Create a group (folder icon) and mask the folder so that the floor is masked out and the walls are open. In the group create a new layer. Now select the path that surrounds the floor. You don't want to have a selection going round the outside of the walls, because we're going to stroke the path and we don't want the outside of the canvas to be highlighted. With the path selected go back to the layers palette and make sure the new layer is selected. Pick a nice large brush and press enter. First off, I want to put in a grungy highlight along the edge. I use a large grungy brush with a low opacity (around 10%) Start off really big - like 100-200px - and stroke the path with white (hit enter with the layer selected - you should see a brush stroke around the path). Then reduce the brush size and do it again. Rinse and repeat until you have a nice gradual highlight up to the wall edge. I set the layer to overlay to get a nice textured highlight.
6. This is nice, but it needs to have an extra texture. I set up an extra layer and this time I'll use a hard round brush with lots of scatter (1000%), colour jitter to swap light and dark and a low opacity (around 20-30%). Stroke the path again (make sure the path is selected then hit enter with the brush tool selected) with a few different sizes of this brush. You should have something like panel 6.
7. Now set this layer to overlay and set the opacity of the overlay layer to have it blend in.
8. The wall shadows are the same trick. In this case set up a new group, and mask this with the inverse of the previous mask (we're working on the floors this time). You can do this by selecting the previous mask, right click->Add Mask To Selection, and then use Ctrl/Cmd-shift-I to invert the selection. Click group icon and then click the Add Layer Mask button (to the right of the fx button at the bottom of the Layers dialog). Add a layer to the group. This layer will be our base shadow layer. Select the second path - from the Paths dialog - and then go to your new layer. Choose a nice dark colour, and a large, low opacity grungy brush (again around 5-10% opacity) and hit enter to stroke the path. Reduce the brush size and repeat. This will give a nice grungy shadow
9. In panel 8 I have this layer set to multiply at 100%. It's a little overbearing, so I reduce the opacity to 10-20% and create a new layer, this time set to overlay. Repeat the process of stroking the path and you should get something like the final image.
Here's the original psd ([link] ) if you want to look at the full breakdown of how this was created. Note that this process is the same amount of work for 1 room as 100, so it's great for adding texture to a large map - and it still looks hand drawn rather than too photoshopped.
Feel free to share this if you find it useful. As ever, past tutorials can be found on the blog here: [link]
Related content


Comments: 6

Why don't you just colour on two separate layers, then lock transparency and use that?
👍: 0 ⏩: 0

I'm gonna need to read this a few dozen times, but I'm seeing some things I can use here.
")
👍: 0 ⏩: 1

Wrong comment on the wrong comment
It's a nifty trick. This version (above) is a bit long but it's basically:
1. Get a selection
2. Turn the selection to a path
3. Stroke the path with a brush
4. Mask out the side of the stroked path you don't want to see.
 (Smile)")
👍: 0 ⏩: 0
It takes a couple of shots to get used to, but it's a lifesaver when you use it on a large map.
👍: 0 ⏩: 1

Yes, I'll try this one next time...
For now I'm on a 19th century style map.
👍: 0 ⏩: 0