HOME | DD
 W-H-E-A-T — GLITCH EYE - Coloring TUROIAL
#tutorial
Published: 2016-11-10 03:38:11 +0000 UTC; Views: 1308; Favourites: 67; Downloads: 0
Redirect to original
Description
Hey guys, here is the Glitch eye, I hope this can be helpful. However I am sorry for no examples this time.If your looking for the Marble Eye tutorial - pre11.deviantart.net/87ee/th/p…
If your looking for the Commons Eye tutorial - w-h-e-a-t.deviantart.com/art/C…
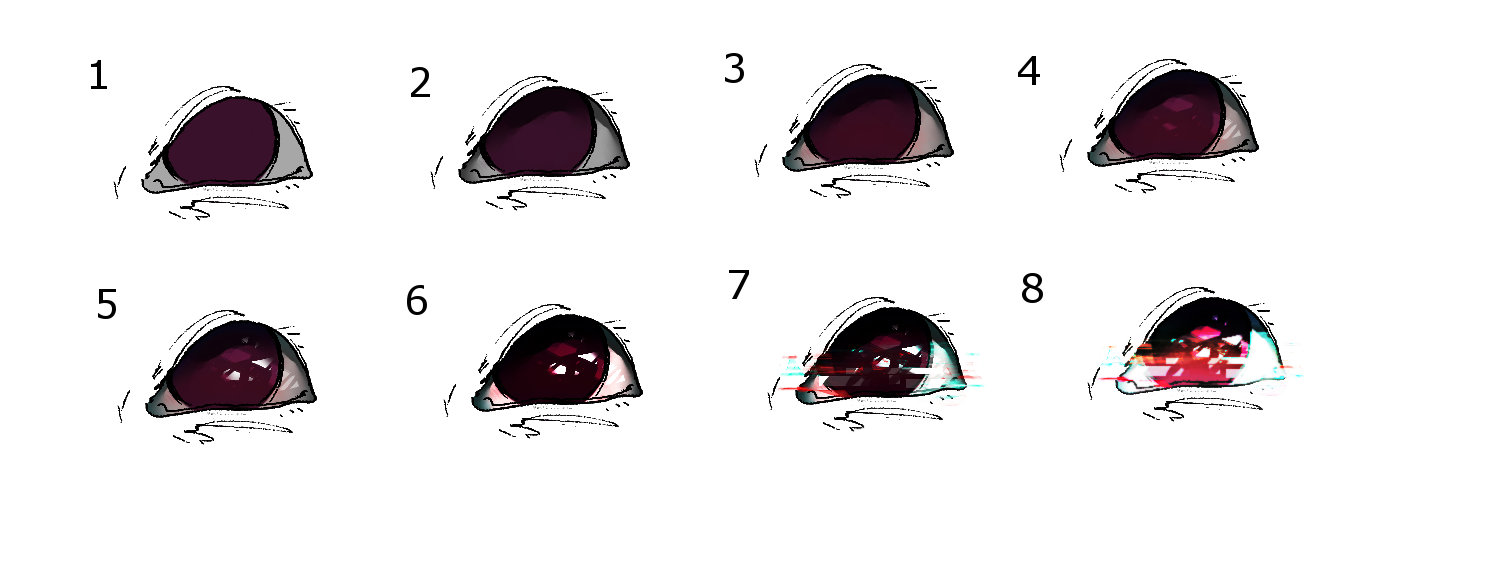
___STEPS
1- Start with a basic 'BASE' colors. (two tones)
2- Add 'SHADOWS' to the top and bottom of the eye. (amount is varied)
3- Add a little BLUE (cold color) to SHADOWED areas, and add a little RED (warm color) to LIGHTER areas.
4- Add TRANSPARENT shines in the LIGHTER area Add
5- Add WHITE shines 'between' the LIGHT and SHADOWED areas.
(After step 5, it is all up to you, what you desire to do with the eye; I chose to enhance the contrast,
you may also invert, dull, and darken when contrasting for different effects)
6- Enhance color.
7- Add glitch effects. ( Rectangles and Lines )
8- Enhance color.
(And, I'm done, but what you chose to do afterward is till up to you, whether its add effects, glows, and more)
____EXPLANATION
After Step 5, this is up to you what you do,
whether that is to change the color entirely, enhance, invert, dull,
whatever you choose will be close to your final outcome.
Follow steps a 1-5 and the rest is yours to play with in whatever way.
Sadly I didn't have any inspiration to do the bottom example eyes like I'd usually do,
please do forgive me. I mainly focused on the Glitch Process.
____TOOLS USED (gimp)
(I have an older version of gimp, please do excuse if any have an updated version and the tools don't match up).
1- Paintbrush Tool (Circle 19) - Only used to add basic colors, and flat colors.
2- Eraser (Circle 19), (BRUSH DYNAMICS (OPACITY - random, and velocity) (HARDNESS - Pressure)) - This Eraser plus Dynamic settings is only used for erasing.
3- Eraser (Calligraphy Brush#1) - Only used for erasing the TRANSPARENT shines, and WHITE shines so they have a more angled and abstract look.
4- Eraser & Paintbrush Tool ( Circle Fuzzy 19) - used for both soft edge erasing on shines, and applying soft color tones to lineart.
(EXTRA TOOLS) within COLOR slot between 'LAYER' and 'TOOLS'
5- Color Balance - To add the CYAN blue tones, and RED tones for cold and warm colors to SHADOWS and LIGHTS.
6- Curves / Color Curves - This tool is the most important for enhancing, dulling, darkening, and inverting your eye.
(FILTER TOOLS)
7- ARTISTIC / Cartoon- Only used on the finished piece to add a depth feel to the colors, or extra lining.
(So sorry if this is confusing, this is just my brushes and settings I use)
____
I do hope these steps in the image will help you understand how I create the Glitch eyes.
If you have any QUESTIONS feel free to ask.
Again how you go about achieving these steps in your own way is up to you. {;
___GOALS
*Inform
Related content


Comments: 6

thank you catname {;
this one took a bit longer but it was worth it.
👍: 0 ⏩: 1

It's fine, that's not like You have a time limit to make it. Take it easy^^
👍: 0 ⏩: 1

I am working on trying this one. I have found that you can duplicate pieces of the eye with rectangle selections to really jitter it without having to use Warp or Displacing tools. :3
👍: 0 ⏩: 1
Nice Goat, I love hearing new ideas and methods in replicating a process,
and I cant wait to see what you come up with this time. >;}
👍: 0 ⏩: 0