HOME | DD
 cat-cat — Cel Shading in Open Canvas
Published: 2005-03-22 18:14:25 +0000 UTC; Views: 145464; Favourites: 1751; Downloads: 20898
Redirect to original
Description
This is my first time writing a tutorial so bear with me I know I'm not the best teacher around but I tried.... *dies*
Anyway, this is a mini tutorial (actually, I'm not even sure this is a proper tutorial or not... I'm just recording what I've done in order to create a piece...) to show you how I do Cel Shading in Open Canvas 3.03.
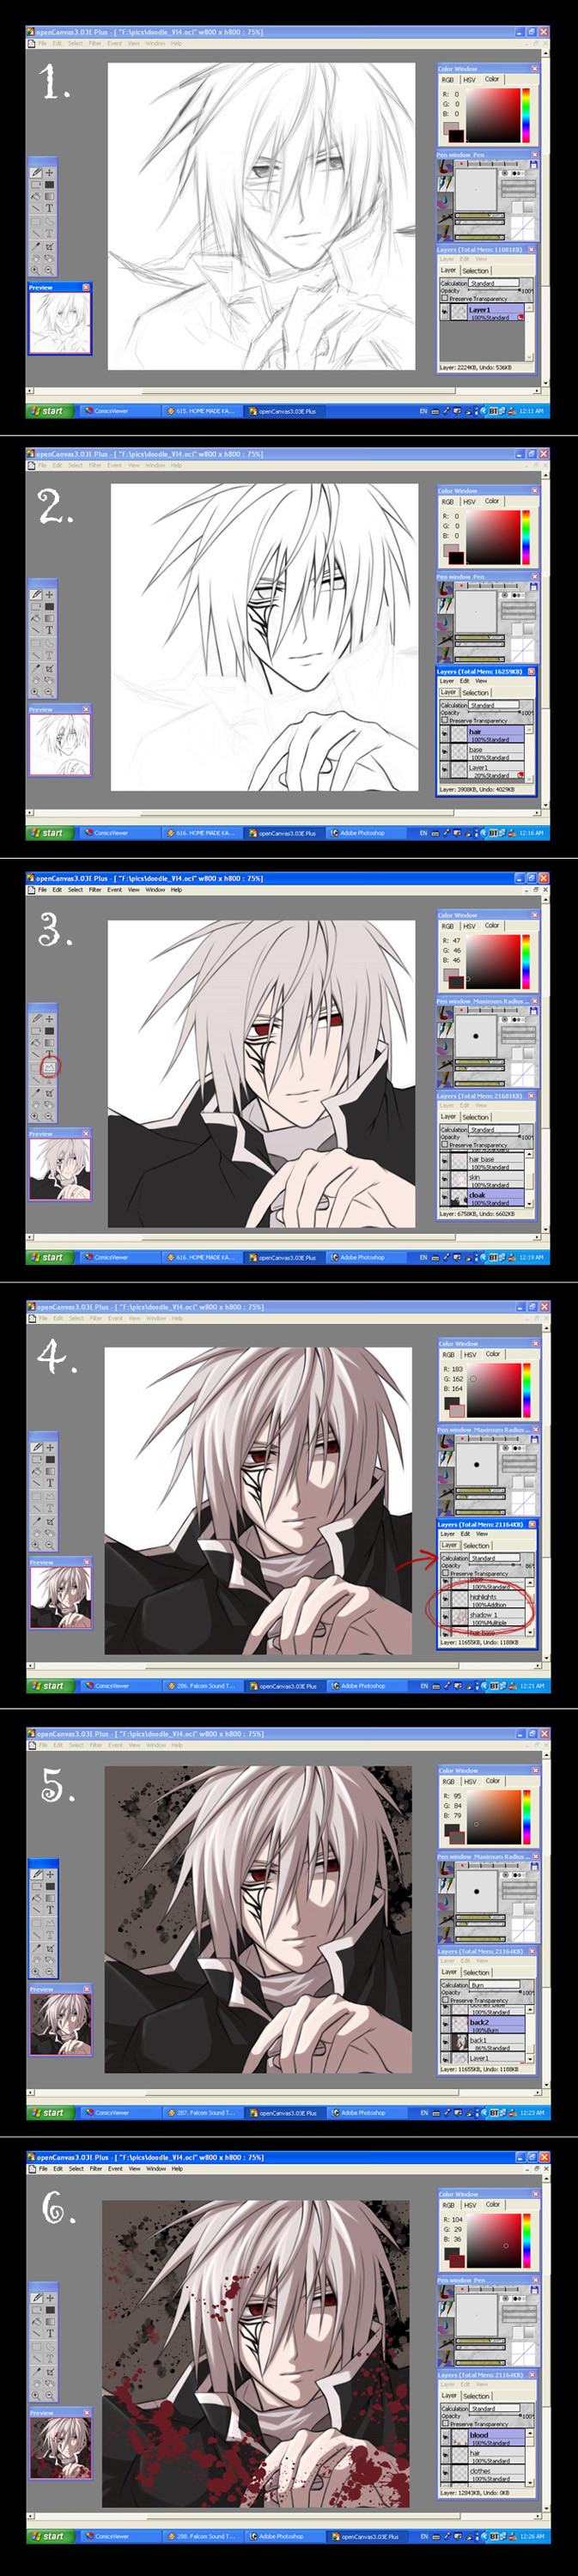
Step 1
Make a sketch!!! As my scanner is too old, my new computer doesn't support it... So I tend to do my sketches directly in Open Canvas. This is not recommended unless you have a tablet!!! (or you're extremely good at drawing with a mouse) It doesn't really matter what size brush you draw in, I usually work with the default setting.
Step 2
As I'm not very confident with my tablet drawing skills, I tend to "ink" my drawing on a seperate layer. So open up a new layer (Calucation = Standard) on top of your "sketch" layer. To make it easier to see your "ink" line, lower the opacity of your "sketch" layer first. I suggest around 20 - 30%. Start inking on the "Ink" layer (again, it's all up to personally preference as to what brush size you want to ink in... I always go with default setting, you can always make your line thicker by going over it several times). As to how to ink clean and neatly, I'm afraid you just have to be patient and practise a lot. I usually zoom in to 150% when I ink, because I found it easier to get clean lines that way
Out of habit, I like to use several layers when I ink - 1 layer for hair, 1 layer for the face + hands etc and 1 layer for clothes. I do that because it's easier to do individual adjustments when needed to. Especially concerning hair and facial features. As hair are always made up of long curves, it is likely that you would ended up with curve that's made up of lots of straight lines when you ink. This is when the seperate layer comes in handy. Inking hair on a seperate layer from the facial features allows you to clean up the hair ink lines without erasing the ink lines for the facial features, vice versa. You can always merge the layers (Layers > Merge Down) when you have finish inking. (you can also delete the "sketch" layer when you have complete the inking process)
Step 3
This is a point of deviation.... you can choose to colour in the background first or colour in your character first.... In this example, I colour in the character first (my bad
)Anyway, open up a new layer (Calculation = Standard), move this layer to BELOW your "ink" layer (or layers) Start filling in the "base" colour (by "base" colour I mean just one block of colour with no variation of tone in i.e. no shadow/highlight) Again, I personally like to use several layers for this. In this example, I used 1 layer for hair, 1 layer for skin + eyes, 1 layer for the cloak and another for the clothes underneath. That way it's easier to make individual adjustments on the colours when needed to.
For those without tablet, you can use the Polygonal Lasso tool (circled in the screenshot) to map out the area you want a particular colour in, then just use the paint bucket to fill in the selected area. For those with tablet, I suggest you not to use the Watercolour/Airbrush tool when you fill in the base colours, use the Pen/Pencil tool at 100% opacity instead. You may still have to go over the area you have painted several times to get the 100% opacity.
The reason for using Pen/Pencil tool instead of Watercolour/Airbrush tool is that Pen/Pencil tool are a lot "firmer". For Watercolour tool, you have to run over the same area a lot of times before you can get to 100% opacity. Same goes for Airbrush tool and on top of that, Airbrush tool has a blurry edge to it (which is something you may not want when trying to paint in Cel Shading style)
Step 4
Open up a new layer(Calculation = Multiply) on top of the "base colour" layer (or layers) but below the "ink" layer. This new layer would be use for shadows. Define your light source then start adding in the shadow accordingly (sorry I don't know how to teach people how to do this, apart from do a lot of observation) Again, use the Pen/Pencil tool at 100% opacity not Watercolour/Airbrush tool (or Polygonal Lasso tool if you prefer).
After you've completed the "shadow" layer, add a new layer (Calculation = Addition) on top of it for highlights. Again, use the Pen/Pencil tool!
Step 5
Add a layer (Calculation = Standard) below the "base colour" layer and use it for background. In this example I just filled the layer with a single colour and painted a bit of blood splattered on it.
This is basically it. In this example I added another layer on top of all the layers and painted some blood splattered on.... My way of doing this gives me a lot of flexibility because I can adjust the colour/brightness of a lot of things individually (as I'm hopeless when it comes to picking colours...) Hope this helps answering the question as to how I paint in Cel Shading style in Open Canvas
EDIT: This method also works for Photoshop and Painter too. Just that in Photoshop it doesn't have the layer option known as "Addition" (at least, I don't think it has), so for the highlight layer, you can use other layer option such as "Screen" or "Colour Dodge" instead.
Related content


Comments: 318


it only took you 15 minutes to do all that!!!
I just got my tablet yesterday and it's IMPOSSIBLE to use open canvas
THANKS HEAPS for the help
👍: 0 ⏩: 0


whered u download it? is it the full ver.? did u hav 2 pay 4 it?
👍: 0 ⏩: 0


can you tell me how u got ur lines so smooth looking im using the trial version and my lines aren't that smooth looking btw this is a great tutorial
👍: 0 ⏩: 0
how do you get ur lines so smooth looking >.< im trying the trial ver. and we i draw the lines are still kind of blocky. P.S this is a really good tutorial ty
👍: 0 ⏩: 0

I. Need. Photoshop. But my parents don't think money should be spent on art. Ah well. Your tutorials are good, btw, and I like seeing the step by step process. ^^
👍: 0 ⏩: 1

really???? you should let them understand your needs.
👍: 0 ⏩: 1
I just dled OpenCanvas... so I'll take a shot at it using your tutorial when I have the time. ^^ Thanks! (and nah, my parents don't support my art!)
👍: 0 ⏩: 0

this is brilliant thanks for making it you're very talented!
👍: 0 ⏩: 0

this is really good !!
i was wondering how do you get the ends to go really pointy and your lines straigt and follow the drawing ??
 (Smile)")
👍: 0 ⏩: 0

O_O WOW im speechless i hope i can get to make a drawinglike these in open canvas one day n_n
👍: 0 ⏩: 0

is there and open canvas version for Mac? lol sometimes it sucks not having windows
")
👍: 0 ⏩: 0


I once had OpenCanvas (just the trial version), but I got rid of it because I couldn't find one tool, which I'm going to ask now...Does OpenCanvas have the circle/shape tool? Usually if I'm drawing a char, I like to start with a nice clean circle for the head (proportions) and then do the sketch, but I couldn't find it in that software, so yeah...I'm just making sure.
Oh, and great pic!
👍: 0 ⏩: 0

Christ. I've been looking every where for a decent cel shading tutorial for shading hair. All of the ones I've found were extremely simplistic and looked professionally awful 
👍: 0 ⏩: 0


I never had too much luck with cell shading, but I will try again with this tutorial! ^_^d
👍: 0 ⏩: 0


Amazing tutorial!! It helped a lot with a new drawing I'm working on. Thank you so much. Favorited it for sure <3
👍: 0 ⏩: 0


I have Paint shop Pro, versions 4 through 9...love them all. I just got open canvas, and I think Im in love. seriously. this tutorial is really helpful in getting me started, thank you!
and to you guys who cant afford the pro version...torrentz baby!
👍: 0 ⏩: 0

wow that's good expecially for celshading! i suck at it even tho it's supposed to be the easier way >.<
👍: 0 ⏩: 0


quick question! ")
👍: 0 ⏩: 0

It's useful but i'm a little bit stupid and i need to see the words next to the image... i love cel shading but still i cannot do it u_u'
I have OC too.
👍: 0 ⏩: 0

this will be useful for me
hey, i dont have a tablet ")
👍: 0 ⏩: 1

I hope you will find it useful!
It is not necessary to have a tablet in order to do cel shading colouring on computer, but having a tablet would give you a greater degree of control I suppose. I used to do it with a mouse before I got my tablet, I just spam the polygon tool function in Photoshop

👍: 0 ⏩: 1
oh noessssss
i'll have to get a tablet soon thenn...

👍: 0 ⏩: 0

I like this, this might be helpful to me in the future.
👍: 0 ⏩: 0


Taah, this is an excellent tutorial and has helped me a lot~ I just started using oC (having switched from Photoshop), and being a cel-shader, it was tough not having Photoshop's path tools. But it never occured to me to use the pencil tool and such! Ah, I'm such a dork!!!
Thank you~!
👍: 0 ⏩: 0

do u download this program thingy or something? or is it like, you gotta go buy it from a store to install on comp? cuz i rlly wanna get open canvas o_o'' it looks so...so...so pro *_*
👍: 0 ⏩: 0

[link]
Download open canvas 4.5 there on that link.
Here's serial number:
PPCEBA85-T2AD-FEHB6E5E
👍: 0 ⏩: 0

Awsome! I'm gunna fave so I can always refer to this if need be.
👍: 0 ⏩: 0

whoa! this is amazing and very helpful! *faves it*
random question also: is that your own character there you colored/shaded? or is he from some anime/manga?
👍: 0 ⏩: 1
Glad that someone actually found this useful!
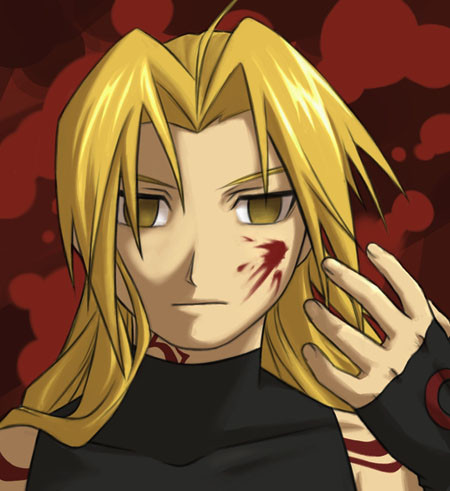
And that is my own character that I was shading in the tutorial~
👍: 0 ⏩: 1

um do you have to have a scanner and get a picture on openCanvas or can you just start from scratch... like i just got it right now so im kinda noob at this =A=...
👍: 0 ⏩: 0

Ahh what tool did you did you use for the blood effects btw?
👍: 0 ⏩: 1
Ah the blood effects was a photoshop paintbrush that I have.... forgot where I got it from though
👍: 0 ⏩: 0

can i have a link for this
i used to have it then my comp crashed and now i have nothing
👍: 0 ⏩: 0

your art's really amazing! thanks for the super awesome tutorial! I just downloaded the trial version of openCanvas 4.5+, but I'm having problems with the layering. I'm a complete newbie to CG art by the way, but I've always wanted to try it out. when I create a new layer, anything I paint on top of it covers up the old layer; how do I make all the layers show up at the same time? thanks so much for your help!
👍: 0 ⏩: 1
Hi there. Sorry for the delay in reply - been swamped by things from all directions!
Anyway, glad you find the "tutorial" somewhat useful. I haven't tried using OC 4.5 so I'm not sure how much the program layout has changed in compare to 3.03, but I doubt they have made any major changes to the layers panel.
Think of the layering concept as similar to the transparent sheets you put on overhead projectors. By default, a layer's attribute is set to "Normal" and with that, the layer will behave as if you are painting a transparent sheet with opague paints. There are several layer attributes that would allow the objects painted onto the layers below to show through:
- "Multiply", this is normally use for painting on shadows, since it would darken the colours on the layers below ("Color Burn" do the same thing but in a different way)
- "Addition", this is normally use for painting highlights, this lightens the colours on the layers below ("Color Dodge" do the same but in a different way)
Best thing would be to play around with the layer settings until you get the effect you wanted to achieve!
👍: 0 ⏩: 1
| Next =>